
MuleSoft Maven Plugin: Tutorial, Best Practices & Examples
MuleSoft provides a tool called the Mule Maven plugin to manage the lifecycle of Mule applications. It extends the Maven plugin and adds Mule-specific goals, making it easier to build, test, and deploy Mule applications.
The Mule Maven plugin reduces errors by automating the application lifecycle for MuleSoft applications. It integrates with CI/CD pipelines, making the application management process faster, more reliable, and more efficient.
This article explains the key concepts behind the Mule Maven plugin and guides the integration of the plugin with Mule applications.
Summary of key concepts of the Mule Maven plugin
Introduction to the Mule Maven plugin
The Mule Maven plugin (MMP) is a Maven plugin provided by MuleSoft that helps you test, package, deploy, and manage Mule applications using Maven. Before delving further into the plugin, let's examine its basic functionality.
Basics of Maven’s build lifecycle
Maven is built around the concept of build lifecycles. There are three built-in build lifecycles: default, which handles the project’s building and deployment; clean, which handles the project's cleaning; and site, which handles the project's website creation.
The default lifecycle, which helps you build and deploy the project, comprises multiple phases, including validate, compile, test, package, verify, install, and deploy.
Each phase includes plugin goals; a phase can be viewed as a stage in the lifecycle, with each goal representing a task inside that phase. A phase can have multiple goals, and goals can also exist independently.
All the phases in a build lifecycle are executed in order. Whenever a particular phase is invoked, Maven ensures that all preceding phases are executed before executing the called phase. For example, when you run the mvn package command on your application, Maven executes the following phases: validate, compile, test, and package.
Benefits of the Mule Maven plugin
The Maven plugin can handle generic compilation, packaging, and deployment of Java-based applications. However, you need the Mule Maven plugin to package Mule applications properly with all Mule descriptors, flows, configs, and dependencies. Here are some key points describing the need for and benefits of the Mule Maven plugin:
- Mule-specific lifecycle goals: MMP binds Mule-specific tasks to Maven lifecycle phases, ensuring that Mule applications are built and packaged according to Mule conventions.
- Deployment to Mule runtimes: Maven cannot handle deployment to Mule-specific runtimes. To bridge this gap, MMP provides specific goals, such as mule:deploy and mule:undeploy, to deploy/undeploy applications.
- Integration with AnyPoint Exchange: MMP handles uploading and managing artifacts on the AnyPoint Exchange through goals such as exchange-deploy and exchange-pre-deploy.
- Automated deployments: MMP can directly connect to CI/CD pipelines, helping automate the entire lifecycle of Mule applications.
- The Maven POM file: MMP makes sharing projects easier because it references dependencies, so you don’t have to manually find and include every dependency within the project itself.
{{banner-large-graph="/banners"}}
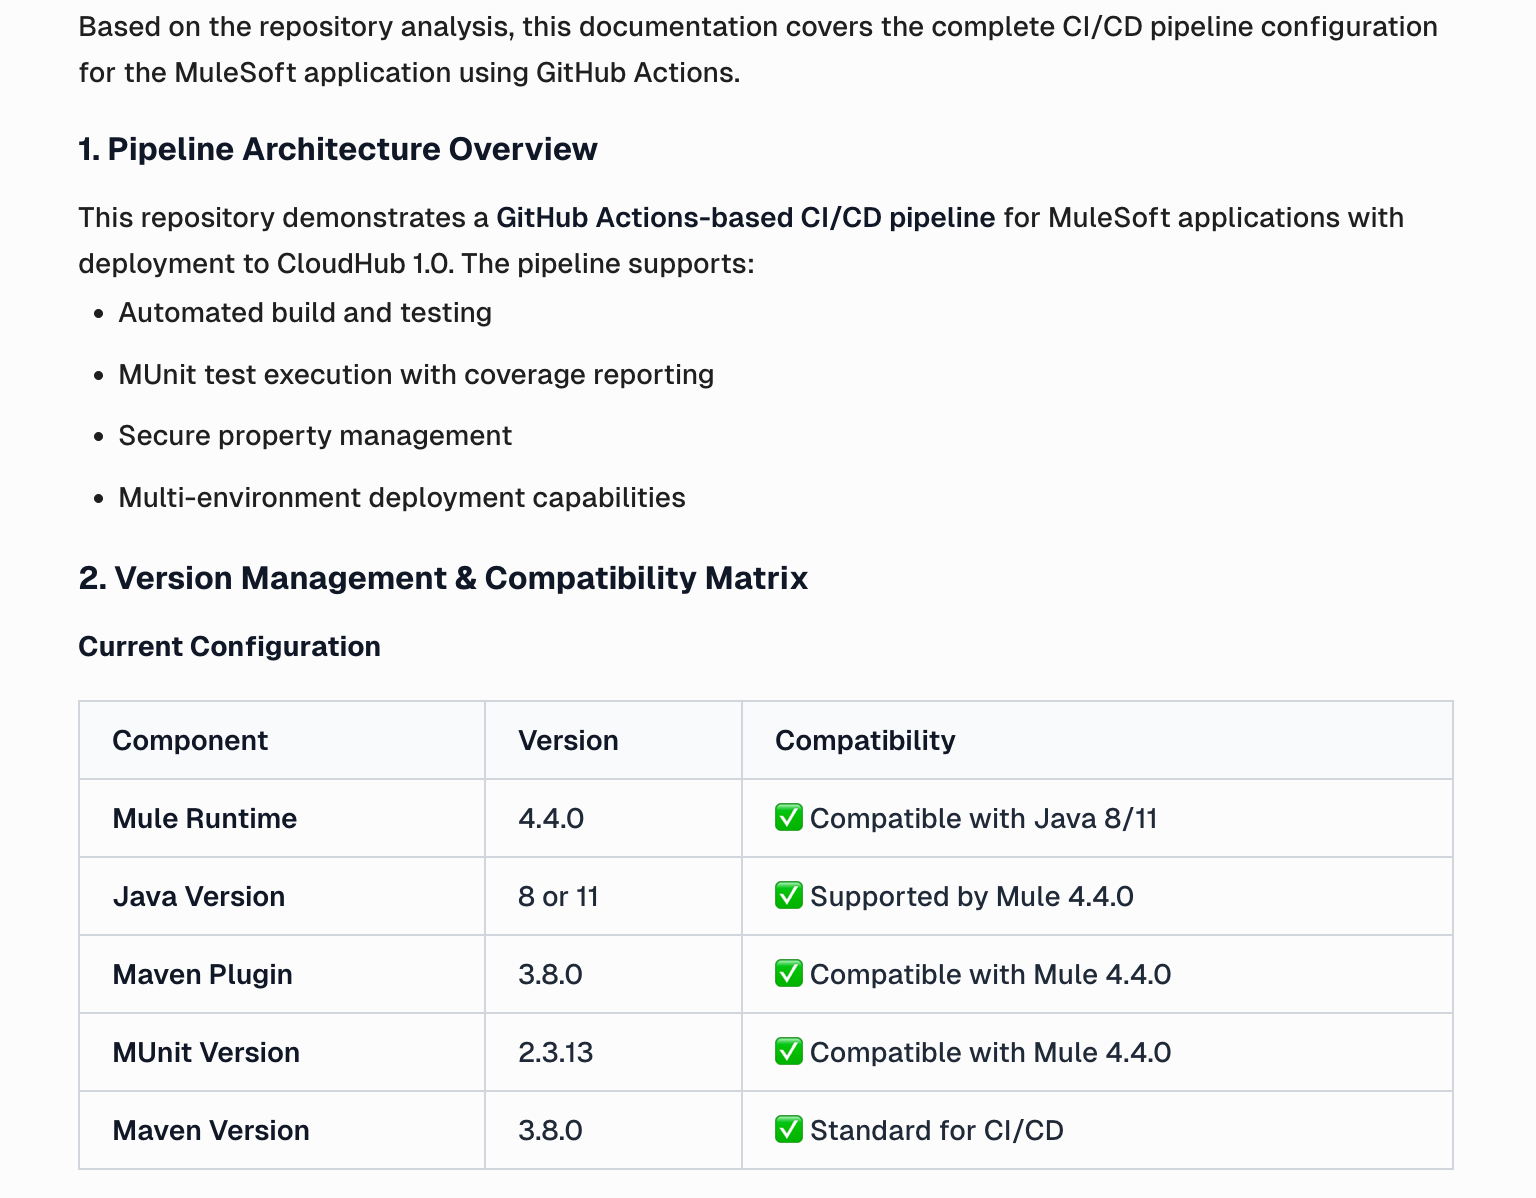
Mule Maven plugin versions and compatibility
Before adding MMP to your Mule project, make sure you are using a version compatible with the application’s Mule runtime and Java version. Using incompatible versions will result in errors while building the Mule application.
The table below lists the different versions and their compatibility with the Mule Maven plugin, along with the newly added features in each update.
Using CurieTech AI Agent Repository Coder to add the CH 2.0 deployment config
CurieTech AI is a platform designed specifically for MuleSoft. It provides AI agents, such as Repository Coder, DataWeave Generator, and MUnit Test Generator, that assist you in coding, testing, and documenting complete workflows. Curie also offers AI tools that enable you to create complex and straightforward integrations using simple natural language prompts.
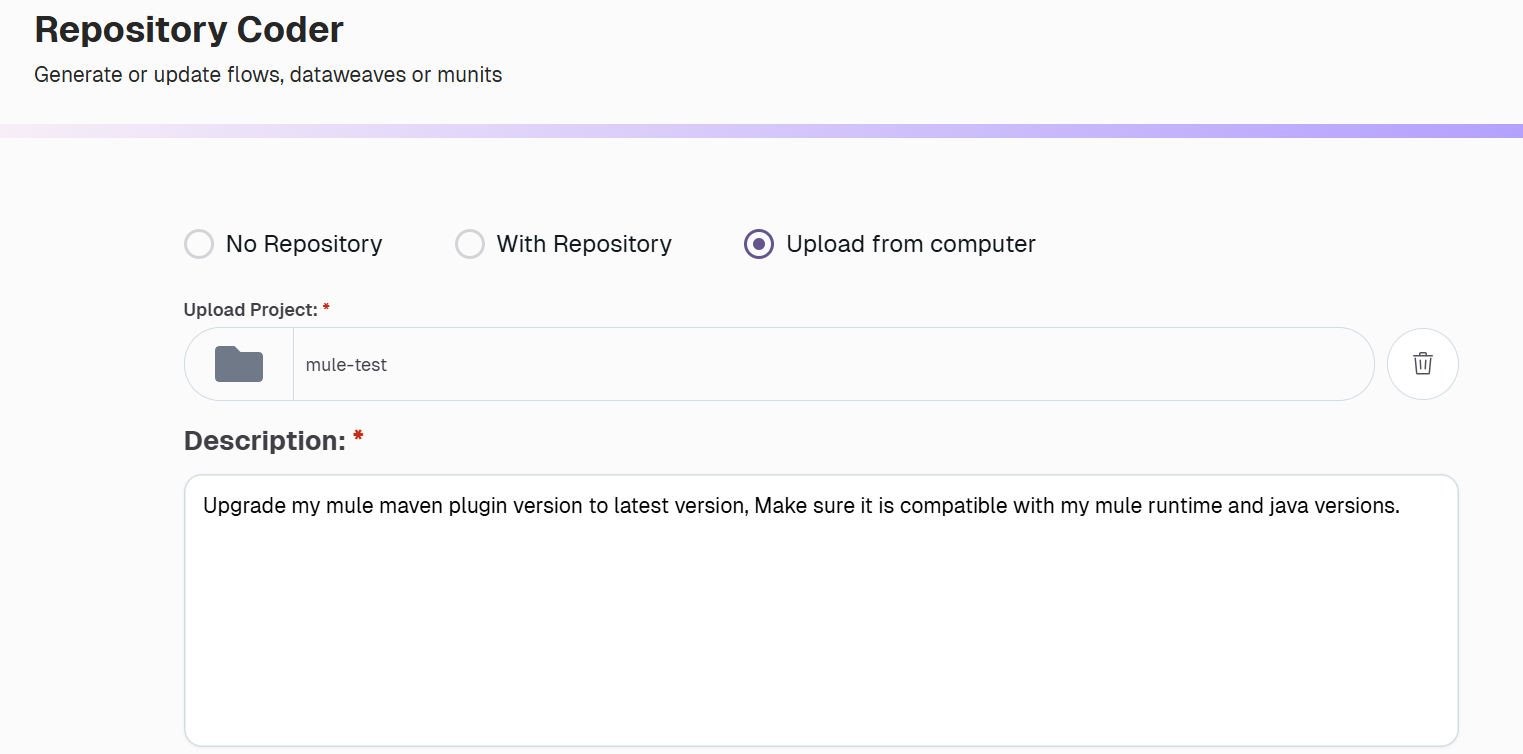
Let’s use the Repository Coder agent to upgrade the Mule Maven plugin version to the latest version, maintaining compatibility with the Mule runtime and Java versions. Below is the screenshot, which provides a prompt to upgrade the mule maven plugin version to the latest version.
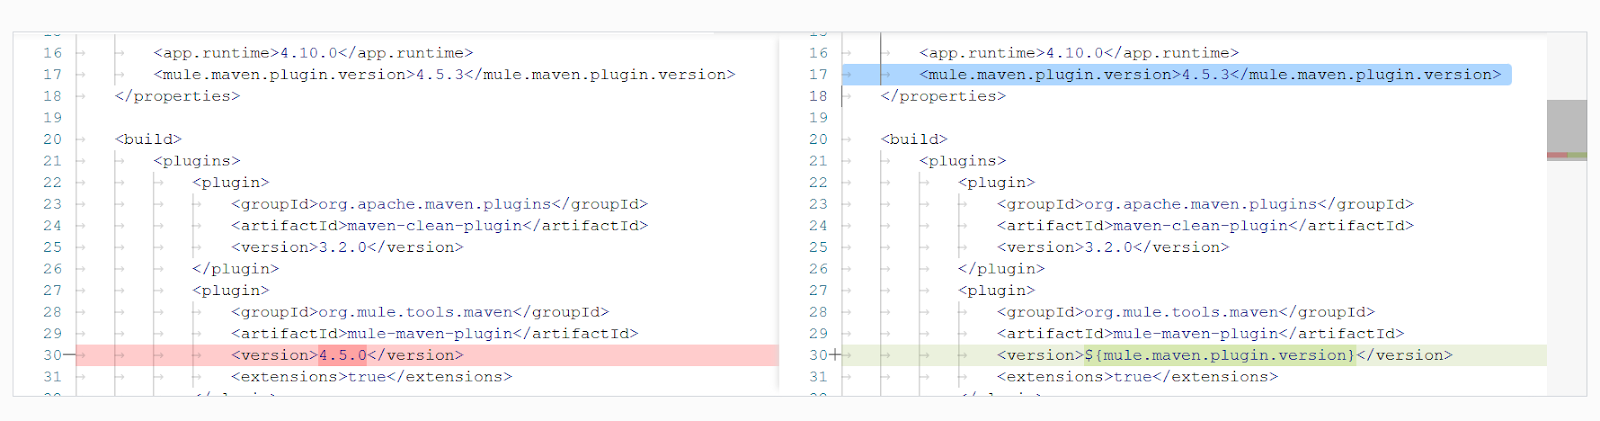
The agent updates the POM file in the project, upgrading the Mule Maven plugin version to the latest compatible version, 4.5.3. The uploaded project uses Mule runtime version 4.10.0 and Java version 17, so the agent upgraded the version to the latest compatible version.
This ensures the latest mule maven plugin version is used, decreasing the risk of being exposed to vulnerabilities in previous versions, and provides the latest enhancements.
Mule Maven plugin goals
Mule Maven plugin goals are predefined goals that the plugin offers to manage Mule applications. These goals, in combination with the default Maven plugin phases/goals, help manage the entire lifecycle of Mule applications.
Package goal (mule:package)
To deploy your Mule application developed using Anypoint Studio or Anypoint Code Builder for VS Code, you must bundle it into a deployable archive that contains all the code and resources supporting your integrations. The mule:package goal generates the application JAR file.
This goal is directly bound to the Maven package phase—mule:package is bound to the package phase in the mule application project—so you don’t need to call it explicitly.
Running the mvn package command ensures that all preceding Maven lifecycle phases (validate, compile, test, etc.) are executed in order before executing the package phase, which automatically performs the mule:package goal. Similarly, running mvn mule:package runs all preceding bound goals automatically.
Both commands produce the same result, but it's essential to understand the distinction between them. The package itself is a phase, and mule:package is a goal bound to the package phase. Here’s a snapshot that describes all the phases and goals for a Mule application.
Deploy goal (deploy)
This goal is used to upload the application to AnyPoint Exchange. When combined with the muleDeploy parameter, the application is deployed to the specified runtime.
The mvn deploy command binds the following goals in order:
- exchange-pre-deploy: This goal prepares the metadata for publishing the artifact to Anypoint Exchange.
- deploy: This goal uploads the prepared artifact to the Exchange, making it available for reusing and sharing.
- exchange-deploy: This goal finalizes the artifact in the Exchange, making it discoverable and usable by others.
Executing the 'mvn deploy' command ensures that all Maven lifecycle phases up to deploy are executed, and the artifact is published to the AnyPoint Exchange. To further deploy the artifact to the specified runtime, you can combine the command with the muleDeploy parameter as follows:
- mvn deploy: Publish the artifact to Anypoint Exchange (optional for CH and standalone environments; required for CH 2.0)
- mvn deploy -DmuleDeploy: Deploy the artifact to the Mule runtime
The mule-deploy parameter instructs Maven to deploy the artifact to the runtime using the deployment strategy specified in the POM file.
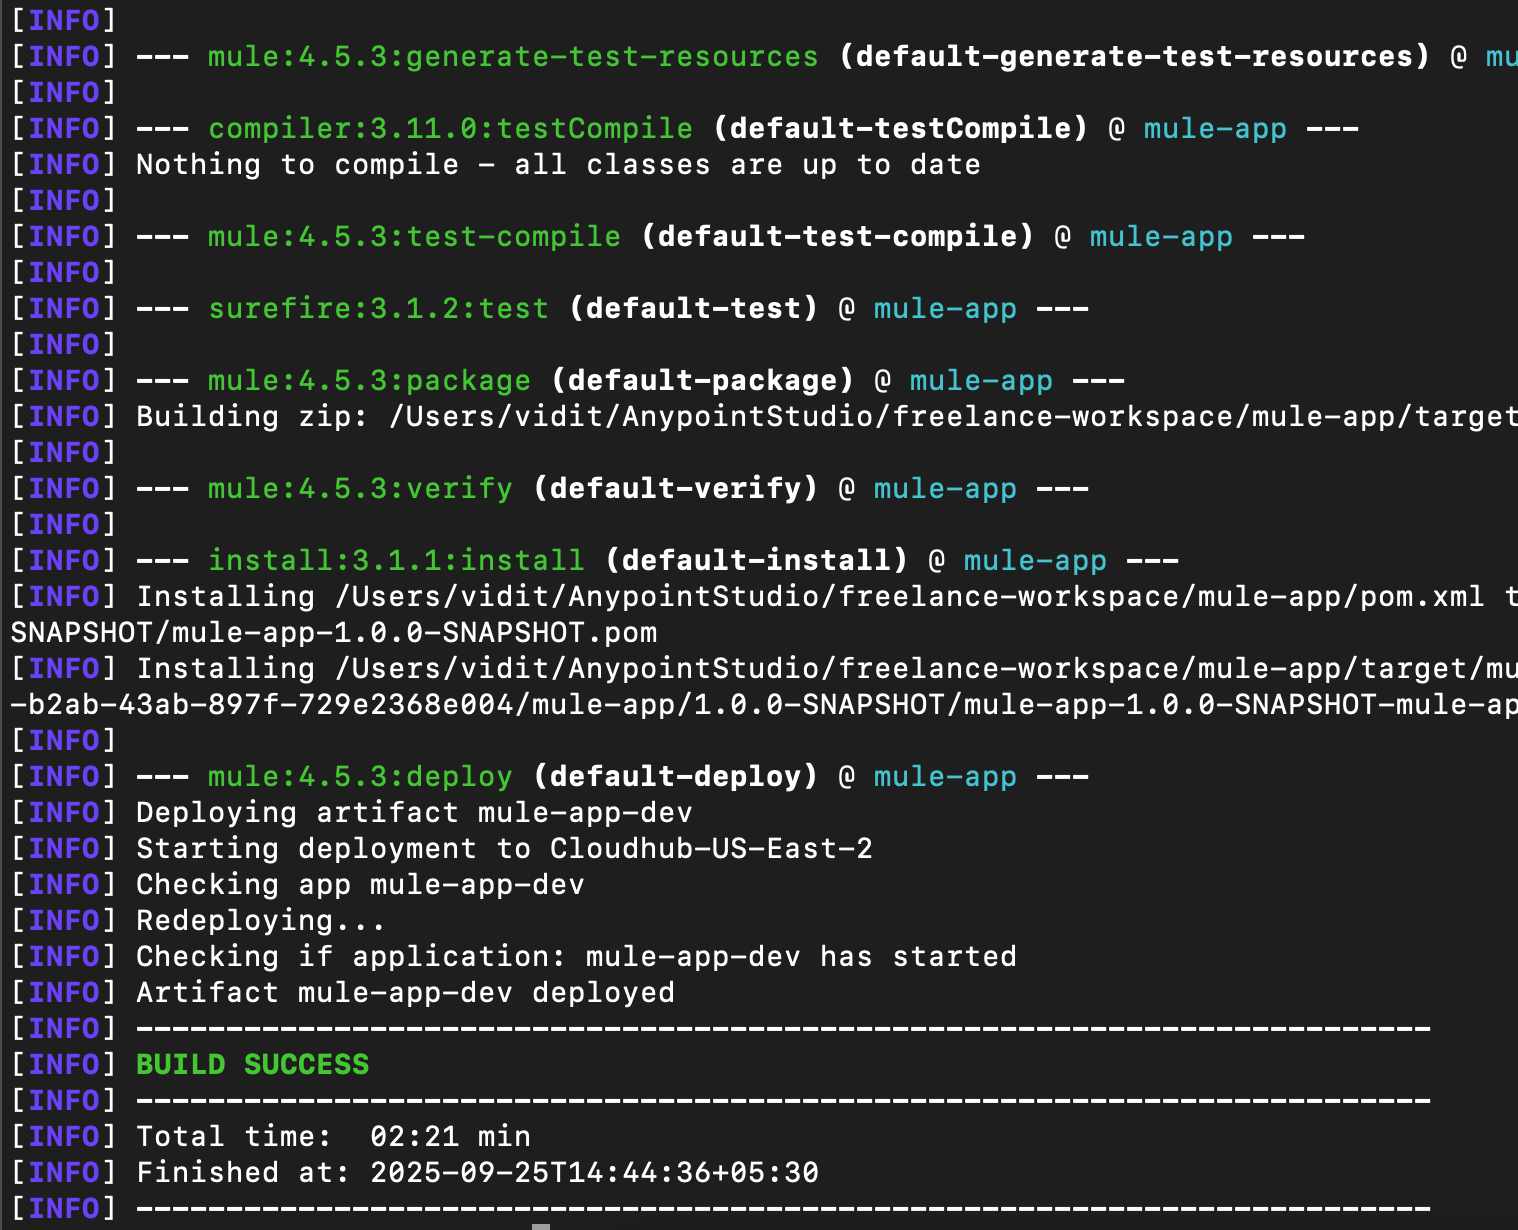
Here is a snapshot for Maven deploy (publishing the asset):
Here is the snapshot for Maven deploy with muleDeploy (deploying the asset):
Mule deploy goal (mule:deploy)
The Mule deploy goal enables you to directly deploy the application without building it. Executing the mvn mule:deploy command skips any other phases/goals in the Maven lifecycle and only executes the mule: deploy goal.
The Mule deploy goal is independent and not bound to any phase in the Maven application lifecycle. It expects the Mule application to be packaged and available for deployment. For CloudHub 2.0, the artifact is expected to be present in the exchange.
The goal retrieves the packaged application from the default target location (Exchange for CH 2.0 deployments and the local directory for others) and deploys it to the target runtime. There is also support for explicitly specifying the artifact location using the mule.artifact parameter while deploying to CloudHub and on-premises environments.
Here is the command to deploy an artifact from a particular location:
mvn mule:deploy -Dmule.artifact=$artifactLocation
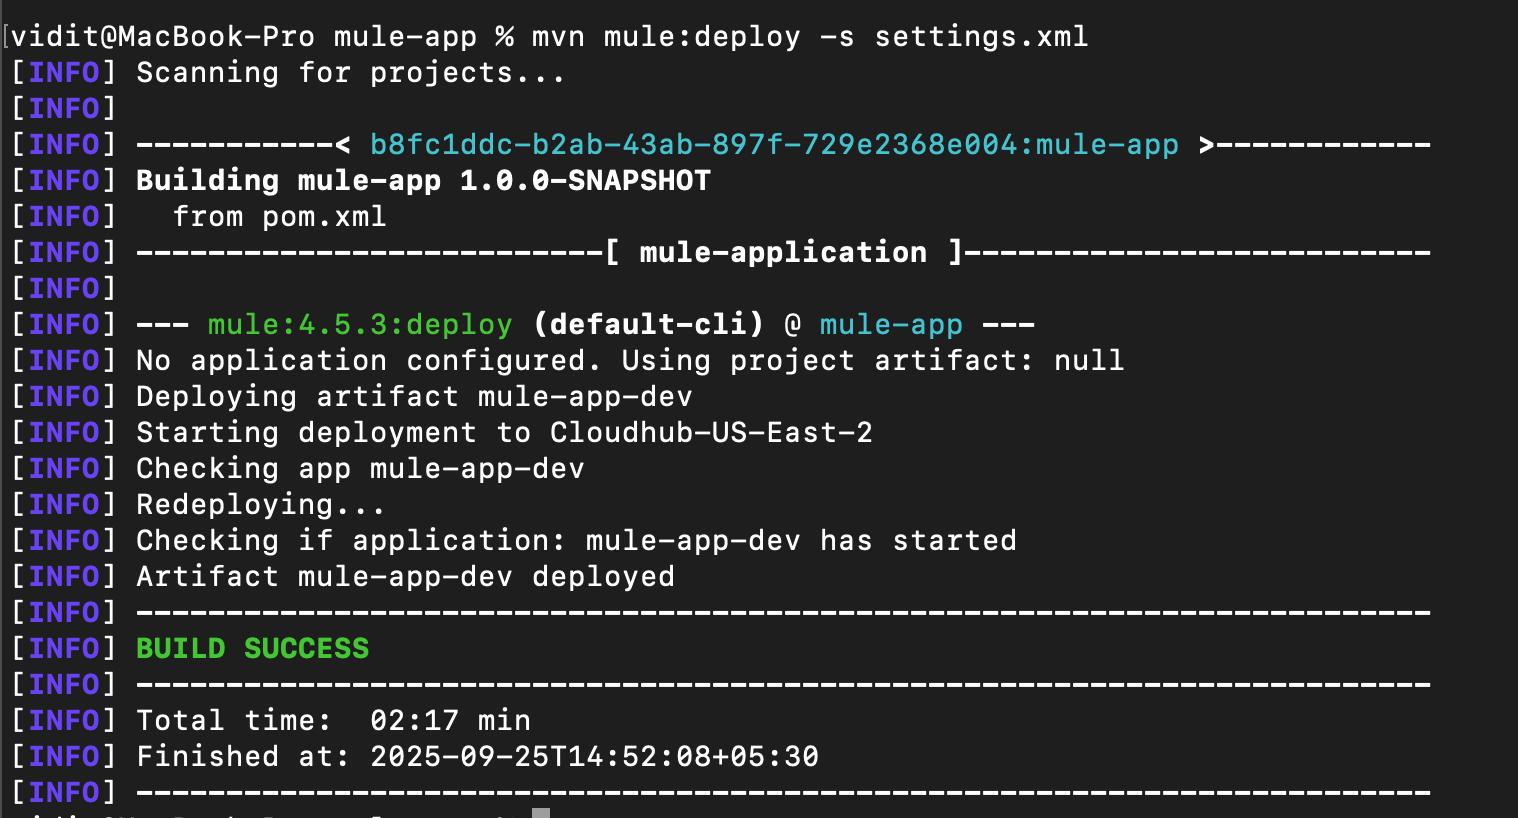
To deploy an artifact using the mule:deploy goal, you can first upload the application to the exchange using the mvn deploy command and then execute the command mvn mule:deploy.
Here is the snapshot for Maven mule:deploy:
Mule undeploy goal (mule:undeploy)
The Mule undeploy goal can remove the application from AnyPoint deployment targets (CloudHub, CloudHub 2.0, Runtime Fabric, or on-premises). It picks up the required properties from the plugin configuration in the POM file and uses them to identify and delete the application.
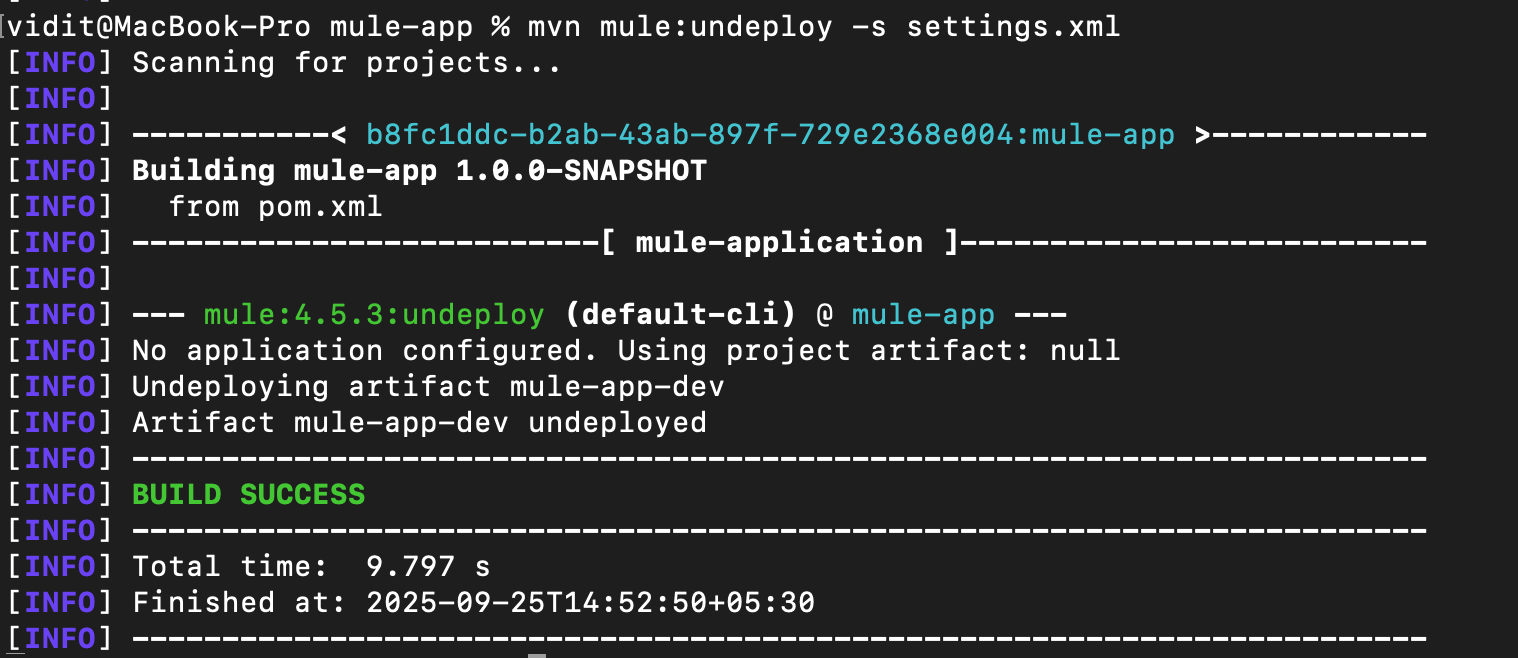
Like the mule deploy goal, the undeploy goal is independent and not bound to any phase in the Maven application lifecycle. Here is the command to remove the application from the deployment target:
mvn mule:undeploy
Note: This command does not delete the artifact on the exchange; it only removes it from the runtime.
Here is a snapshot for Maven mule:undeploy:
Adding the Mule Maven plugin to a Mule project
The Mule Maven plugin needs to be configured in the Mule application to utilize its capabilities. The following steps guide you through adding the plugin to the project and provide basic instructions for controlling the plugin's behavior.
Configure the Mule plugin in the project
The plugin can be added to the project using its Maven dependency.
<plugin>
  <groupId>org.mule.tools.maven</groupId>
  <artifactId>mule-maven-plugin</artifactId>
  <version>4.5.3</version>
  <extensions>true</extensions>
</plugin>
Add the following repository to the project’s POM file to download the Mule Maven plugin dependency. This instructs Maven to search for the Mule Maven plugin in the specified repository rather than the default Maven Central repository.
<pluginRepositories>
  <pluginRepository>
    <id>mule-public</id>
<url>https://repository.mulesoft.org/nexus/content/repositories/releases</url>
  </pluginRepository>
</pluginRepositories>
Skip deployment verification
The plugin waits to verify the deployment once the application is uploaded and deployed to a target runtime. If deployment verification is not required, it can be skipped, and the plugin will just deploy the application and complete the process without waiting for the application to start.
Here is the configuration snippet for skipping the deployment verification (skipDeploymentVerification: true):
<plugin>
  <groupId>org.mule.tools.maven</groupId>
  <artifactId>mule-maven-plugin</artifactId>
  <version>4.5.3</version>
  <extensions>true</extensions>
  <configuration>
    <runtimeFabricDeployment>
      <skipDeploymentVerification>true</skipDeploymentVerification>
    </runtimeFabricDeployment>
  </configuration>
</plugin>
CloudHub 2.0 deployment with example
We have covered how Maven and the Mule Maven plugin work; let’s examine the process with an example to better understand the flow. This section outlines the entire configuration and workflow for deploying a Mule application to a CloudHub 2.0 environment from start to finish.
Configuration structure and flow
To maintain a flexible and easy-to-manage deployment configuration, the project should separate build logic, deployment configuration, and environment-specific settings. This ensures that all configurations are loosely connected to the project POM. They can be added or updated individually without changing the POM.
This topic covers building a loosely coupled CH 2.0 deployment pipeline using the Mule Maven plugin.
Externalize deployment properties
To ensure that each environment can define its own properties, you can externalize the deployment strategy configuration in the POM file and maintain the properties for each environment in a separate file. To achieve this, create a folder in the Mule application and add the property files for each environment.
Each environment can have different configurations; for example, the number of vCores and replicas might differ for dev and test environments. Keeping separate files for each environment helps maintain organization.
You can also create a standard property file for properties shared across all environments and read it along with the environment-specific properties at runtime.
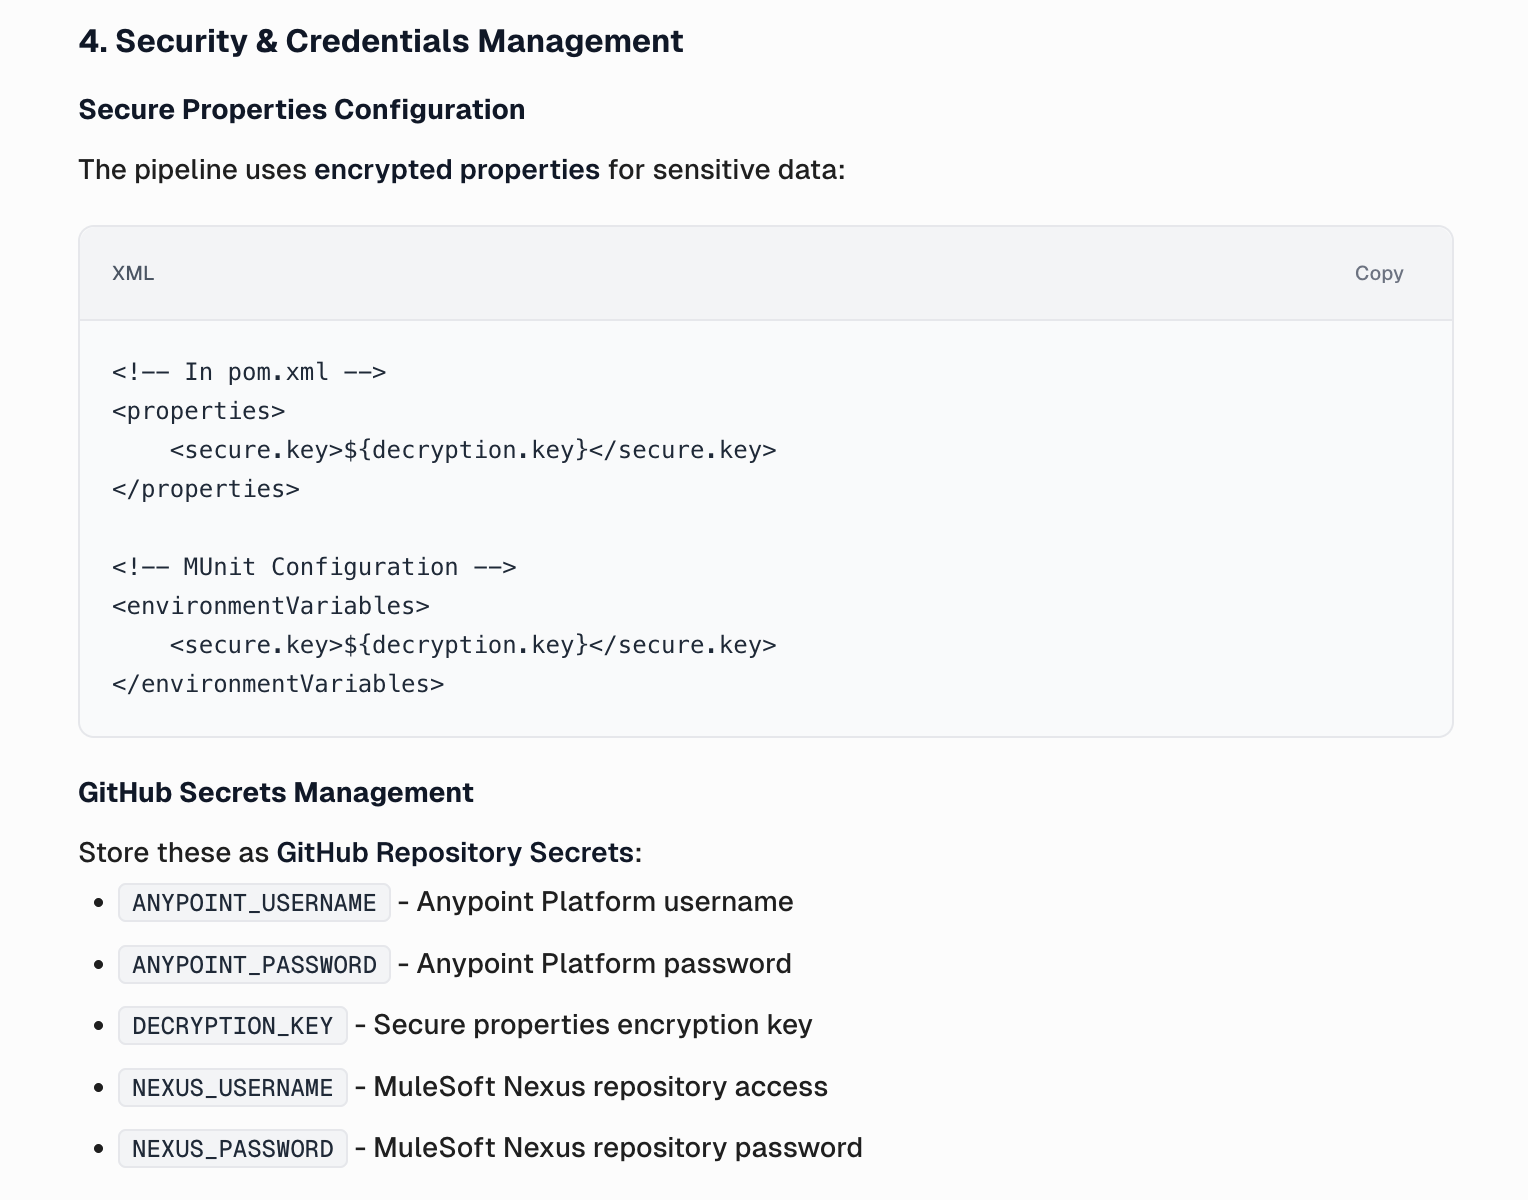
Note: Never store sensitive properties, such as passwords or AnyPoint platform client IDs/secrets, in these property files. Sensitive properties should only be stored in secure vaults and then loaded at runtime.
Read deployment properties at runtime
Since deployment properties are defined per environment in separate files, it is necessary to read these properties at runtime to use the specified values for deployment. To do this, you can use properties-maven-plugin. This plugin offers goals for reading properties from external files, setting system properties, and writing properties to files. The read-project-properties goal can be used to read the deployment properties at runtime.
In Maven, each plugin is bound to a phase in the build lifecycle. The properties plugin is bound to the initialize phase, one of the earliest phases before compilation and packaging. This ensures that the deployment properties are loaded and available before the packaging phase starts.
The execution tag defines the goal as read-project-properties, with the configuration file tag set to ${deployment.properties}. This property can be passed at runtime, containing the file's path to be read. For example, if you want to load the deployment configuration for the development environment, you can use this:
-Ddeployment.properties=deployment-config/dev.properties
Here is the plugin configuration to be added to the project’s POM file.
<plugin>
	<groupId>org.codehaus.mojo</groupId>
	<artifactId>properties-maven-plugin</artifactId>
	<version>${maven.properties.version}</version>
	<executions>
		<execution>
			<phase>initialize</phase>
			<goals>
				<goal>read-project-properties</goal>
			</goals>
			<configuration>
				<files>
					<file>${deployment.properties}</file>
				</files>
			</configuration>
		</execution>
	</executions>
</plugin>
Configuring authentication
To upload and deploy the Mule application to the AnyPoint platform, you need a mechanism to authenticate to the platform. Use a connected app to manage this authentication. The configured connected app must have adequate permissions to upload and manage applications in Exchange and the runtime. Here is the list of scopes required for the connected app:
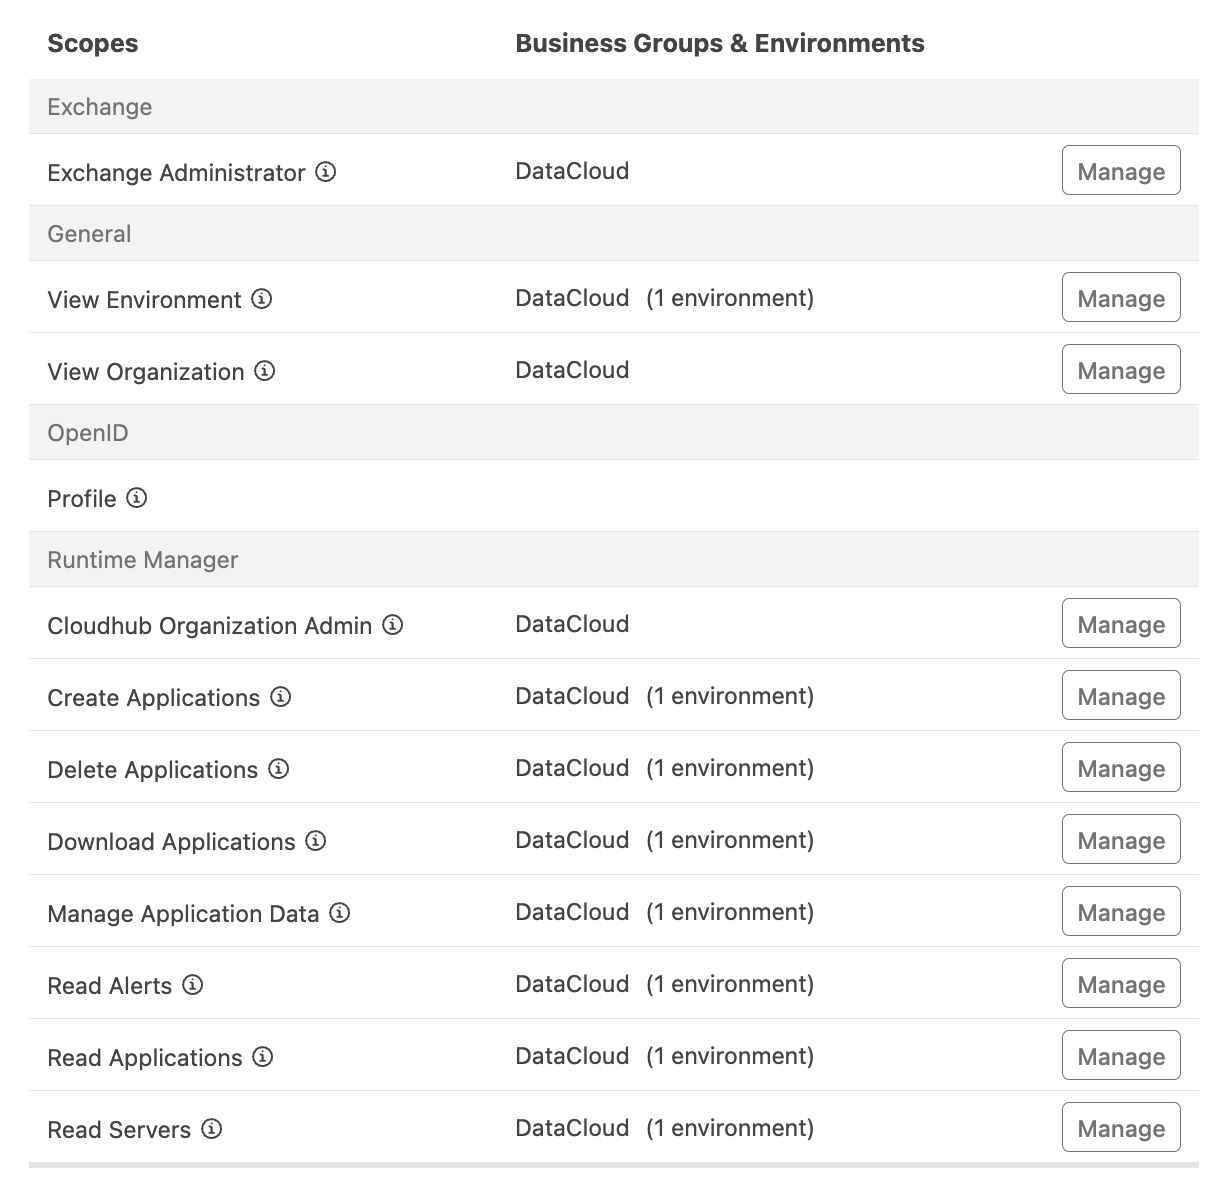
Once the connected app is created with the scopes above, it can manage the authentication. Note that different connected apps are recommended for non-production and production environments to ensure security and protected access.
Configuring the server in the settings file
Once you have the connected app credentials, add them to the settings file. To add the connected app, follow the format below (note that this format is specific to Anypoint Exchange):
<server>
	<id>anypoint-exchange-v3</id>
	<username>~~~Client~~~</username>
	<password>clientID~?~clientSecret</password>
</server>
Here’s a snapshot from the settings file for the server config:

The server ID can be used in the deployment strategy and in distribution management to point to the server credentials for the Anypoint platform's authentication.
Configuring distribution management
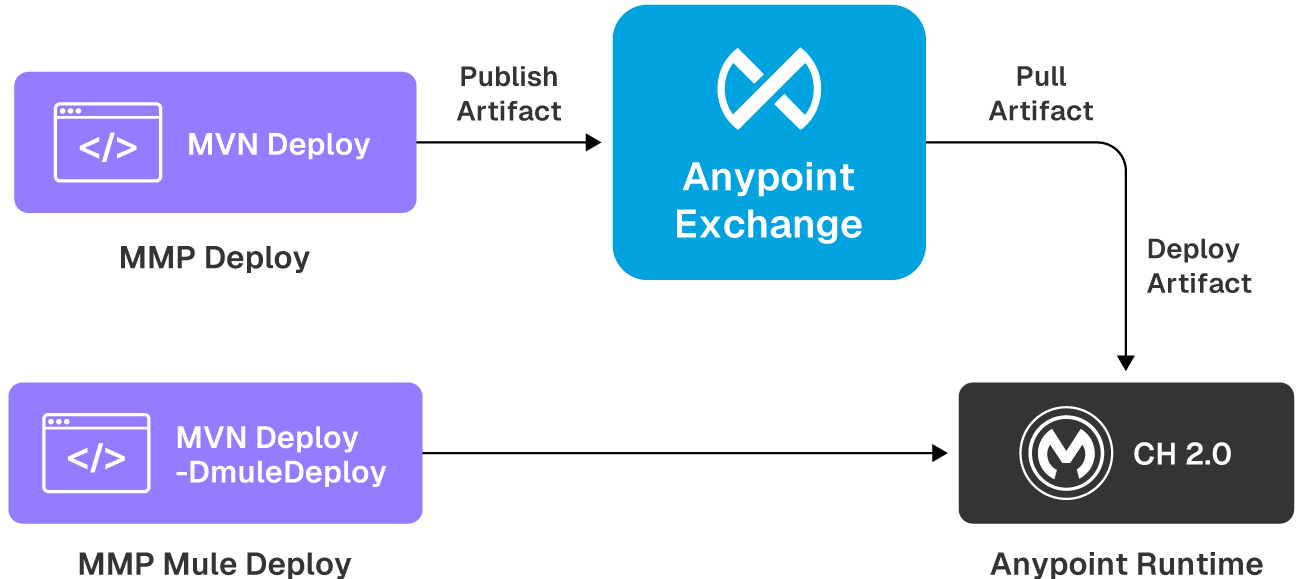
CloudHub 2.0 follows a containerized Kubernetes architecture where each deployment is treated as a discrete, versioned artifact. This requires an artifact repository, and the Anypoint platform utilizes Exchange. To deploy the application to CH 2.0, the asset must first be published to Exchange and then deployed to the CH 2.0 runtime.
To do this using Maven, you need to configure distribution management, which defines the remote repository where the built artifact should be uploaded. In this case, the remote repository is Anypoint Exchange.
Here is the Distribution Management section, where you are required to upload artifacts to the exchange. The repository ID should match the server defined in the settings file, ensuring that authentication works as expected while publishing the built artifact.
<distributionManagement>
	<repository>
		<id>anypoint-exchange-v3</id>
		<name>Exchange Private Repository</name>
<url>https://maven.anypoint.mulesoft.com/api/v3/organizations/${project.groupId}/maven</url>
		<layout>default</layout>
	</repository>
</distributionManagement>
The repository uses the Maven Facade V3 API, which enables you to publish and consume assets from the exchange.
Configuring the deployment strategy
All the prerequisites are now set up, so let’s start connecting all the parts and configuring the deployment strategy for CH 2.0 deployment. The configuration element for CH 2.0 deployment contains all the properties required to deploy an artifact. Here is the configuration for deploying the Mule application to the CH 2.0 runtime:
<?xml version="1.0" encoding="UTF-8"?>
<plugin>
  <groupId>org.mule.tools.maven</groupId>
  <artifactId>mule-maven-plugin</artifactId>
  <version>${mule.maven.plugin.version}</version>
  <extensions>true</extensions>
  <configuration>
    <sharedLibraries>
      <sharedLibrary>
        <groupId>net.sf.jt400</groupId>
        <artifactId>jt400</artifactId>
      </sharedLibrary>
    </sharedLibraries>
    <classifier>mule-application</classifier>
    <cloudhub2Deployment>
      <businessGroup>${anypoint.businessGroup}</businessGroup>
      <uri>${anypoint.uri}</uri>
      <provider>${anypoint.provider}</provider>
      <muleVersion>${mule.version}</muleVersion>
      <environment>${deployment.environment}</environment>
      <target>${deployment.target}</target>
      <applicationName>${deployment.appName}</applicationName>
      <server>anypoint-exchange-v3</server>
      <replicas>${deployment.replicas}</replicas>
      <vCores>${deployment.vCores}</vCores>
      <deploymentSettings>
        <http>
          <inbound>
          <forwardSslSession>${deployment.inbound.forwardSslSession}</forwardSslSession>
            <lastMileSecurity>${deployment.inbound.lastMileSecurity}</lastMileSecurity>
          </inbound>
        </http>
        <updateStrategy>${deployment.updateStrategy}</updateStrategy>
        <generateDefaultPublicUrl>${deployment.generateDefaultPublicUrl}</generateDefaultPublicUrl>
      </deploymentSettings>
      <properties>
        <mule.env>${mule.env}</mule.env>
        <anypoint.platform.base_uri>${anypoint.uri}</anypoint.platform.base_uri>
        <anypoint.platform.client_id>${anypoint_client_id}</anypoint.platform.client_id>
        <anypoint.platform.client_secret>${anypoint_client_secret}</anypoint.platform.client_secret>
      </properties>
      <secureProperties>
        <mule.key>${mule_key}</mule.key>
      </secureProperties>
      <integrations>
        <services>
          <objectStoreV2>
            <enabled>${deployment.services.objectStoreV2}</enabled>
          </objectStoreV2>
        </services>
      </integrations>
    </cloudhub2Deployment>
  </configuration>
</plugin>
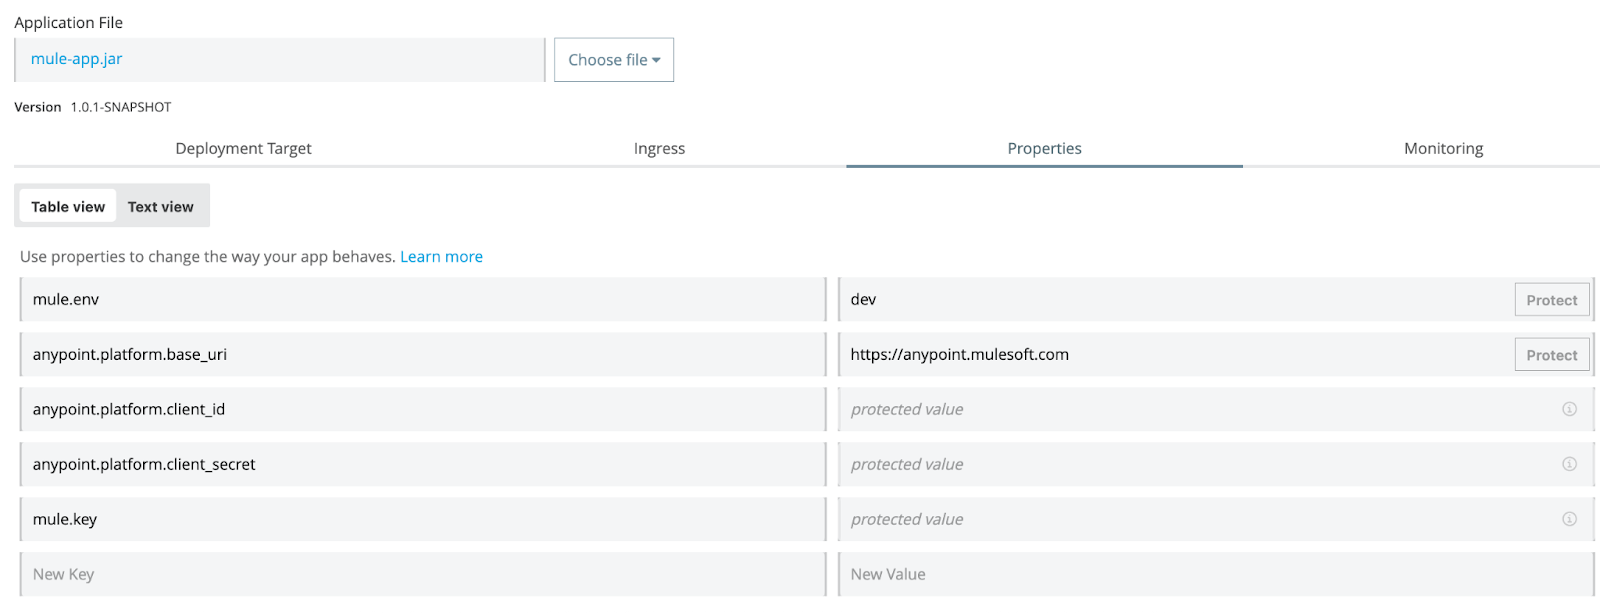
All deployment properties are externalized and stored in environment-specific files. Only the non-sensitive properties (such as vCores, business group, environment, deployment target, etc.) are kept in environment-specific files. Sensitive properties (such as Mule Key and Anypoint Platform Client ID/secret) should be passed at runtime and not stored in any location.
The configuration defines a server element for authentication, which loads the credentials from the Maven server’s settings file (the settings file path can also be passed explicitly at runtime). The value should match the server ID defined in the settings file.
Publishing and deploying the artifact to CloudHub 2.0
Now that the setup and configuration are complete, let's use the Mule Maven plugin to package, publish, and deploy the Mule application to the CH 2.0 environment.
To deploy the Mule application to CH 2.0, the following steps are required:
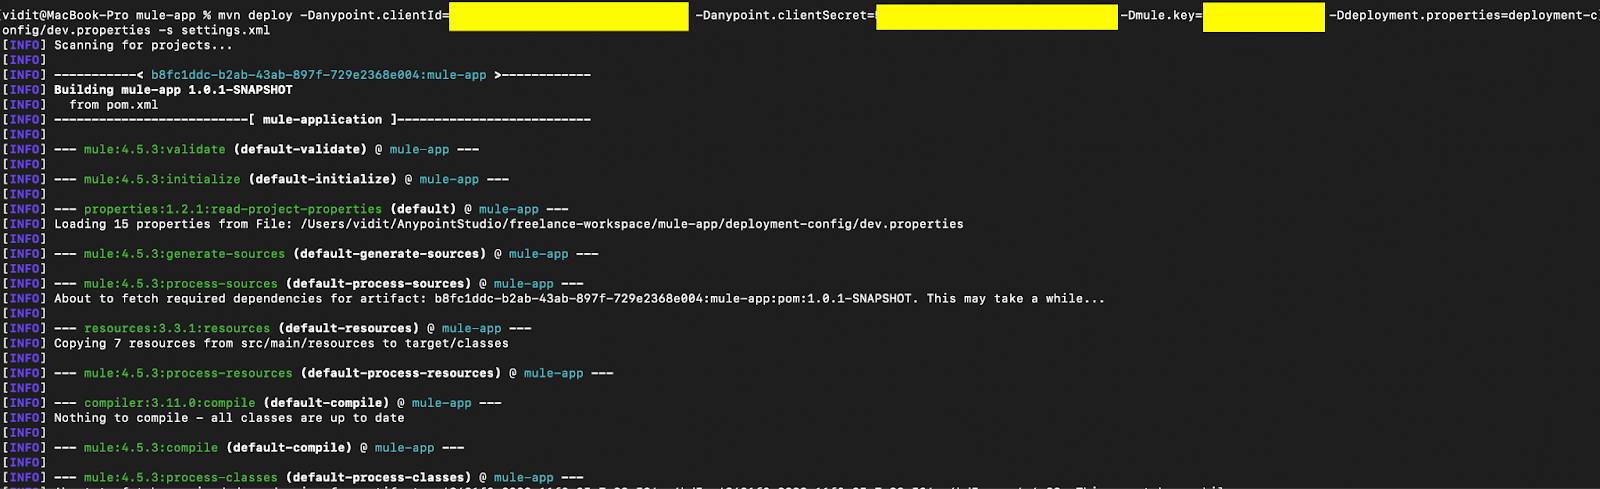
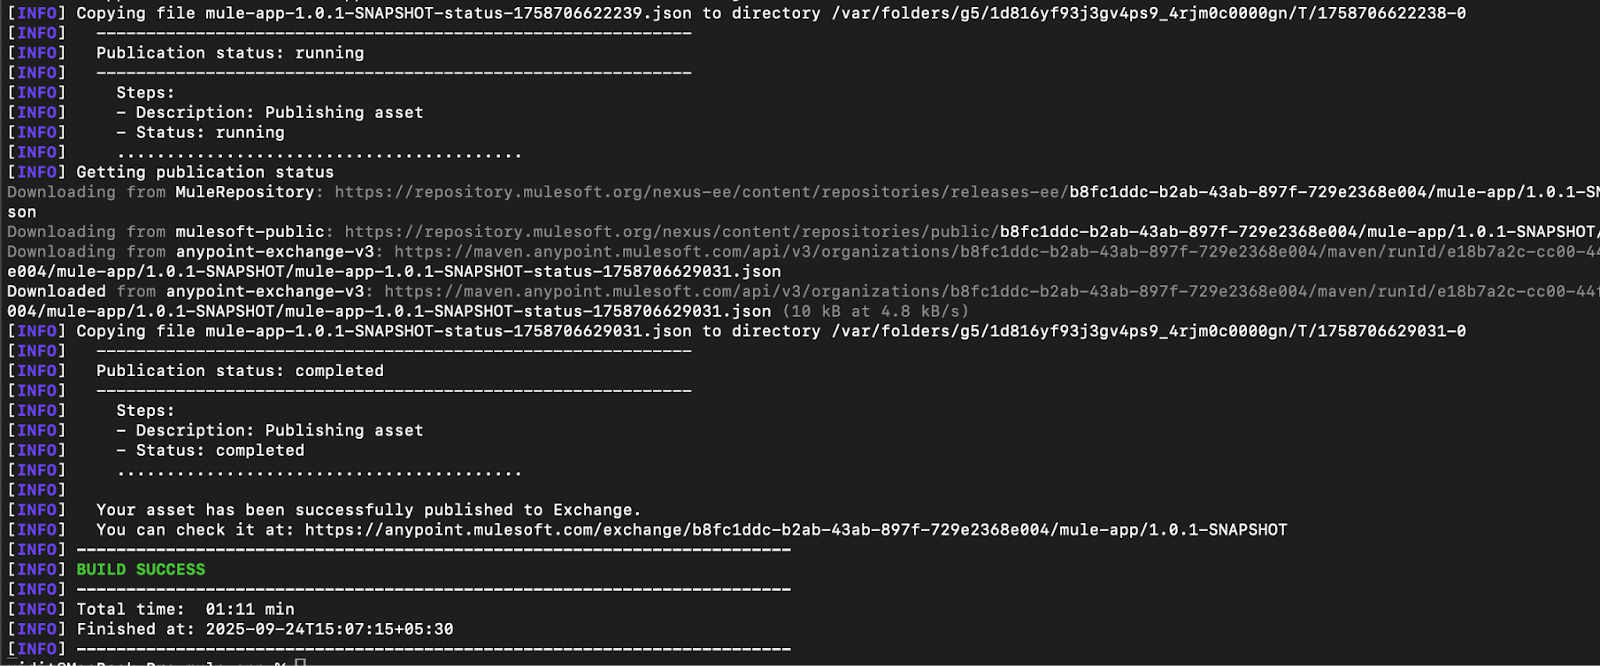
- Publishing the asset to Exchange: As discussed earlier, you can use the Maven deploy command to package and publish the artifact to Exchange. Here is the complete command with required parameters (for this example) passed at runtime:
mvn deploy -Danypoint.clientId=$platformClientID
-Danypoint.clientSecret=$platformClientSecret
-Dmule.key=$muleKey
-Ddeployment.properties=$deploymentPropertiesPath -s
$settingsFilePath
This command ensures that environment-specific properties are read and made available for the deployment configuration, secure properties are passed at runtime, all the phases until deployment are triggered, and the artifact is published to the exchange.
Here are the snapshots of the command above executed locally on the machine:
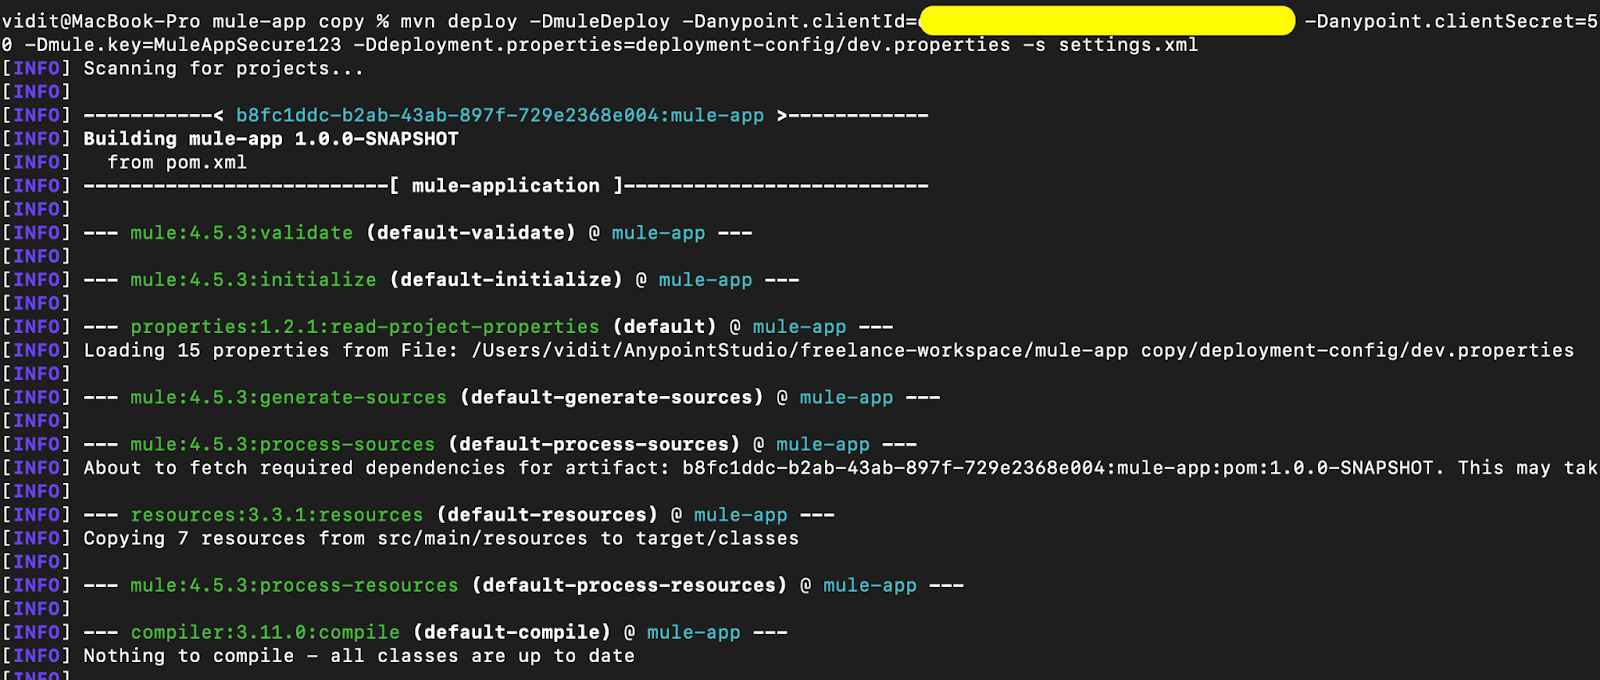
- Deploying the artifact to the CH 2.0 runtime: Now that the artifact is available in Exchange, you can trigger the Maven deploy command with the muleDeploy parameter to deploy the application to the CH 2.0 runtime. This will deploy the artifact present in the exchange to the Mule runtime.
mvn deploy -DmuleDeploy -Danypoint.clientId=$platformClientID
-Danypoint.clientSecret=$platformClientSecret
-Dmule.key=$muleKey
-Ddeployment.properties=$deploymentPropertiesPath -s
$settingsFilePath
Here are the snapshots of the above command executed locally on the machine:
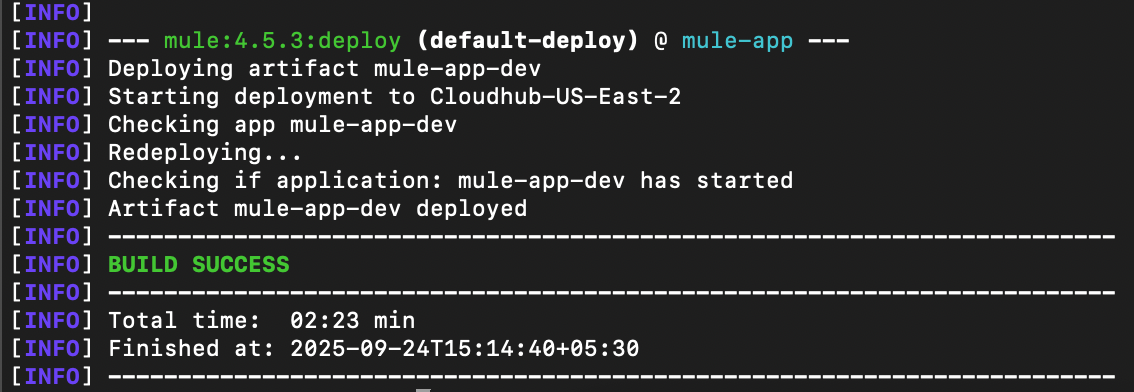
Once both steps are completed, the application should be available in the CH 2.0 environment with the configured parameters. Here is a snapshot of the deployed application:
Using CurieTech AI Agent Repository Coder to add the CH 2.0 deployment config
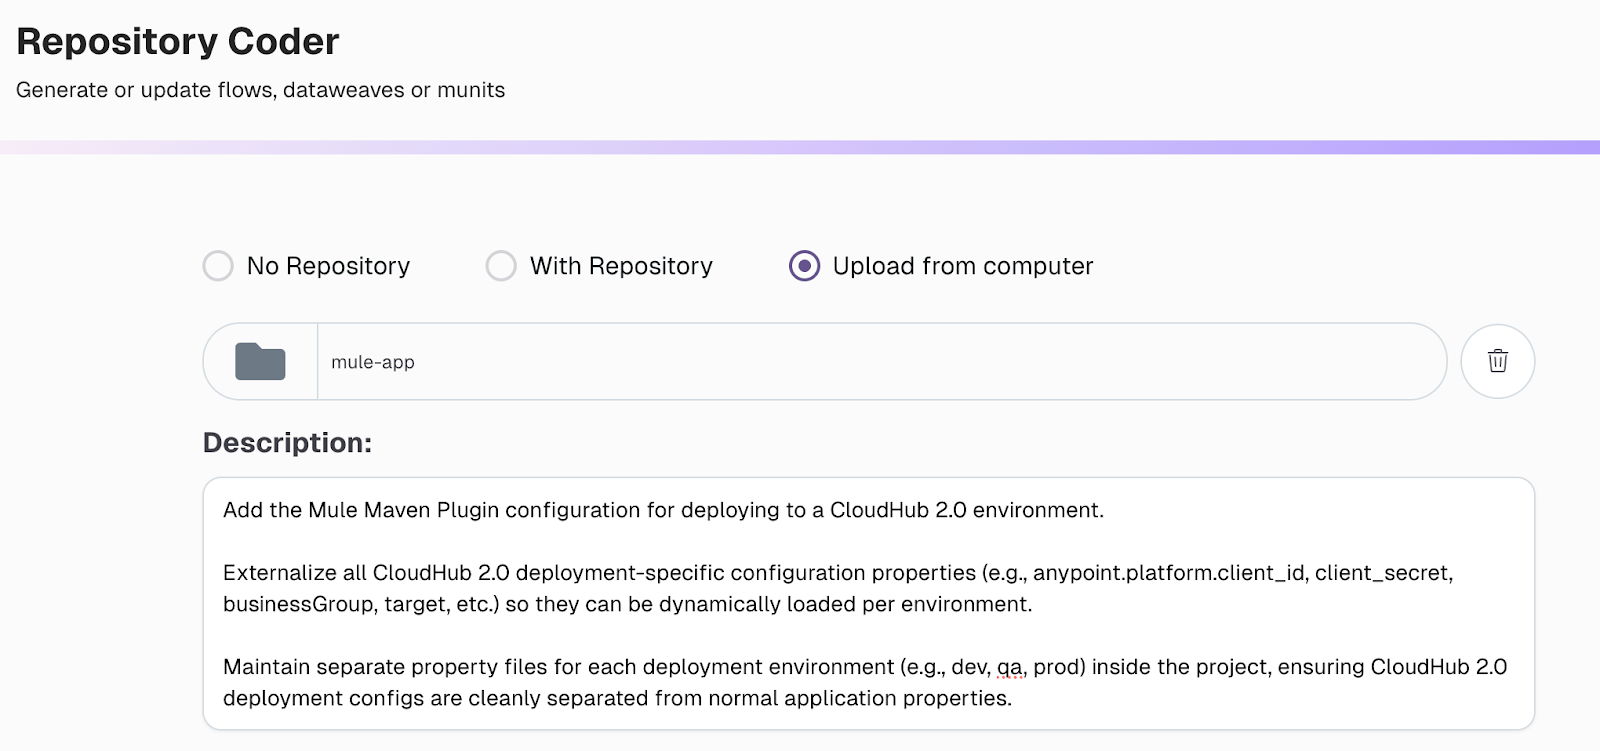
Using simple natural language prompts, you can use the CurieTech AI Agent Repository Coder to add the configuration for CH 2.0 deployment and reduce development time. Let’s explore the CurieTech AI Agent Repository Coder via an example that adds the CH 2.0 deployment config to the Mule application.
The following prompt specifies the addition of the deployment configuration for CH 2.0 deployment, externalizing all deployment-specific properties and maintaining separate property files for each environment.
The agent adds the requested changes to the project. You can also review the changes made by the agent and provide feedback, allowing the agent to update the code accordingly.
The following configuration was automatically generated by the agent to enable seamless deployment to CloudHub 2.0, ensuring that all required properties, environment variables, and deployment parameters are correctly aligned.
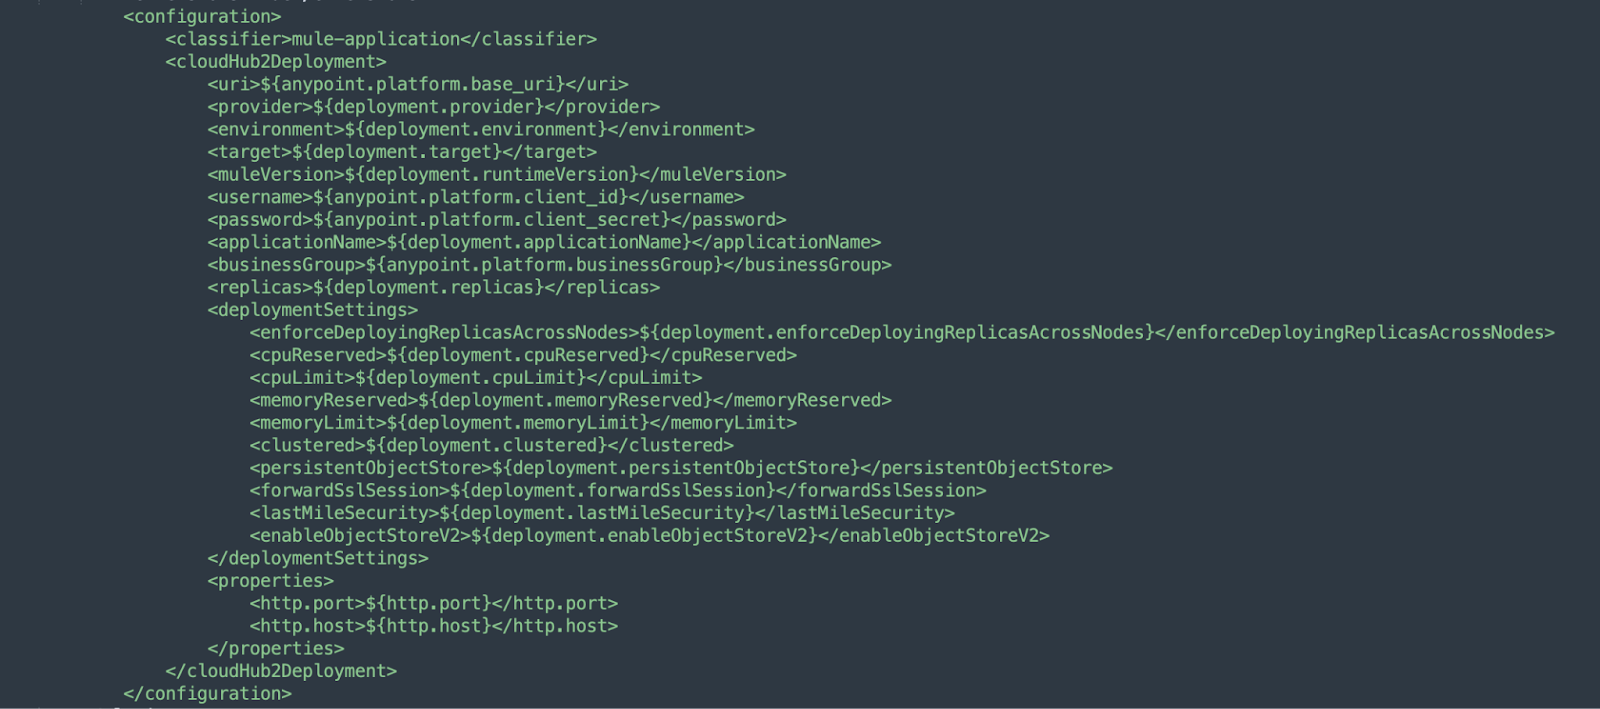
The properties plugin is added to enable dynamic loading of configuration properties at runtime, ensuring flexibility and environment-specific customization during deployment.
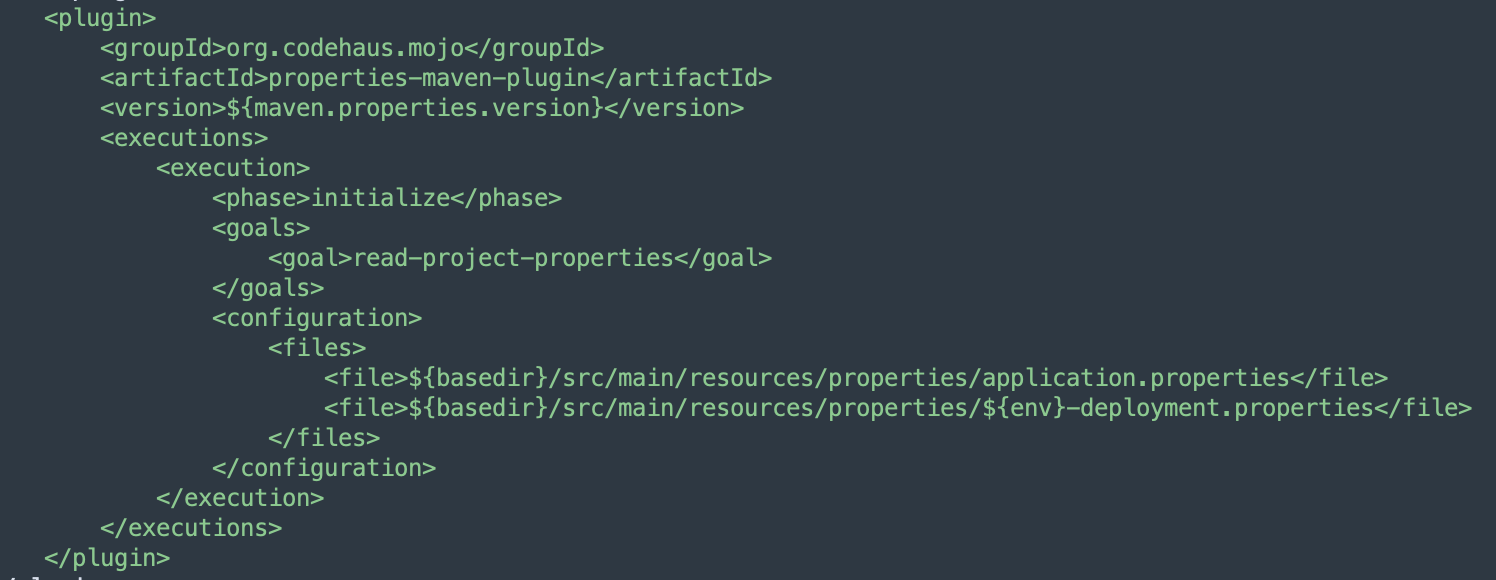
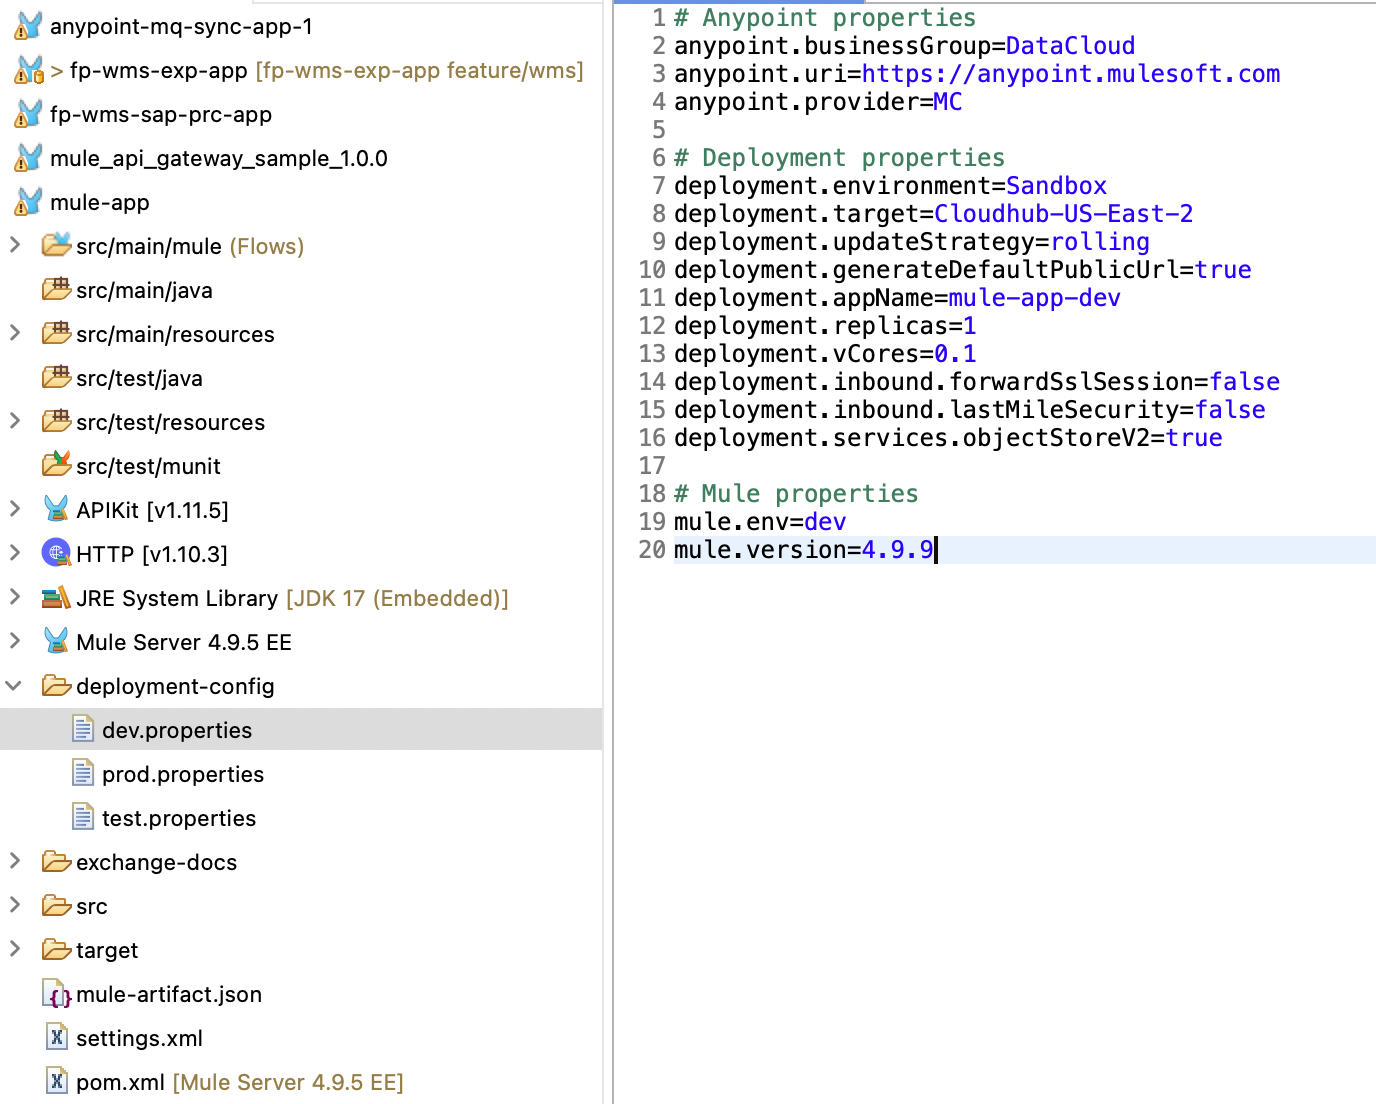
The following snapshot shows the development environment deployment properties file, automatically generated by the agent, which contains environment-specific configurations required for seamless deployment.

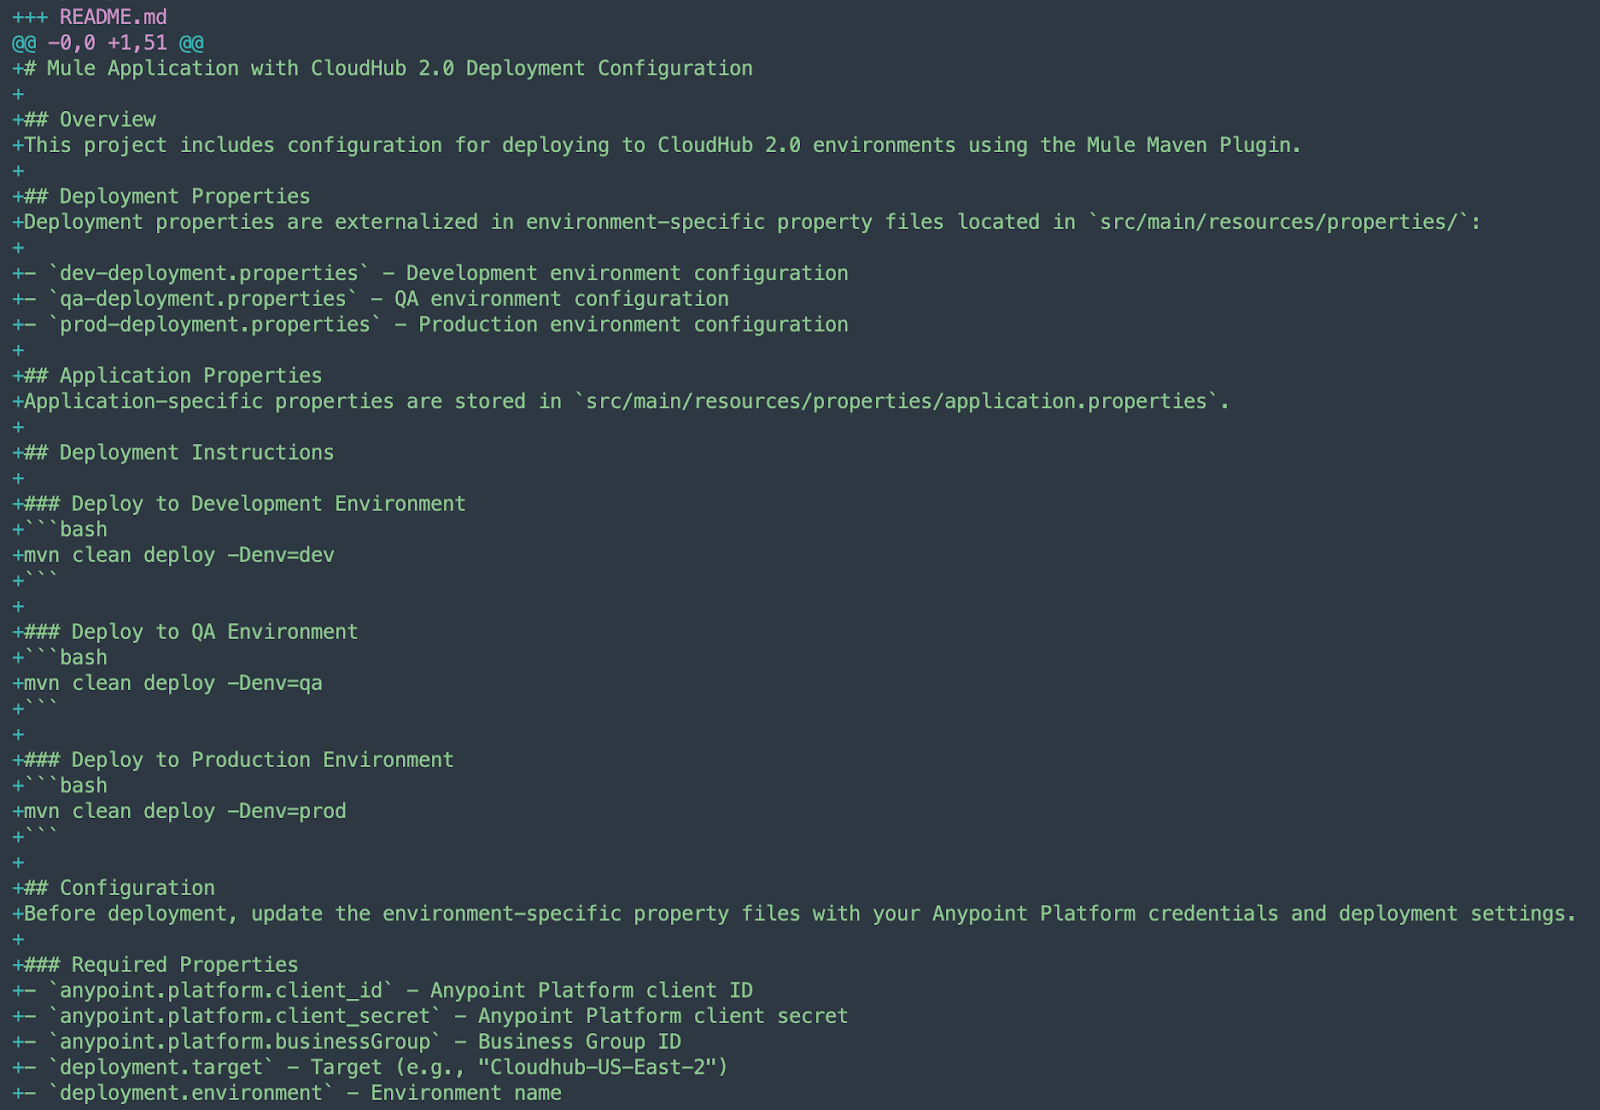
The agent also generates a comprehensive README file that summarizes all the modifications made, providing clear documentation for reference and easier project maintenance.
{{banner-large="/banners"}}
Common errors and troubleshooting
Builds can fail due to errors while working with Maven and the Mule Maven plugin to deploy Mule applications. This section addresses common mistakes that can occur and provides guidance on troubleshooting them.
Configuration errors
Configuration errors can arise due to missing or invalid properties in the deployment strategy, distribution management, or a mismatch between the server ID in the POM and the settings file, among other things. Let’s discuss the common configuration errors.
Missing or invalid properties in the deployment config
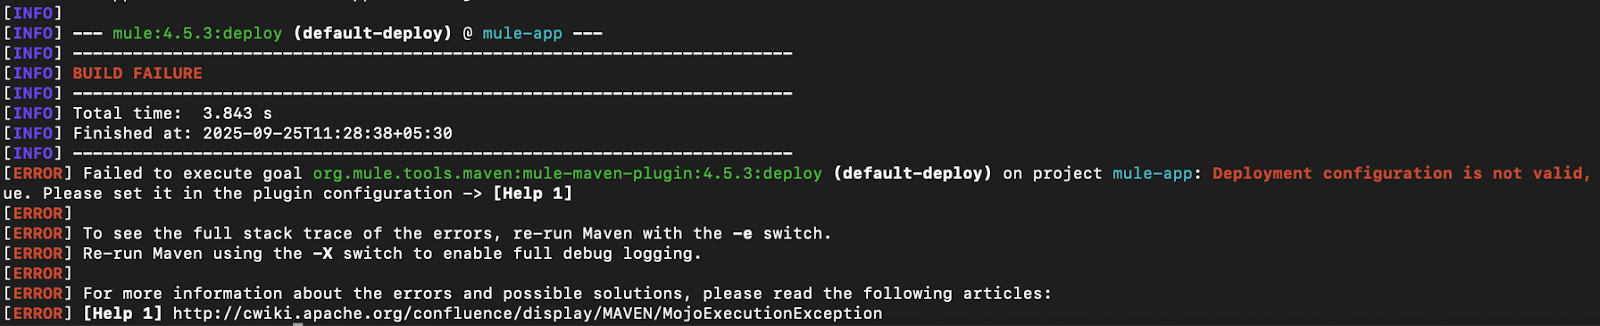
Always ensure that the required configuration parameters are present and valid in the deployment strategy configuration. For example, if the target parameter is not present in the configuration, the deployment command will fail, pointing to the missing/invalid attributes. To resolve these errors, look for the specific stack trace provided by the Mule Maven Plugin when packaging the application.
Here is a snapshot of an error when the target property is not present in the configuration (mvn deploy -DmuleDeploy):
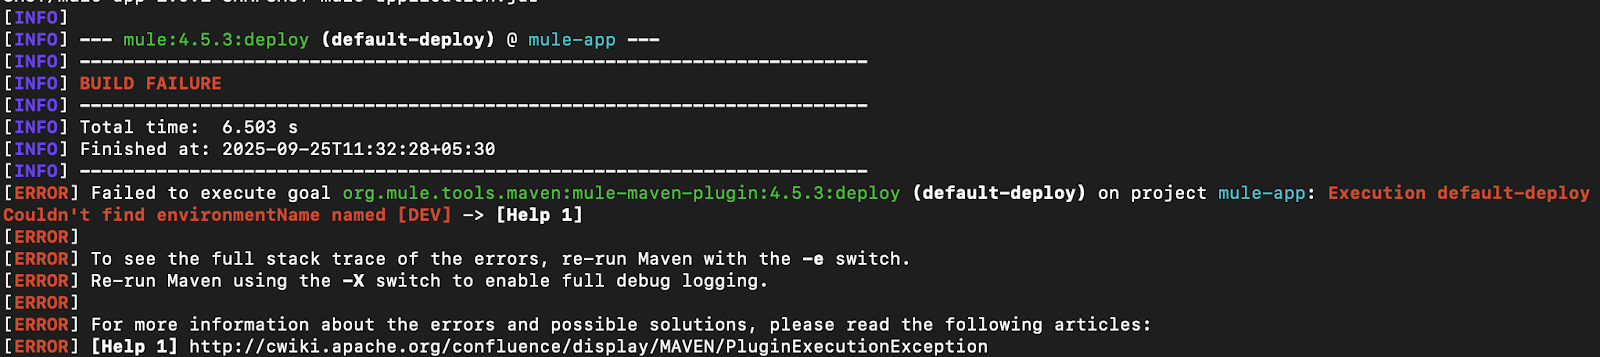
Here’s a snapshot when the deployment environment name is incorrect (mvn deploy -DmuleDeploy):
Server ID mismatch
A mismatch between the server ID in the settings file and the deployment strategy will cause issues when publishing and deploying the artifact. If no matching server is present in the settings file, authentication will not work, resulting in the process failing.
Always ensure that the server referred to in the deployment config and the distribution management exist in the settings file.
Here’s an example of an authentication error due to server mismatch (mvn deploy):
Note: The Mule Maven plugin might not always indicate the exact cause of failure. Use the debug flag to figure out the actual issue.
Authentication errors
Authentication and authorization errors can occur due to missing or invalid credentials, as well as insufficient access. Here are some of these issues and their corresponding troubleshooting steps.
Invalid credentials (401)
When authenticating using a connected app, ensure that the credentials are added in the recommended format in the settings file and server configuration. Also, check that the credential values are correct.
Use the deployment command with the debug flag to verify if a 401 authentication error causes the issue. It lists the exact cause of failure.
Here is a snapshot of an authentication error due to bad credentials (mvn deploy):

Note that MFA-enabled accounts will also return a 401 authentication error even if the credentials are correct. In this case, it is recommended that you use a connected app.
Required access not present (403)
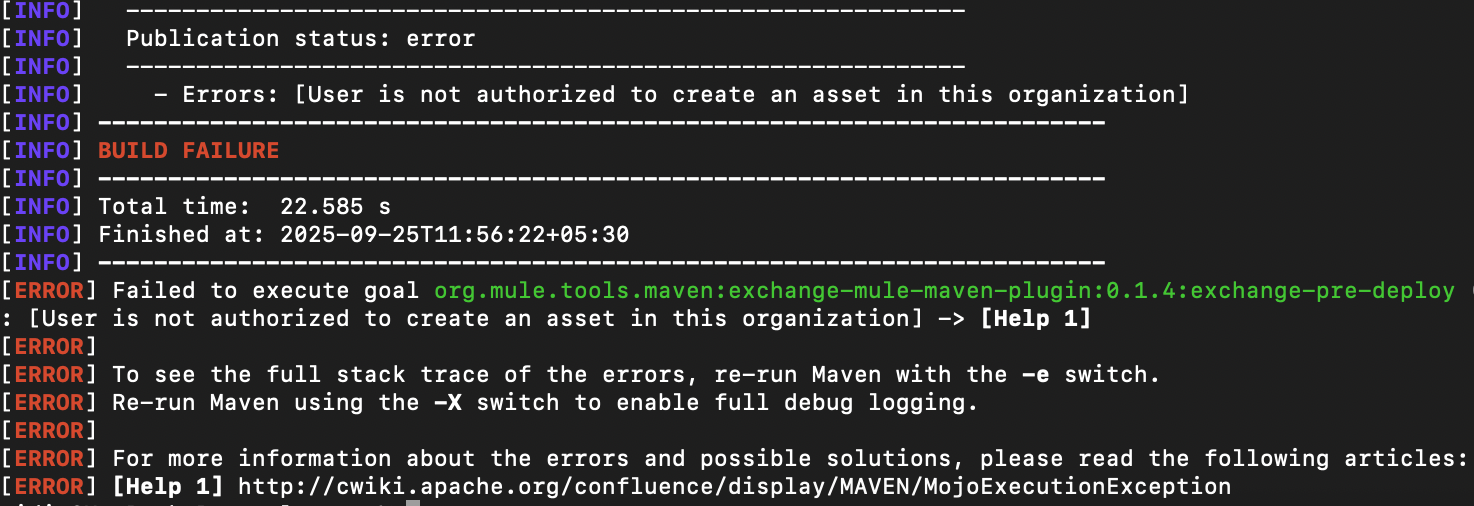
In addition to authentication errors, you might encounter authorization errors due to insufficient access/privileges to perform the required operation. Always ensure that the user/connected app has the correct scopes and access to perform the deployment activities in the business group and environment to which the deployment is targeted.
For example, for CH 2.0 deployments, the artifact must first be published to Exchange, and for this, the connected app should have the Exchange Administrator scope. If the scope is missing, it returns an authorization error.
Here is a snapshot of an error when trying to publish the asset with insufficient access scopes (mvn deploy):
Server not present in settings file
Ensure that the server referred to in the deployment configuration of the POM file exists in the settings file. If it doesn’t exist, the deployment will fail with authentication errors.
Deployment errors
Deployment errors can occur due to issues with the platform, duplicate assets, assets not present in Exchange when deploying to CH 2.0, and other similar problems. Let’s discuss some of the most common scenarios.
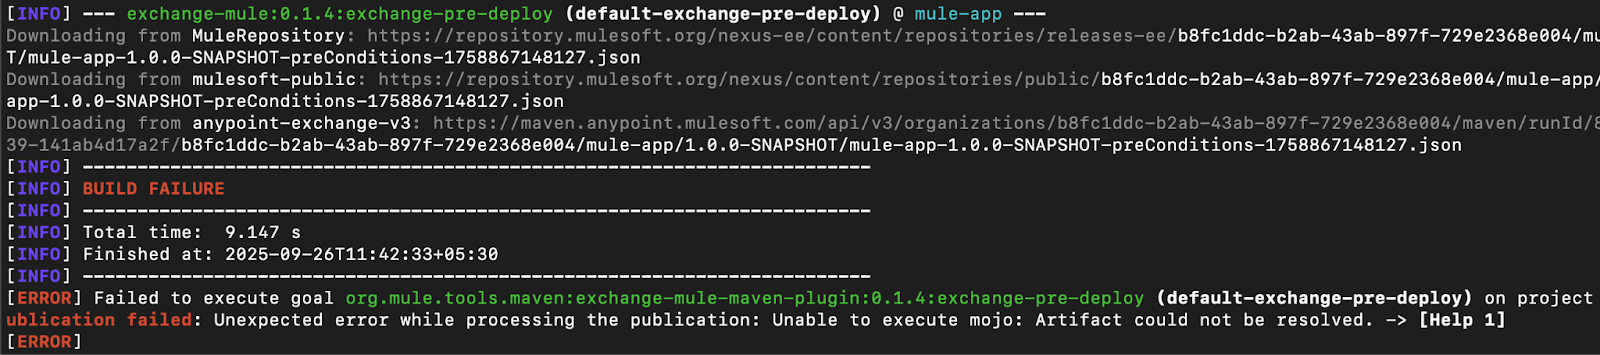
Asset not present in exchange (for CH 2.0 deployments)
CH 2.0 requires the artifact to be present in Exchange before it gets deployed to the runtime. This error can occur when you attempt to deploy an artifact directly to the runtime before it has been published to Exchange. In this scenario, the platform returns a 404 Not Found error because it cannot find the artifact to be deployed in the exchange.
To overcome this, ensure that the artifact is first published to Exchange (using 'mvn deploy') and then deployed to the CH 2.0 runtime (using 'mvn deploy -DmuleDeploy').
Here is a snapshot of an asset not present in the exchange error (mvn deploy -DmuleDeploy):

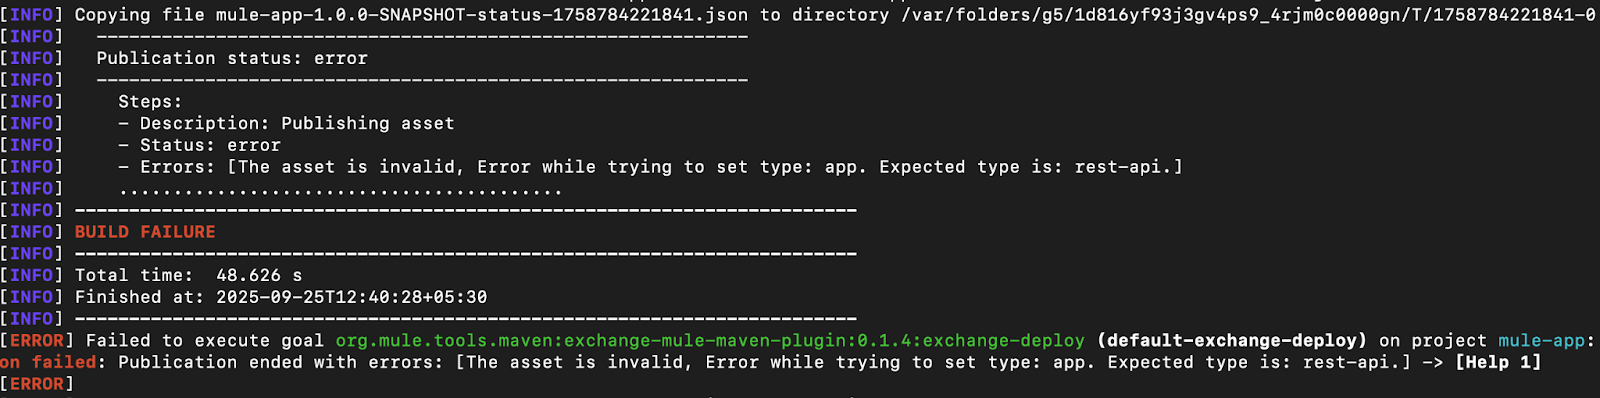
Asset conflict
This error occurs when you attempt to publish an 'app' asset and another asset with the same name but a different type (e.g., 'rest-api') already exists. This is not supported in Exchange and returns a publication error.
To resolve this issue, either remove the existing asset if it is not required or rename one of the assets. Here is a snapshot of a publication error due to asset conflict (mvn deploy):
Using CurieTech AI Agent Single Code Review Lens to troubleshoot publish failure
CurieTech AI Agent Single Code Review Lens can help troubleshoot issues while publishing and deploying apps to Anypoint runtimes. The agent can read the source code from either a GitHub repository or directly upload the application from your machine. Once the codebase is uploaded, you can ask the agent questions about the project.
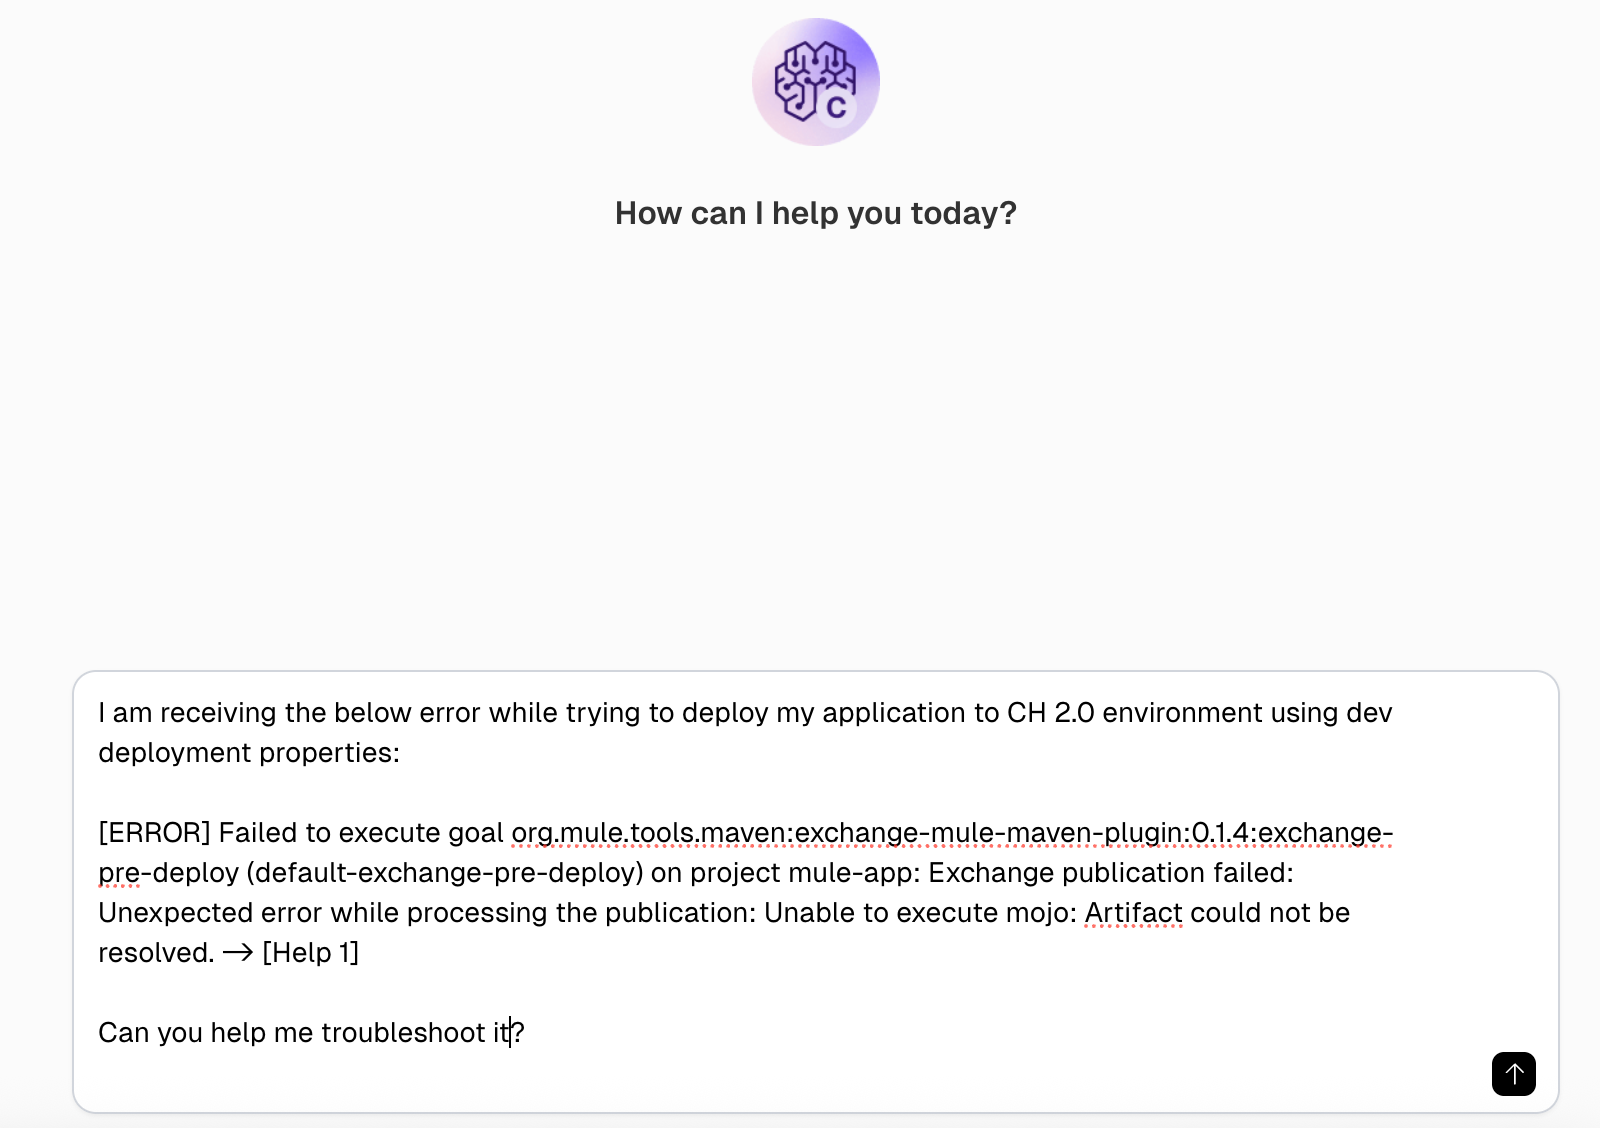
In this example, we attempt to troubleshoot an “Exchange publication failed” error when publishing the Mule application to Exchange.
The prompt in the screenshot below mentions the error and requests suggestions for troubleshooting it.
The agent understands the error in the context of the provided Mule application and offers valuable suggestions to resolve issues, such as adding the missing exchange repository to the project POM, verifying the settings file for server credentials, checking connected app permissions, and ensuring Mule Maven plugin compatibility, among other recommendations.
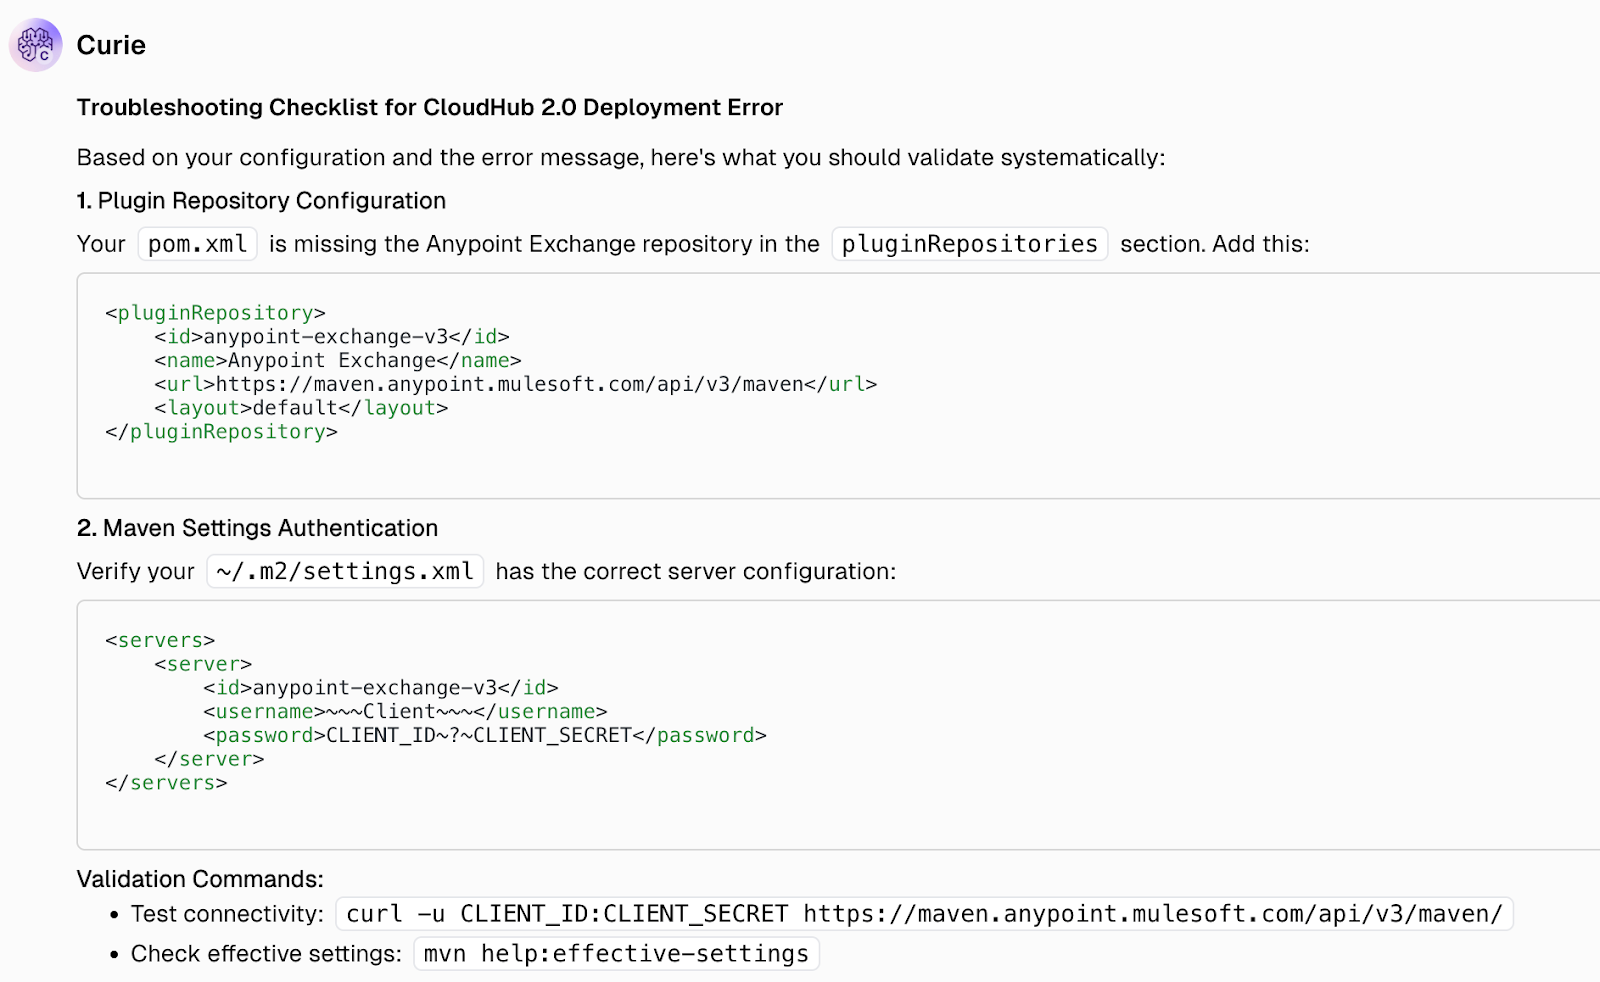
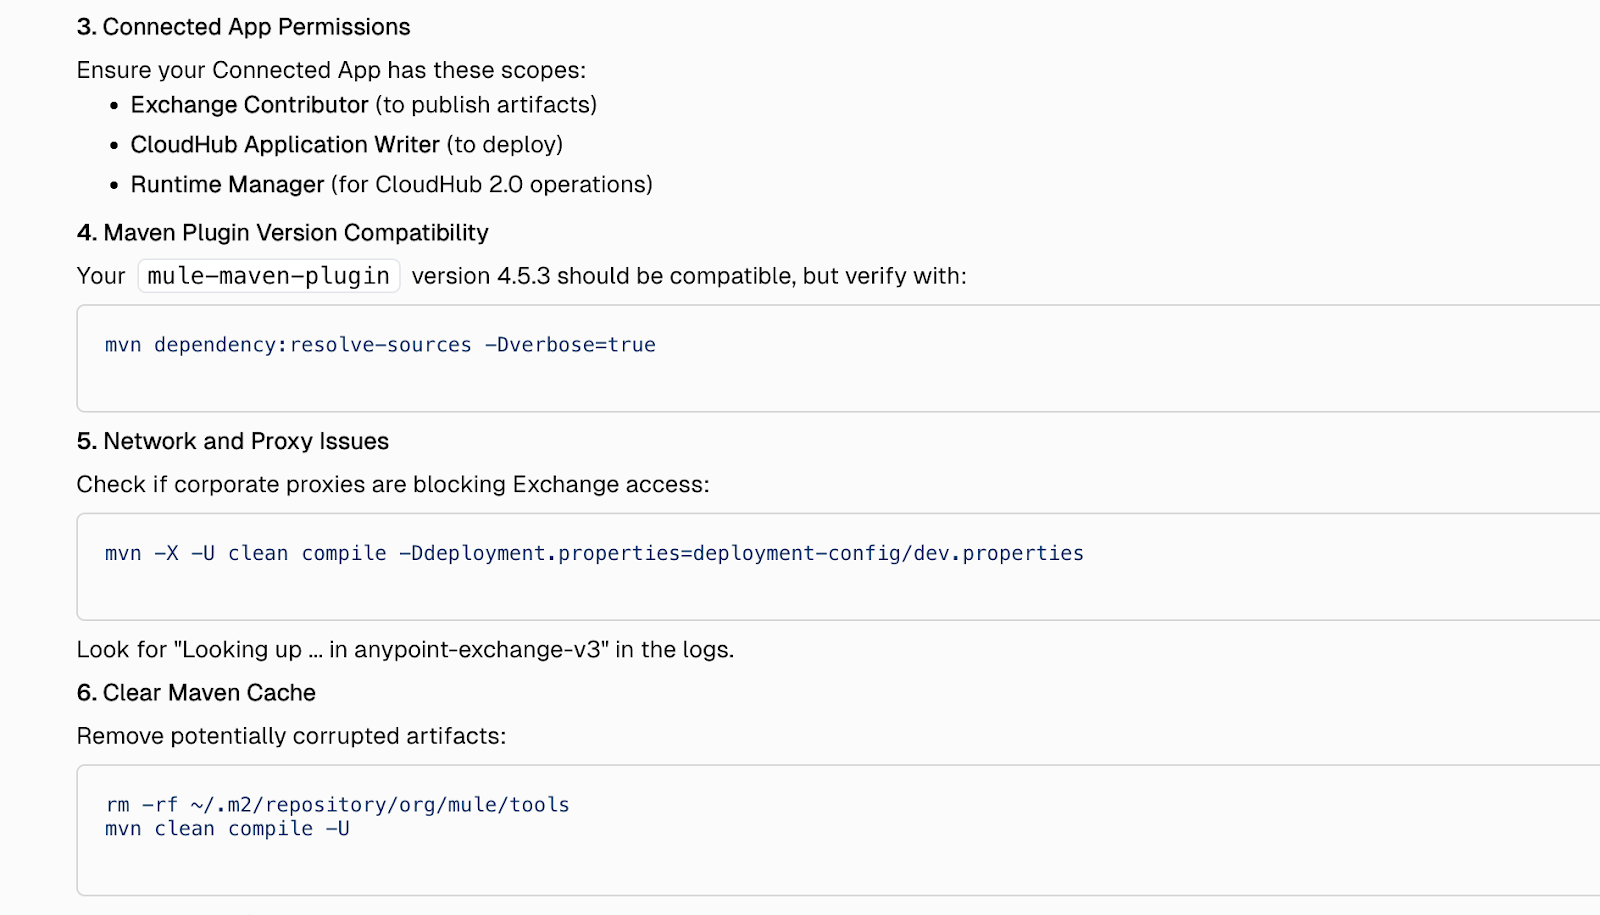
By guiding users through these steps with precise, context-aware insights, the agent not only reduces troubleshooting time but also minimizes deployment failures and configuration errors—ultimately improving developer productivity and ensuring smoother delivery cycles. Moreover, it helps teams maintain consistent project configurations, prevents recurring issues through proactive suggestions, and accelerates overall release timelines by streamlining the debugging and validation process.
Best practices
When building pipelines for automated deployments, it is essential to adhere to best practices to ensure that build logic and configurations remain separate, thereby adding flexibility and enhancing ease of maintenance. Following best practices helps prevent errors, making deployments reliable and consistent.
The following sections highlight the best practices for building deployment pipelines with the Mule Maven plugin.
Use encrypted credentials
Always use encrypted credentials when running builds using the Mule Maven plugin directly or as part of CI/CD pipelines. This ensures that usernames, passwords, and client secrets are never exposed in configuration files.
Using encrypted credentials in a settings file
The Mule Maven plugin supports the use of encrypted credentials in deployments. To encrypt credentials using Maven, follow the steps below:
- To encrypt credentials, you need a master password that will be used to encrypt and decrypt credentials. To create the master password, run the following command (replace $masterPassword with your master password):
mvn --encrypt-master-password $masterPassword

- Once you have the master password, create a new settings-security.xml file and add it, as shown below. This security file stores sensitive information, so it is not stored in the settings file in plain text.
<settingsSecurity>
	<master>{masterPass}</master>
</settingsSecurity>
- Next, encrypt your AnyPoint password using the following command (replace $myAnypointPassword with your AnyPoint password). Maven uses the master password to encrypt the provided value:
mvn --encrypt-password $myAnypointPassword

- After obtaining the encrypted password value, you can replace the plain-text password with the encrypted password in the server configuration settings file.

The Mule Maven plugin will now use encrypted passwords for deployments, keeping secrets safe.
In CI/CD pipelines
When building CI/CD pipelines, all platforms offer a way to securely store and access sensitive information. It is recommended that these properties be loaded at runtime in the pipeline and passed as required.
The implementation for storing sensitive information can differ by platform; for example, Jenkins uses the Credentials plugin, and GitHub Actions stores them under the secrets section with restricted access. Use the recommended solution for the platform to store the secrets securely.
Externalize deployment properties
Externalizing deployment properties and keeping them separate in environment-specific files ensures that deployment configuration can be controlled for each environment. At any point, if the configuration for any environment needs tweaking, this can be done by simply changing the deployment configuration for that environment without affecting the build configuration or the configurations for other environments.
The section “Configuration structure and flow” above discusses a straightforward approach for implementing this within a Mule application.
Avoid bundling the settings file with the project
The settings file often contains sensitive information. To ensure that this information is not exposed to everyone, never distribute the complete settings file in the Mule project. Bundling the settings file within the project exposes security risks and also tightly couples the file with the project, making updates difficult.
Here are some recommended approaches to safeguard the settings file:
- Use a template settings file with placeholders for usernames, passwords, and other relevant information. Developers can use this file locally by replacing the placeholders with their actual credentials.
- In automated pipelines, centralize the settings file in CI/CD and inject it into the build at runtime.
These steps keep credentials safe and make it easier to rotate them without modifying the project repository.
Document the deployment pipeline
Always document deployment pipelines, clearly explaining the flow of the pipeline and each step as well as the versions of plugins used and their compatibility. Here are some points to remember while doing this:
- Document the versions of all images/plugins used in the pipeline, such as Java and Maven, while clearly stating their compatibility with the application’s Mule runtime. This ensures that when the application runtime is updated, it doesn’t break the automated pipelines.
- Document the version increment process and how the versions are incremented before the artifact is deployed to the environment. This ensures that the correct versioning guidelines are followed for each deployed artifact.
- Document how the pipeline's credentials, tokens, and sensitive data are stored and injected securely.
- Document how environments are defined (dev/test/prod), environment variables, Maven profiles, and property files, and how they are added to the project at runtime.
Documenting using CurieTech AI
You can use CurieTech AI to generate faster and more reliable documentation. The agent can save a lot of time and provide a detailed file that documents each step. You can chat with Curie, give the prompt pointers to follow, and ask the AI agent about your task.
This example uses a prompt to generate the CI/CD pipeline documentation while following the abovementioned pointers. Here is a snapshot of the prompt:
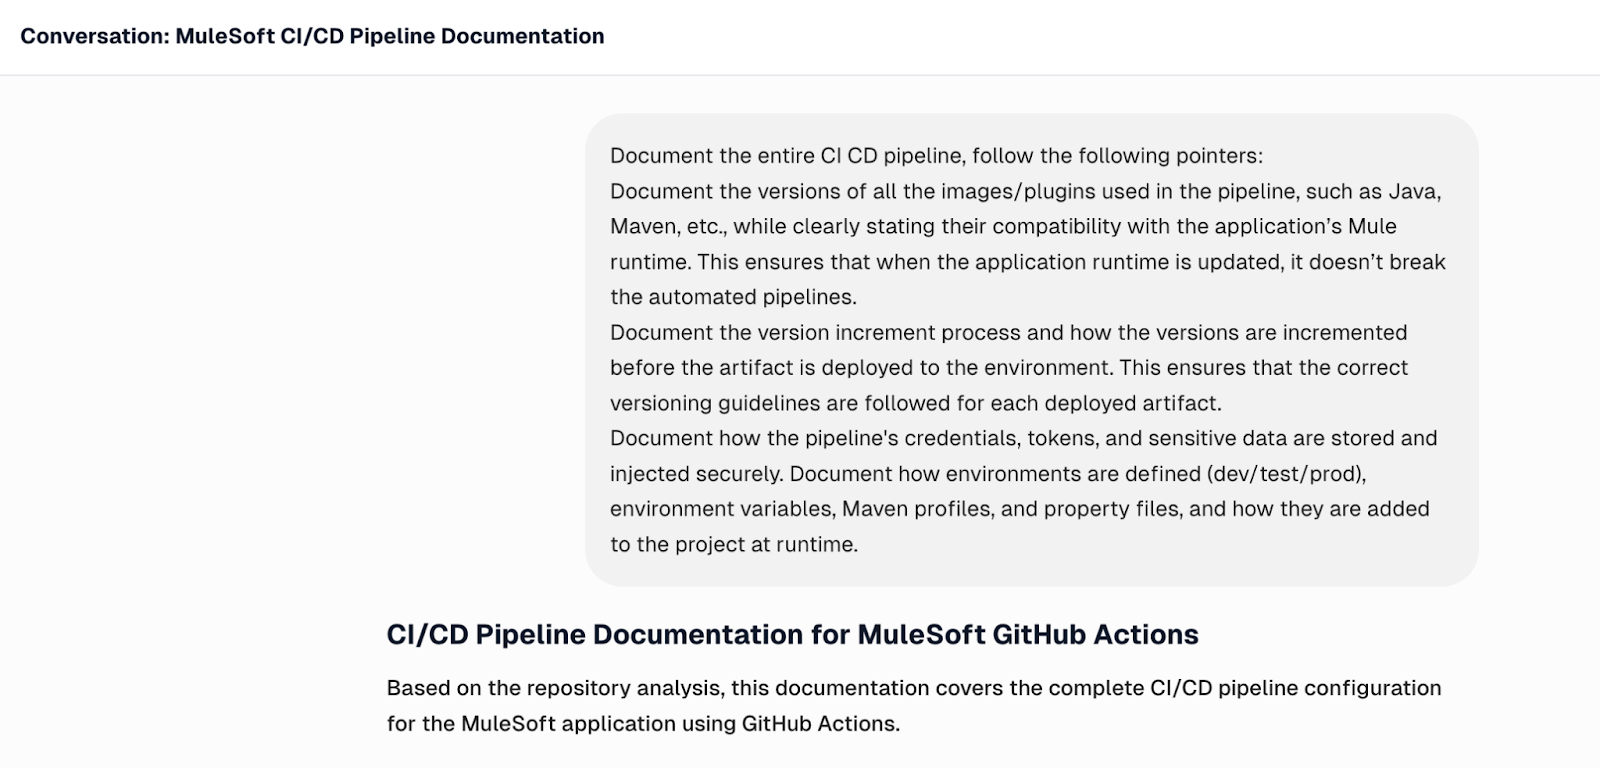
In this example, Curie automatically detects the GitHub Actions pipeline within the uploaded code, analyzes its configuration and workflow, and generates a clear, step-by-step document that explains the pipeline architecture, version management, and deployment process. This not only saves hours of manual effort but also ensures consistency, clarity, and traceability across development teams, helping to maintain high documentation quality while accelerating delivery.
The following section provides an overview of the credential management process, illustrating how Curie securely handles authentication details, access permissions, and secret storage to maintain system integrity and compliance.
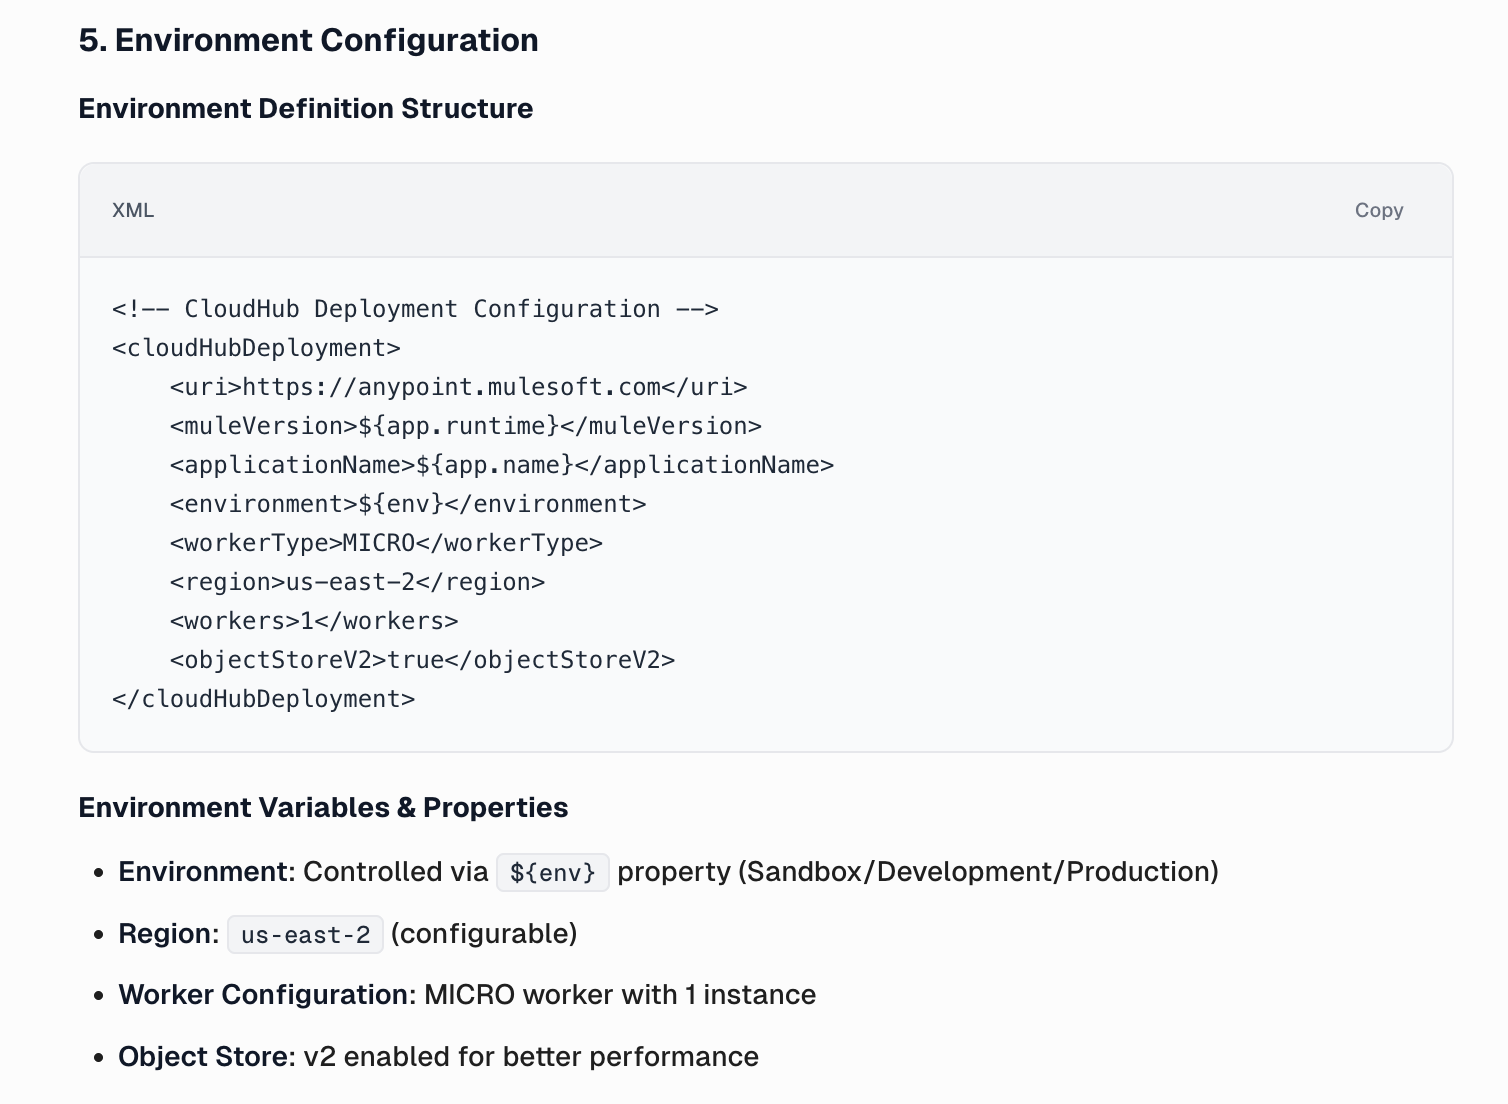
Finally, CurieTech AI generates detailed environment configuration documentation, outlining key variables, dependencies, and runtime settings across environments to ensure consistent and error-free deployments.
{{banner-large-table="/banners"}}
Conclusion
The Mule Maven plugin streamlines the process of building, packaging, and deploying Mule applications by integrating seamlessly with Maven and CI/CD workflows. It enables developers to automate repetitive tasks, maintain consistency across environments, and reduce manual errors. With a clear understanding of its lifecycle goals, configuration setup, and deployment strategies, teams can implement faster, more reliable delivery pipelines.
By following best practices—such as encrypting credentials, externalizing properties, and documenting pipelines—developers can ensure secure, reusable, and maintainable deployments. Combined with CurieTech AI, which accelerates configuration, troubleshooting, and documentation, teams can further enhance productivity and operational efficiency across the entire MuleSoft delivery lifecycle.