
MuleSoft Proxy: Tutorial, Examples & Best Practices
Today, businesses rely on APIs to connect systems, share capabilities, and deliver customer value. However, granting consumers direct access to backend services can introduce security risks, complicate governance, and cause operational problems. To address these challenges, many teams adopt API Proxies, a lightweight mediation layer that enables organizations to enforce policies, improve manageability, and ensure consistency without burdening backend services.
This article dives deep into MuleSoft API proxies and discusses how they can be implemented.
Summary of key concepts related to creating a MuleSoft proxy
What is an API proxy?
An API proxy acts as a bridge between clients and backend services. It receives and intercepts client requests, performs configured governance or policy checks, and then routes them to the appropriate backend service without modifying the request and the underlying API’s functionality. By introducing abstraction to the backend’s specifics, such as its technology stack, deployment location, or implementation details, organizations can apply security measures, traffic controls, and consistent validations, regardless of how the backend services evolve.
How an API Proxy works
An API proxy helps manage, secure, or monitor API traffic without rewriting your backend services. It provides a safe method to enforce governance and apply operational controls while keeping your APIs flexible for future changes.
How an API proxy works
Here is how the flow of an API proxy looks:
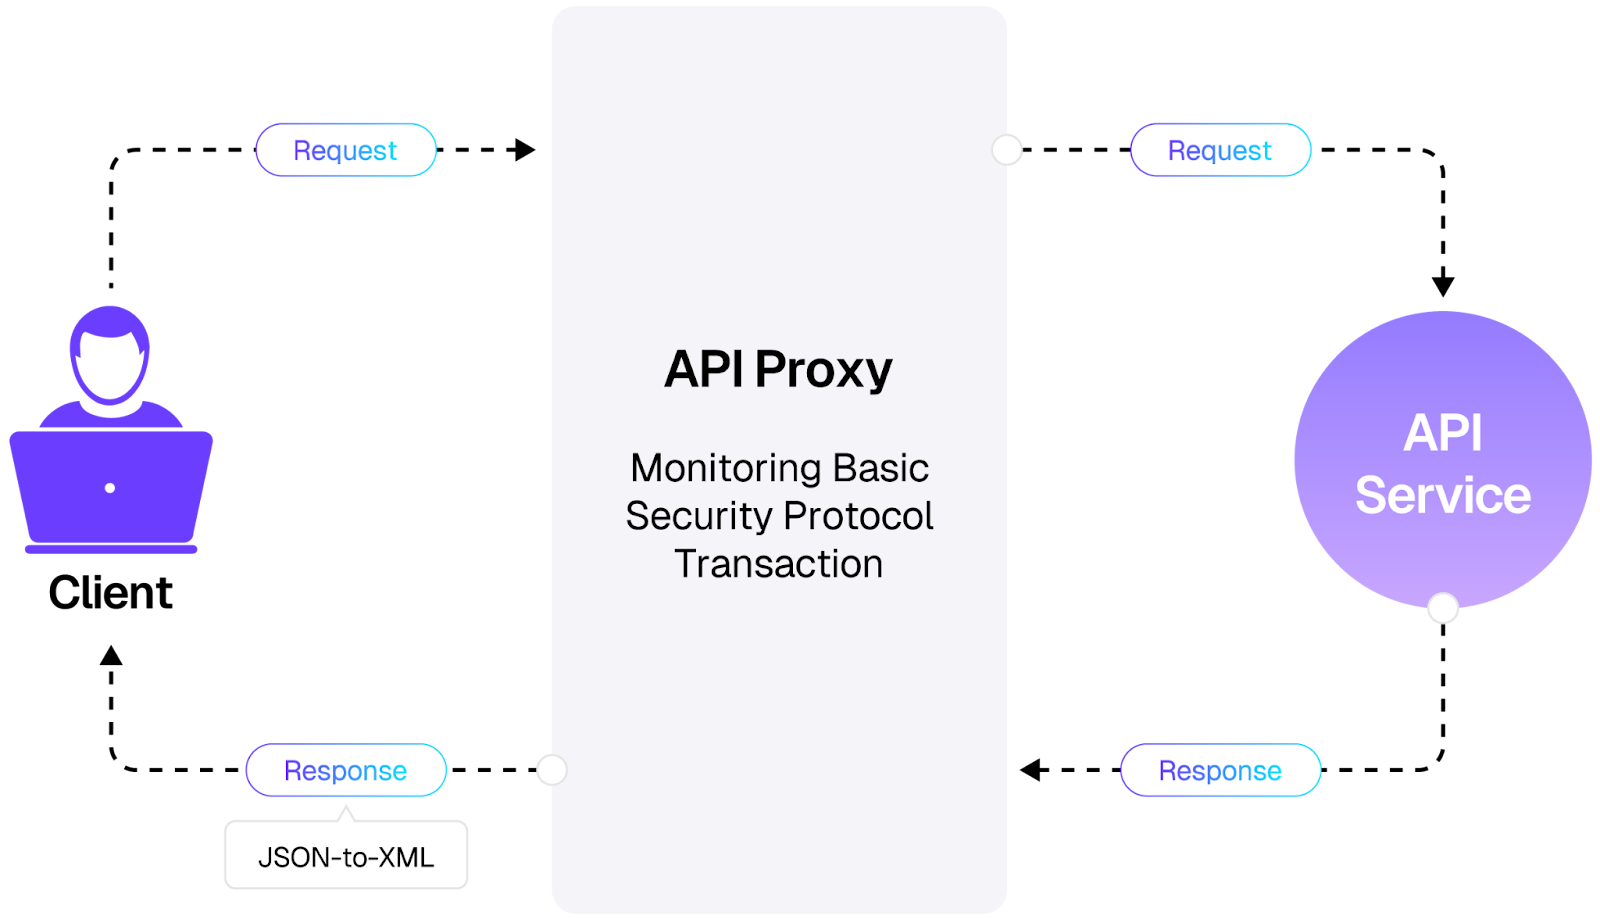
- Client request: A consumer sends an HTTP request to the proxy endpoint.
- Policy enforcement: The proxy applies configured policies, such as verifying credentials, checking IP allow lists, or validating payloads.
- Request forwarding: The proxy sends the validated request to the backend API.
- Response handling: The backend responds, and the proxy may log the transaction, apply response transformations, or standardize error formats before sending it back to the client.
Benefits of using an API proxy and when to use it
Security enforcement
You can add extra security with a proxy without touching the backend code. Rate limits, IP restrictions, OAuth, or JWT checks can all be added or changed in one place. This makes it much easier to react quickly if a new security requirement arises or if you need to block unwanted access.
Traffic management
A proxy allows you to manage how requests get to your backend. You can slow down requests if there’s a sudden increase in traffic. You can also save common responses in a cache for quicker return times. Additionally, you can distribute requests across several servers to keep everything running smoothly.
Centralized governance
Instead of updating each API separately, you can set standard rules from one central location, such as logging, adding headers, applying CORS, or running analytics. That way, everything follows the same standards, and the development team spends less time making changes in multiple places.
Monitoring and analytics
Because all traffic flows through the proxy, it can act as an application to collect performance and usage data. You can see response times, where errors happen, and which APIs get the most calls. This makes troubleshooting problems and planning for growth easier before bottlenecks appear.
When to use an API proxy
Here are some situations where it makes sense to use an API proxy:
- Enforcing policies in one place: Set up authentication, authorization, or rate limits without changing backend code.
- Managing traffic flow: Control request volumes, slow down spikes, and protect backend systems from overload.
- Strengthening security: Mask backend details, block suspicious requests, and monitor threats.
- Handling multiple versions: Serve different API versions to consumers without breaking existing integrations. Switch between the versions seamlessly using proxies.
- Gaining visibility: Monitor usage trends, spot unusual patterns, and gather insights to improve performance.
- Need to swap backends easily: Replace or upgrade backend services without disrupting clients.
{{banner-large-graph="/banners"}}
Setting up MuleSoft Proxy API
Creating a proxy API in MuleSoft is simple by following the steps discussed in this section.
Creating an API spec and publishing to Exchange
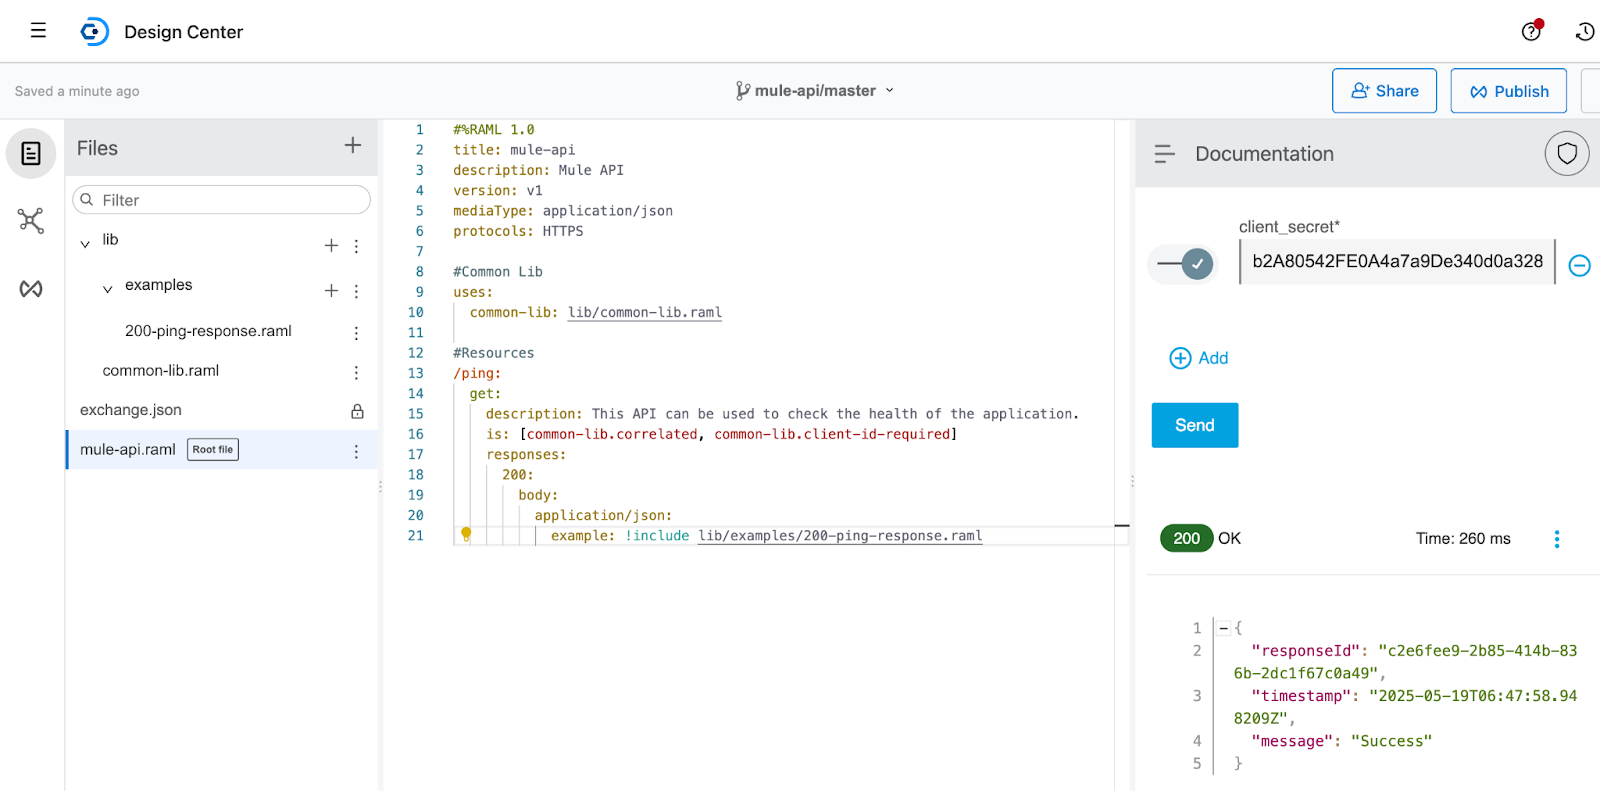
To set up a proxy for a service, it should be discoverable, which can be done by publishing the service to Anypoint Exchange. You can create a simple API specification in the Anypoint Design Center and publish it to the exchange.
This example uses a simple API spec with a /ping endpoint, which returns a successful response when the request succeeds.
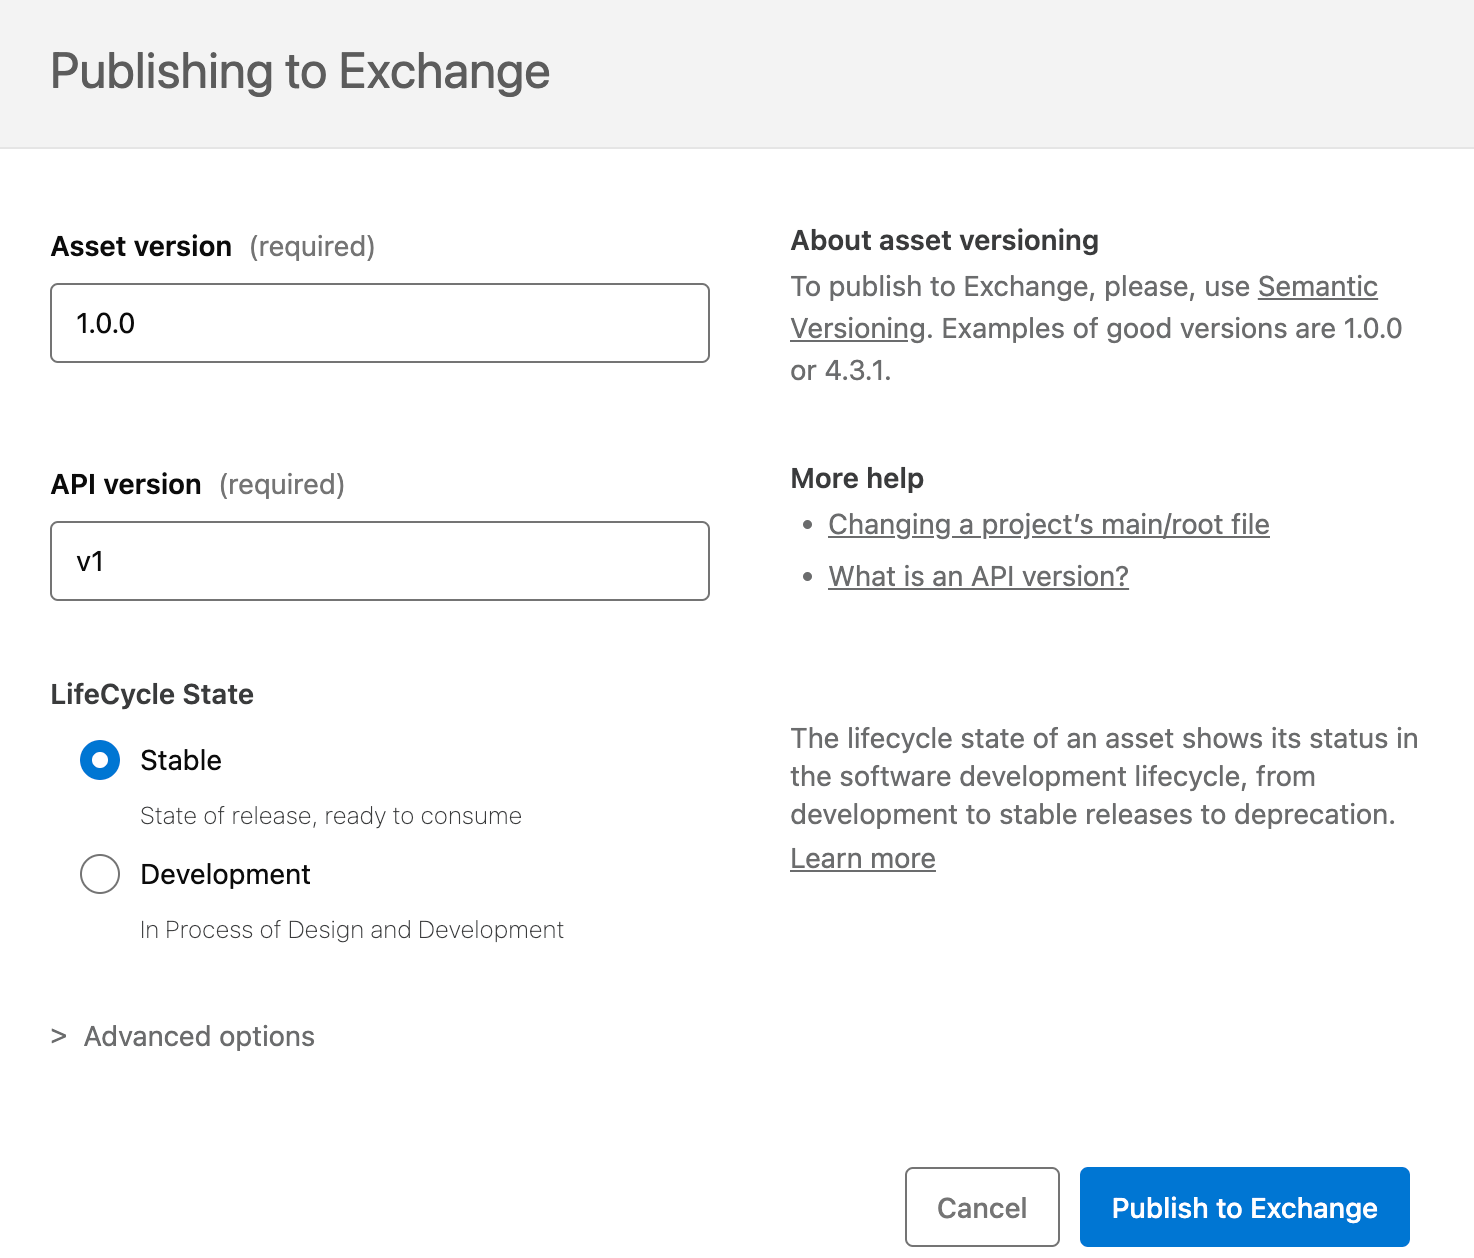
Here’s what it looks like to publish the API to Exchange.
Creating a MuleSoft application for the API
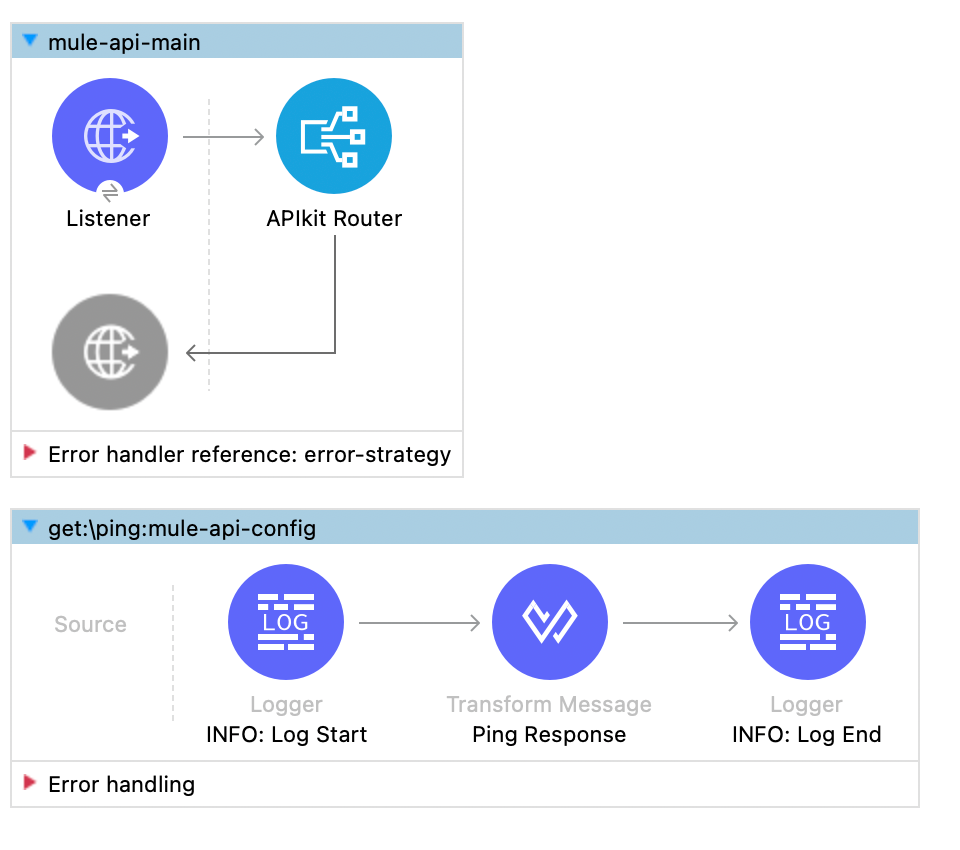
Once the specification is ready and published to Exchange, build a minimal Mule application to host the API specs:
- Import the API specification into the Mule project, either directly through Exchange as a dependency or by downloading the API spec from Design Center and adding it to the project's API folder.
- Create the flow for the /ping endpoint, which returns a successful response when hit. Here is how the example flow looks:
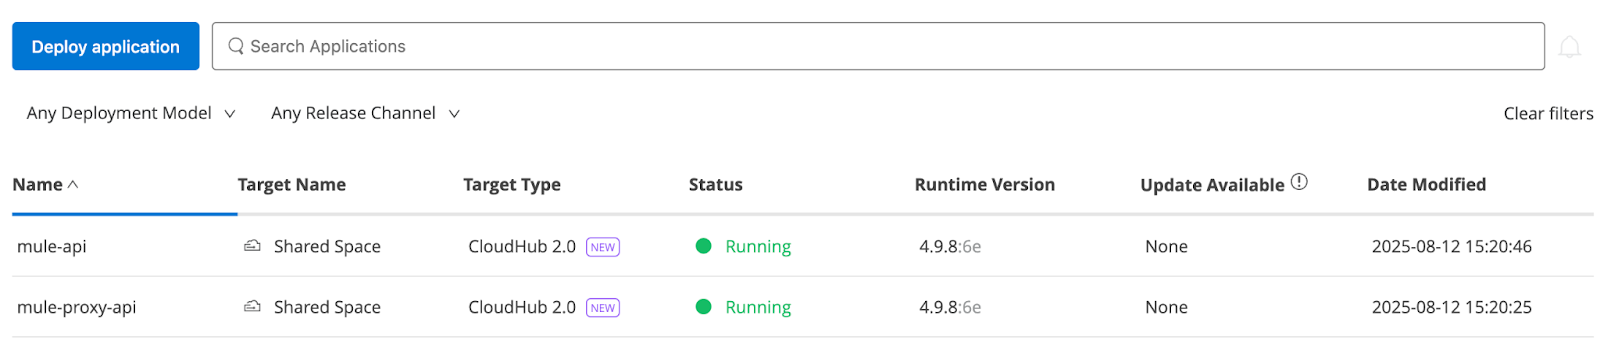
- Deploy the application to Anypoint Runtime:

Now that the application is up and running in the Mule environment, we can use it to serve requests by placing a proxy in front of it.
Configuring the MuleSoft proxy
To configure the MuleSoft proxy, navigate to the API Manager and follow the steps below.
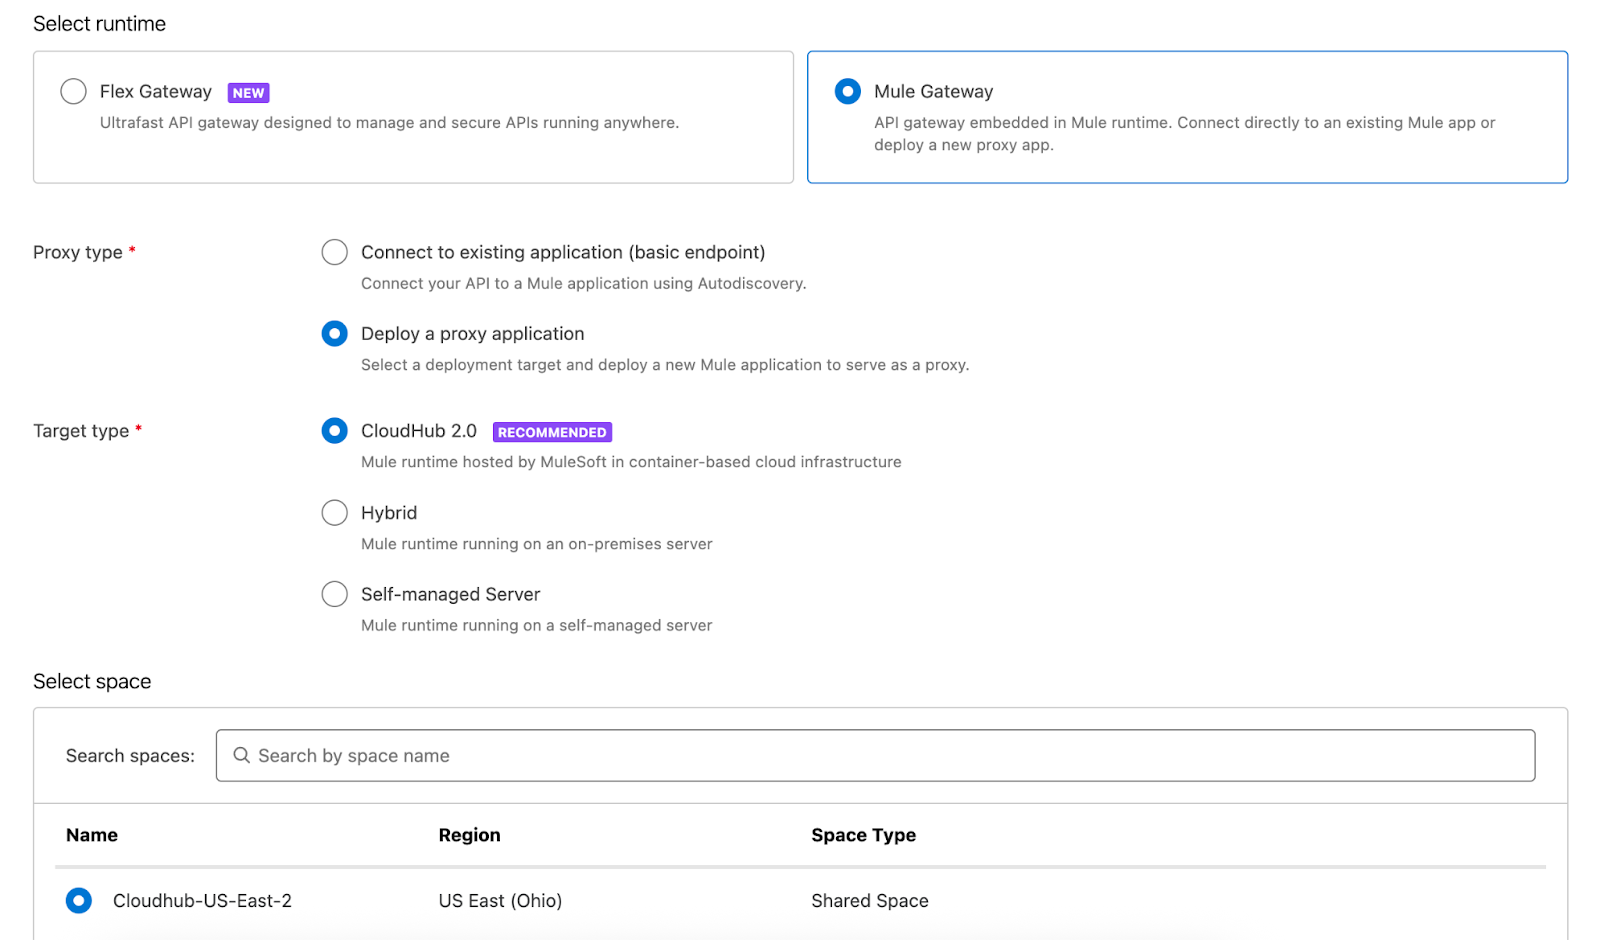
- Select the Add New API option. In this step, configure all runtime-related settings. For the API gateway, Mule Gateway is used to handle API requests through the Mule application.
Since you need to deploy a new proxy application, choose the Deploy proxy option and set the runtime target to CloudHub 2.0.
Note: The runtime target may vary depending on the environment or platform where your Mule applications are deployed.
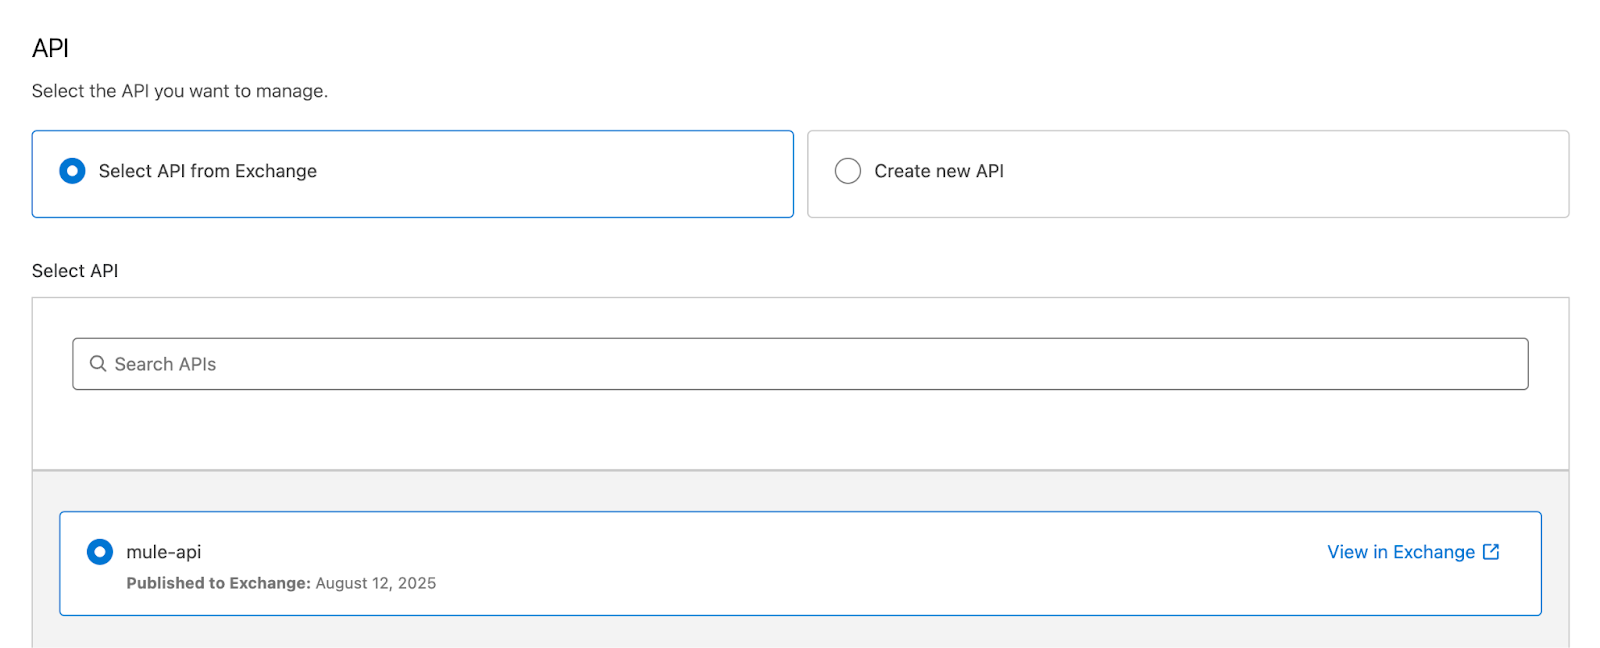
- On the next page, select the API for which the proxy is being added. This example uses the previously published API spec: mule-api.
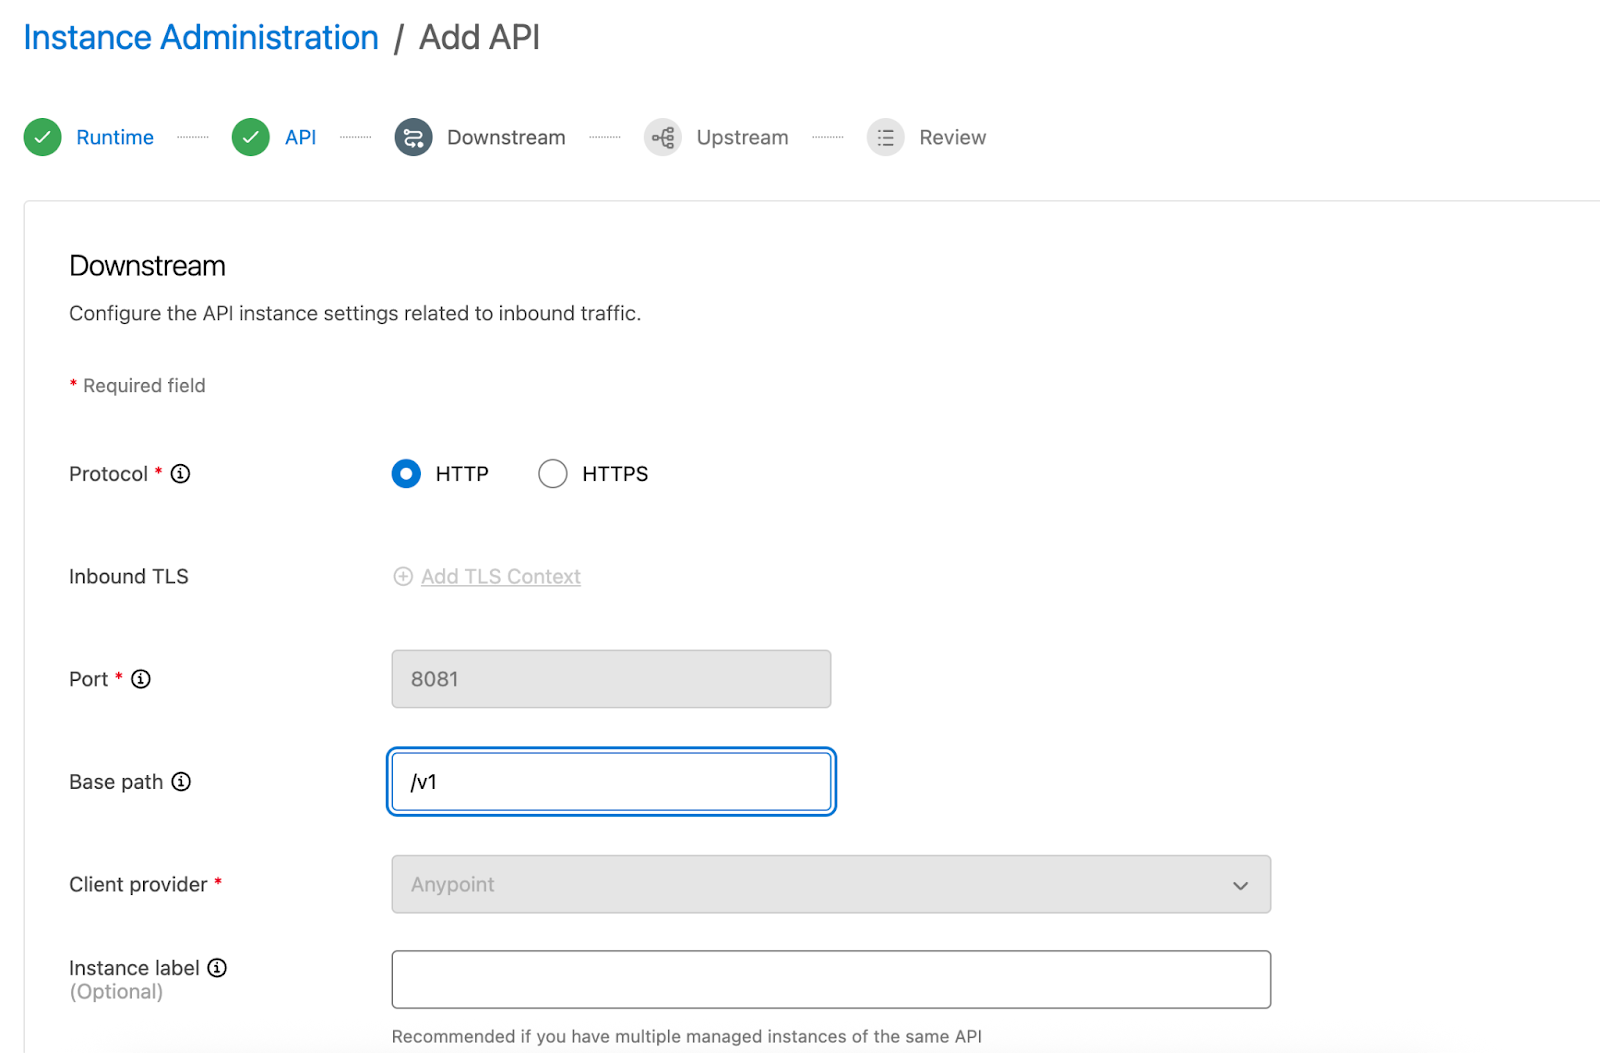
- On the next page, you can configure the downstream API settings that control how the proxy handles inbound traffic. Here, you can choose the protocol, set the proxy base path, and optionally set advanced options such as the proxy version and request timeout. The HTTP protocol is used in this example, with the base path set to /v1.
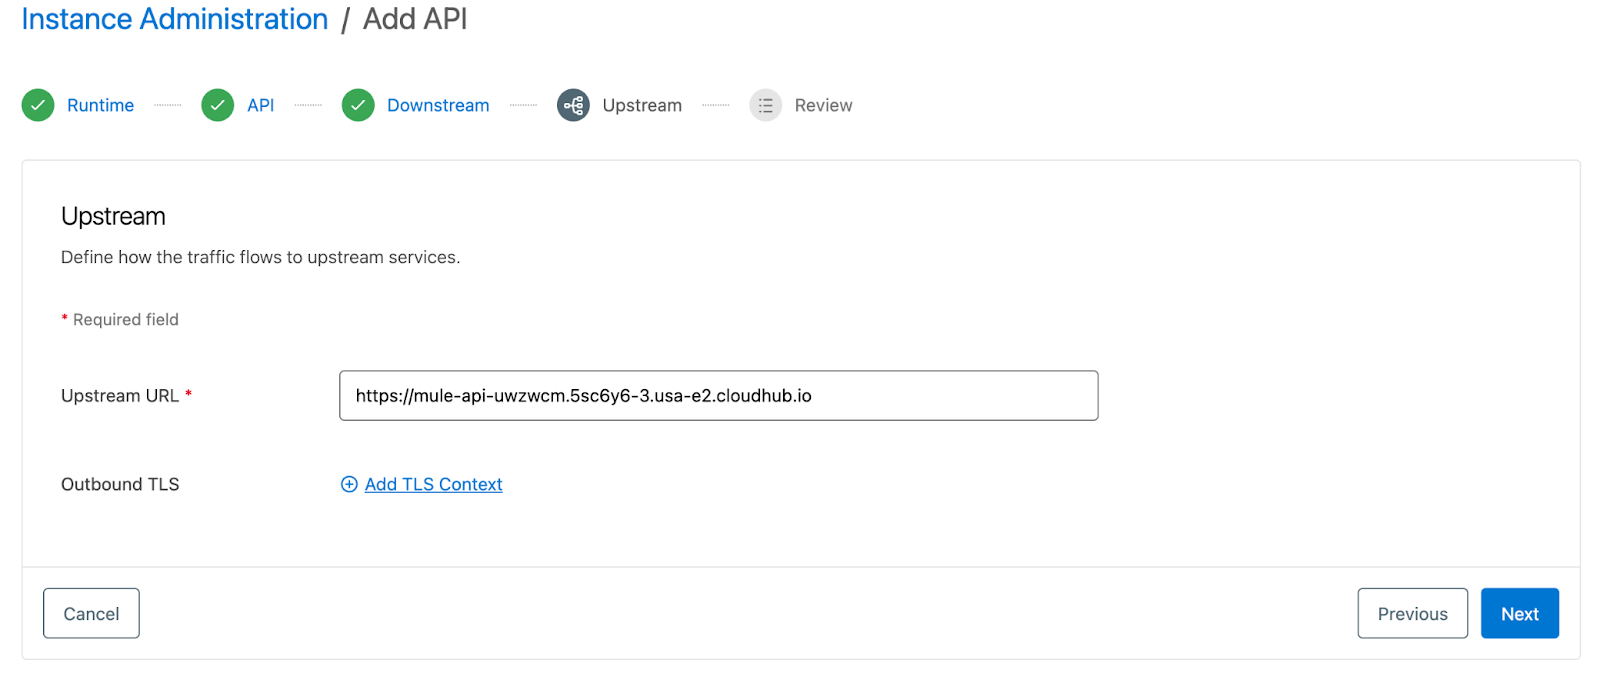
- After clicking Next, configure the upstream service details. In this step, you’ll set the upstream URL to point to the backend service implementation behind the proxy. If secure communication with the backend is required, you can also configure a TLS context.
- Once all the above configurations are done, the proxy settings can be saved and deployed to the Runtime by clicking the Save and Apply option. Anypoint Platform will automatically build the proxy package and deploy this proxy as configured. The platform also automatically takes care of the autodiscovery config.
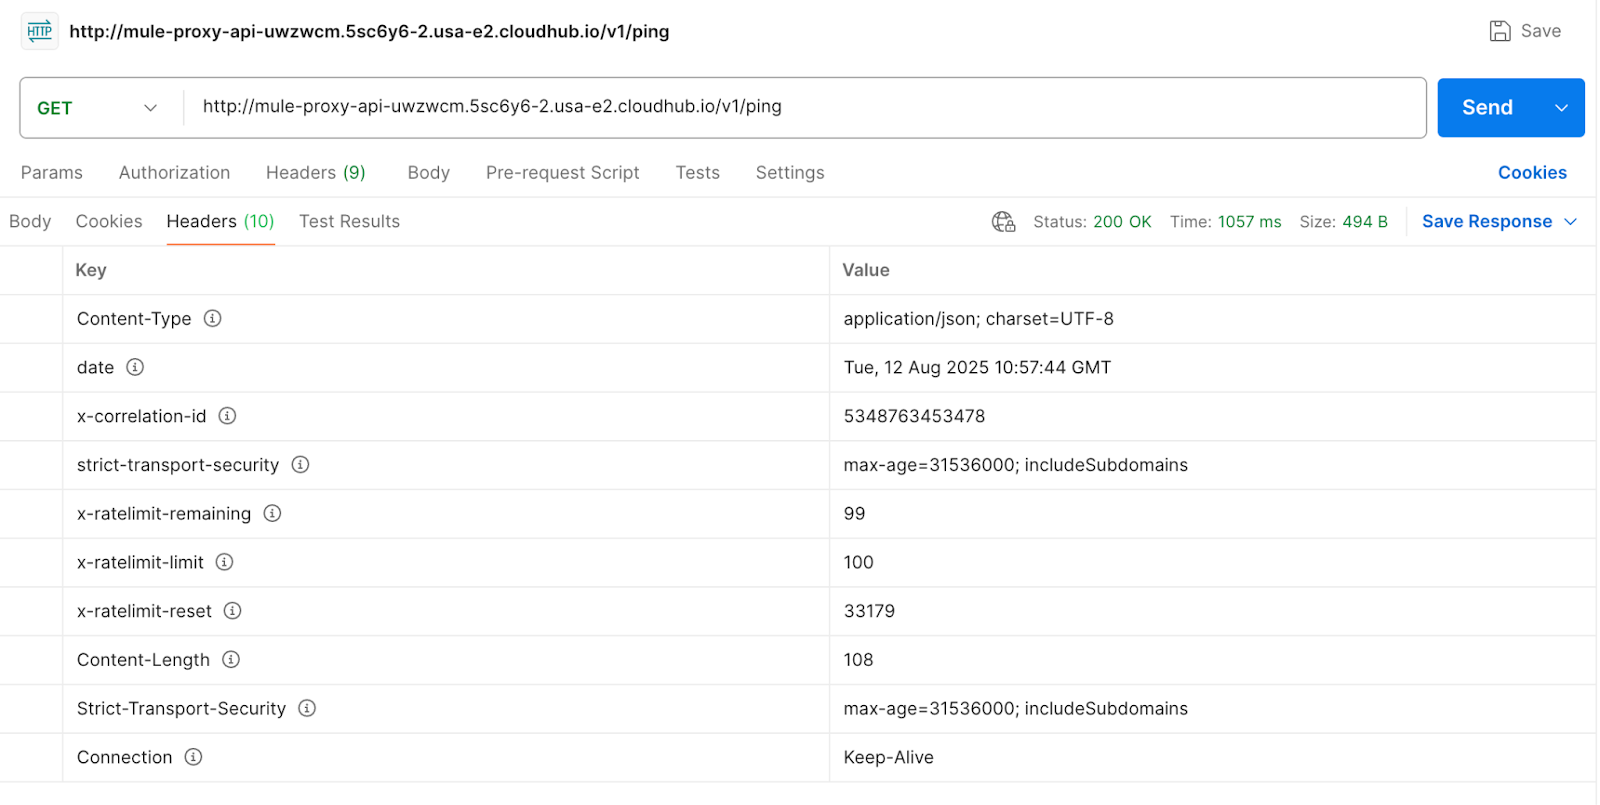
Let's test the new proxy service to see if it works as expected as a layer between the client and the implementation.

The request is made to the proxy application endpoint, which successfully routes it to the implementation and returns the application's response.

Note: In the URL, /v1 is the base path for the proxy, and /ping is the endpoint in the backend service.
Using the CurieTech AI Agent Repository Coder to generate the integration
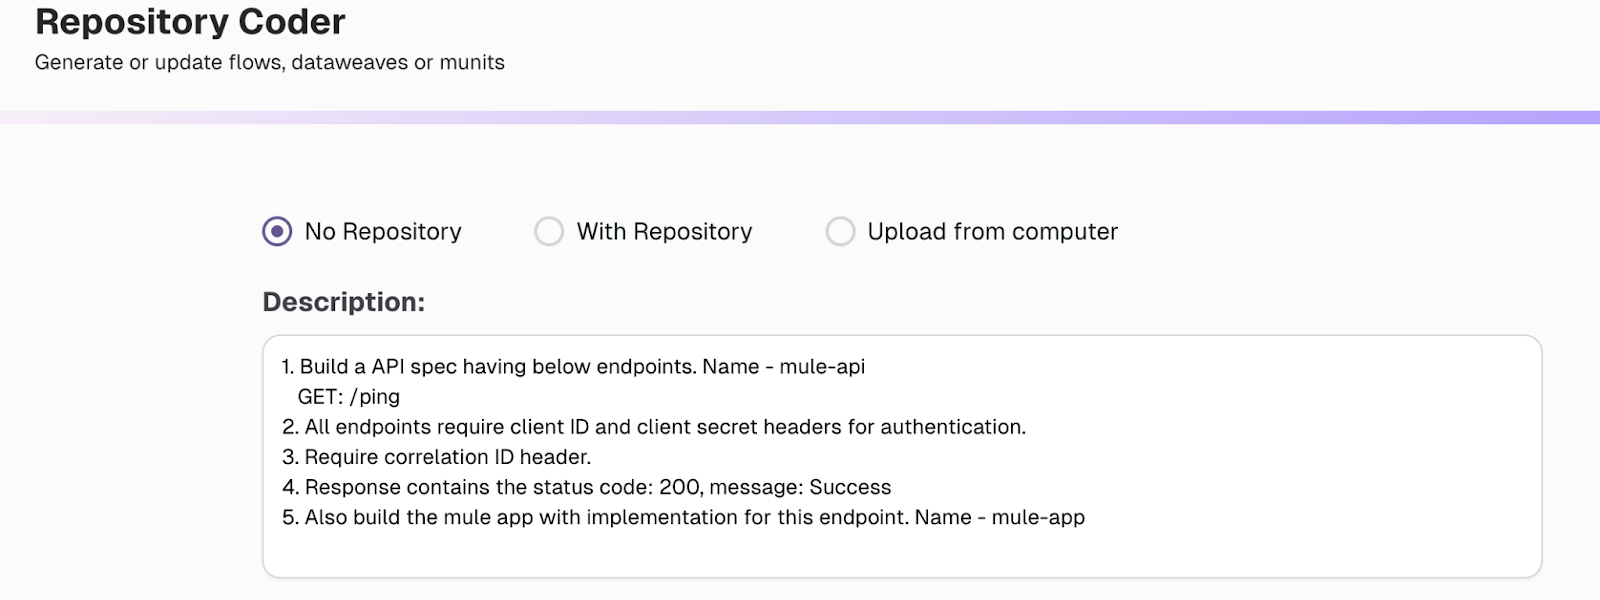
You can also use CurieTech’s AI Agent Repository Coder to accelerate the development and implementation of API specs. CurieTech AI is a specialized AI platform built and optimized for MuleSoft, offering AI agents that help you code, test, and document entire workflows. CurieTech offers specialized AI tools to help you create integrations with ease using simple natural language prompts.
Let's explore an example of generating the spec for our API and implementing it using CurieTech’s AI Agent Repository Coder.
From the CurieTech homepage, select the Coder agent under the Code tab to generate the API Spec.

Alternatively, you can use CurieTech’s new Anypoint Studio plugin, which directly integrates into your development environment.

This example utilizes a straightforward prompt that outlines the requirements in the API specification and implementation.
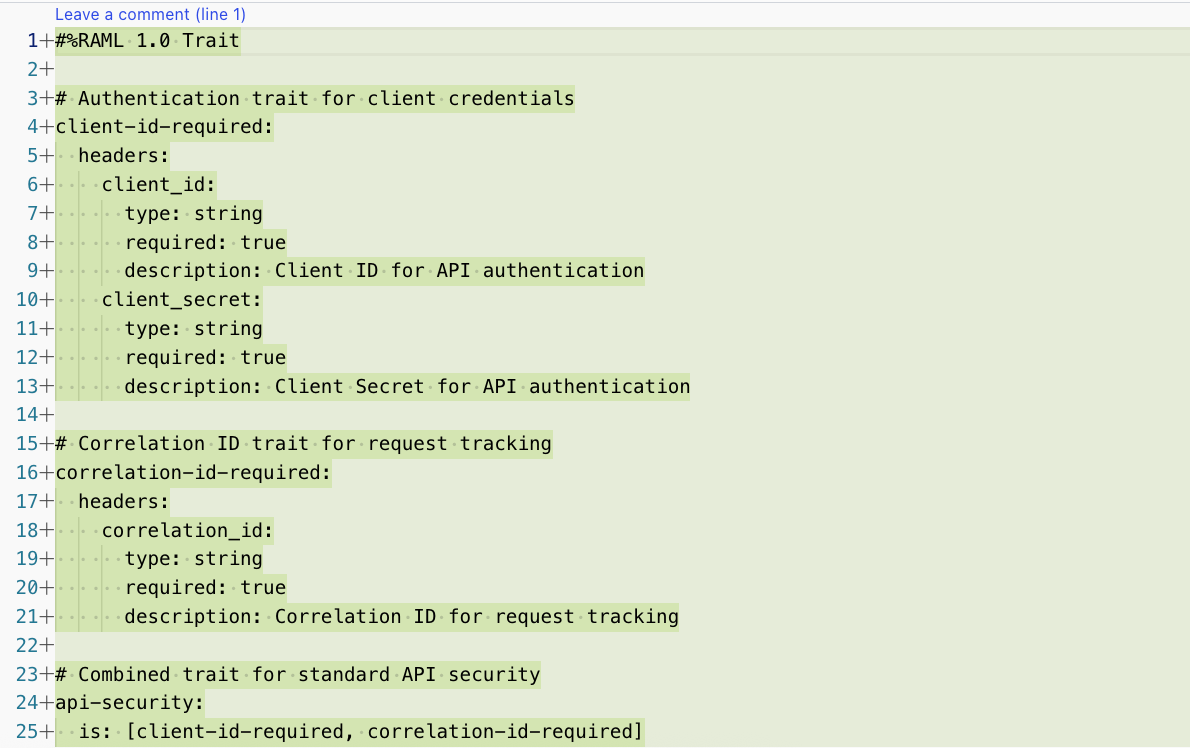
The agent understands the request and generates the API specification and implementation code in accordance with standard practices. You also have the option to provide feedback to update the code based on review comments.
Here is the snapshot of the traits and API spec generated by the agent.

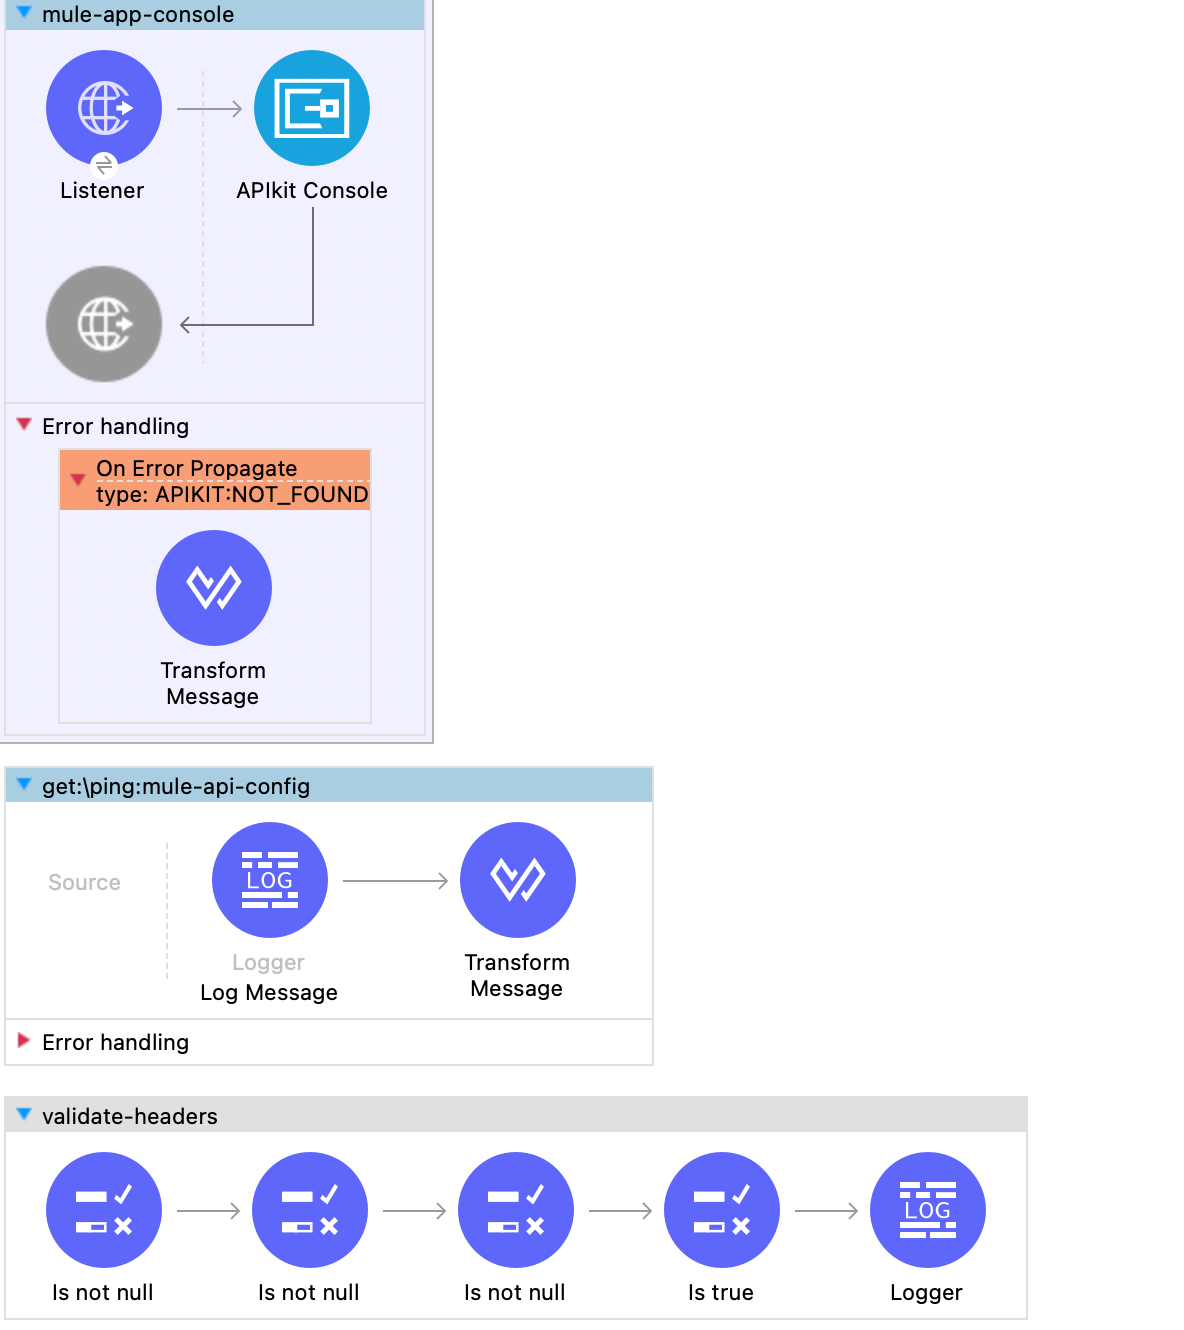
Here is the snapshot of the generated API flow.

Here are the API flows when imported into Anypoint Studio.
Using CurieTech AI Agent Single Code Review Lens
CurieTech AI Agent Single Code Review Lens can be used to generate the proxy based on the API spec created previously and to walk through the steps for deploying a proxy to Anypoint Platform. This makes creating a proxy with simple prompts easier and saves essential time typically spent manually developing API proxies.
Select the Single Code Repo Lens AI Agent under the Coding Insights Section to use the AI Agent. Select a repository or provide the Mule application containing the API spec that will be used as the base for the prompts. The step below uses the existing implementation code and asks the CurieTech AI Agent Single Code Review Lens to build a new MuleSoft API proxy using the API spec in the provided code and a step-by-step guide for setting up an API proxy in the Anypoint Platform.
Here is the snapshot of the output from the agent with the new API proxy files.

The agent generated a step-by-step guide to configure the proxy on Anypoint Platform.

{{banner-large="/banners"}}
Applying API Policies with MuleSoft Proxy
Once the proxy is up and running, you can apply MuleSoft’s built-in or custom policies. This ensures that only approved and filtered requests are forwarded to the backend service, keeping the application safe at the gateway. You can also decide exactly who gets access and set rate limits, so no single client can unfairly use the service. It’s a simple way to keep things secure, ensure everyone plays fair, and adjust quickly when new requirements arise.
This section focuses on applying policies like Client ID enforcement, rate limiting, and IP Allowlist to the proxy application.
Applying policies to an API proxy is similar to using those for a MuleSoft application:
- Navigate to API under API Manager and select the Policies option. Here, you can select all the required policies for the API.
- As part of this example, three policies are applied. Client ID Enforcement ensures unauthenticated access is not allowed to the API, Rate Limiting to ensure controlled API usage and maintain the application load, and an IP Allowlist, which allows only a predefined set of IPs to control access to the API.

- Once all the policies are applied, we can test each. When using the wrong credentials, the gateway returns a 401 Unauthorized response with an invalid client.
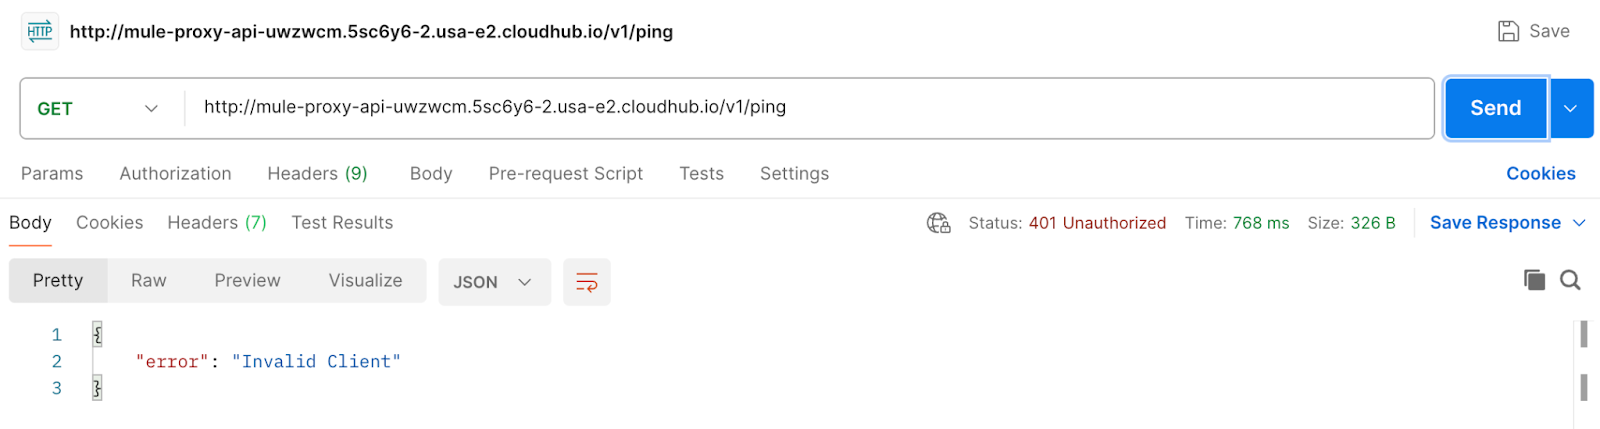

All these policies are applied at the proxy level, protecting the underlying resource from unwanted strain and strengthening security.
Error handling and response customization
MuleSoft proxies can also be used to handle common errors and standardize error responses across an organization. Instead of all services returning their mix of messages, formats, or codes, you can standardize those responses in the proxy to make the error format consistent. This can be done without adopting the standard error format across all backend services, saving time, development effort, and confusion.
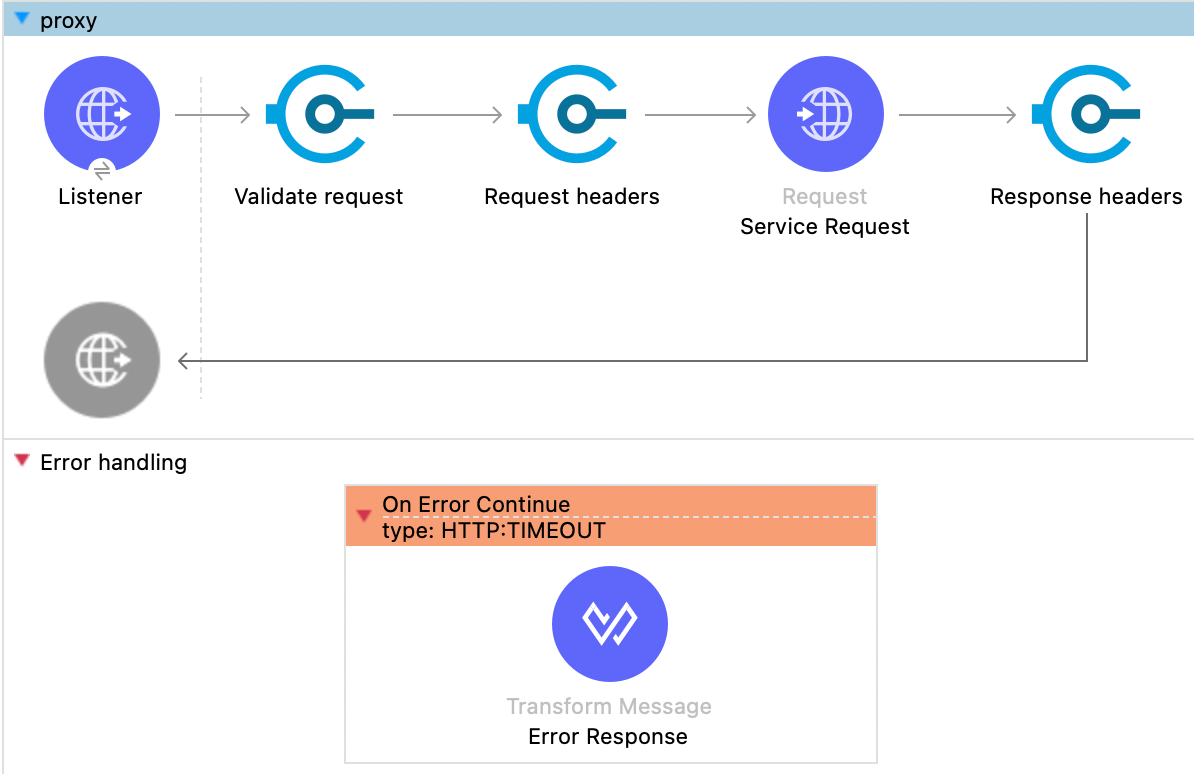
Error handling with MuleSoft proxy
When you deploy a MuleSoft proxy in front of your API, it becomes the first line of defense against problems like authentication failures, invalid requests, or unexpected backend errors. Instead of letting raw error messages flow back to the client, you can handle them in the proxy—making them more helpful, safer, and easier to understand.
Your backend order service can sometimes take too long to respond during peak load. Without a proxy, the client would see a low-level 504 Gateway Timeout or no message. This scenario can be handled in the proxy as follows:
- The proxy receives the request.
- The proxy calls the backend API using an HTTP Request connector.
- If the backend doesn’t respond within the set timeout, the proxy catches the error in an On Error Propagate block and returns a proper response
Here is the code snippet for catching an HTTP Timeout error in the proxy:
<on-error-propagate type="HTTP:TIMEOUT">
	<set-payload>
    	<![CDATA[
        {
			code: error.errorMessage.attributes.statusCode,
			error: 'HTTP:TIMEOUT',
			message: error.description
		}
        ]]>
    </set-payload>
</on-error-propagate>
Snapshot of the updated flow:
Standardizing error responses using MuleSoft Proxy
By default, a MuleSoft proxy acts as a link between the client and the backend service without modifying the request and response to the backend service. All success and failure responses are passed back to the consumer, with the proxy response code validator treating all codes from 0 to 599 as valid response codes.
Let's take an example where a backend service returns the following error response:
{
  "timestamp": "2025-08-13T09:15:22Z",
  "status": 404,
  "error": "Not Found",
  "message": "Item ID 54321 not found in database",
  "path": "/inventory/54321"
}
To standardize this error response, you can modify the proxy flow as follows:
- Add a choice router after the backend service request to check if the status code is an error response code.
- Transform the error response to a standard format.
%dw 2.0
output application/json
---
{
  status: 404,
  timestamp: payload.timestamp,
  error: "RESOURCE_NOT_FOUND",
  message: "The requested item could not be found."
}
Here is the updated proxy flow snapshot to standardize error responses ranging from 400 to 599 status codes.

The exact format can be extended to all types of errors from the backend services, maintaining a standardized error format for all services. This keeps the backend details private, standardizes all responses, and allows teams to update the error formats without touching the backend code.
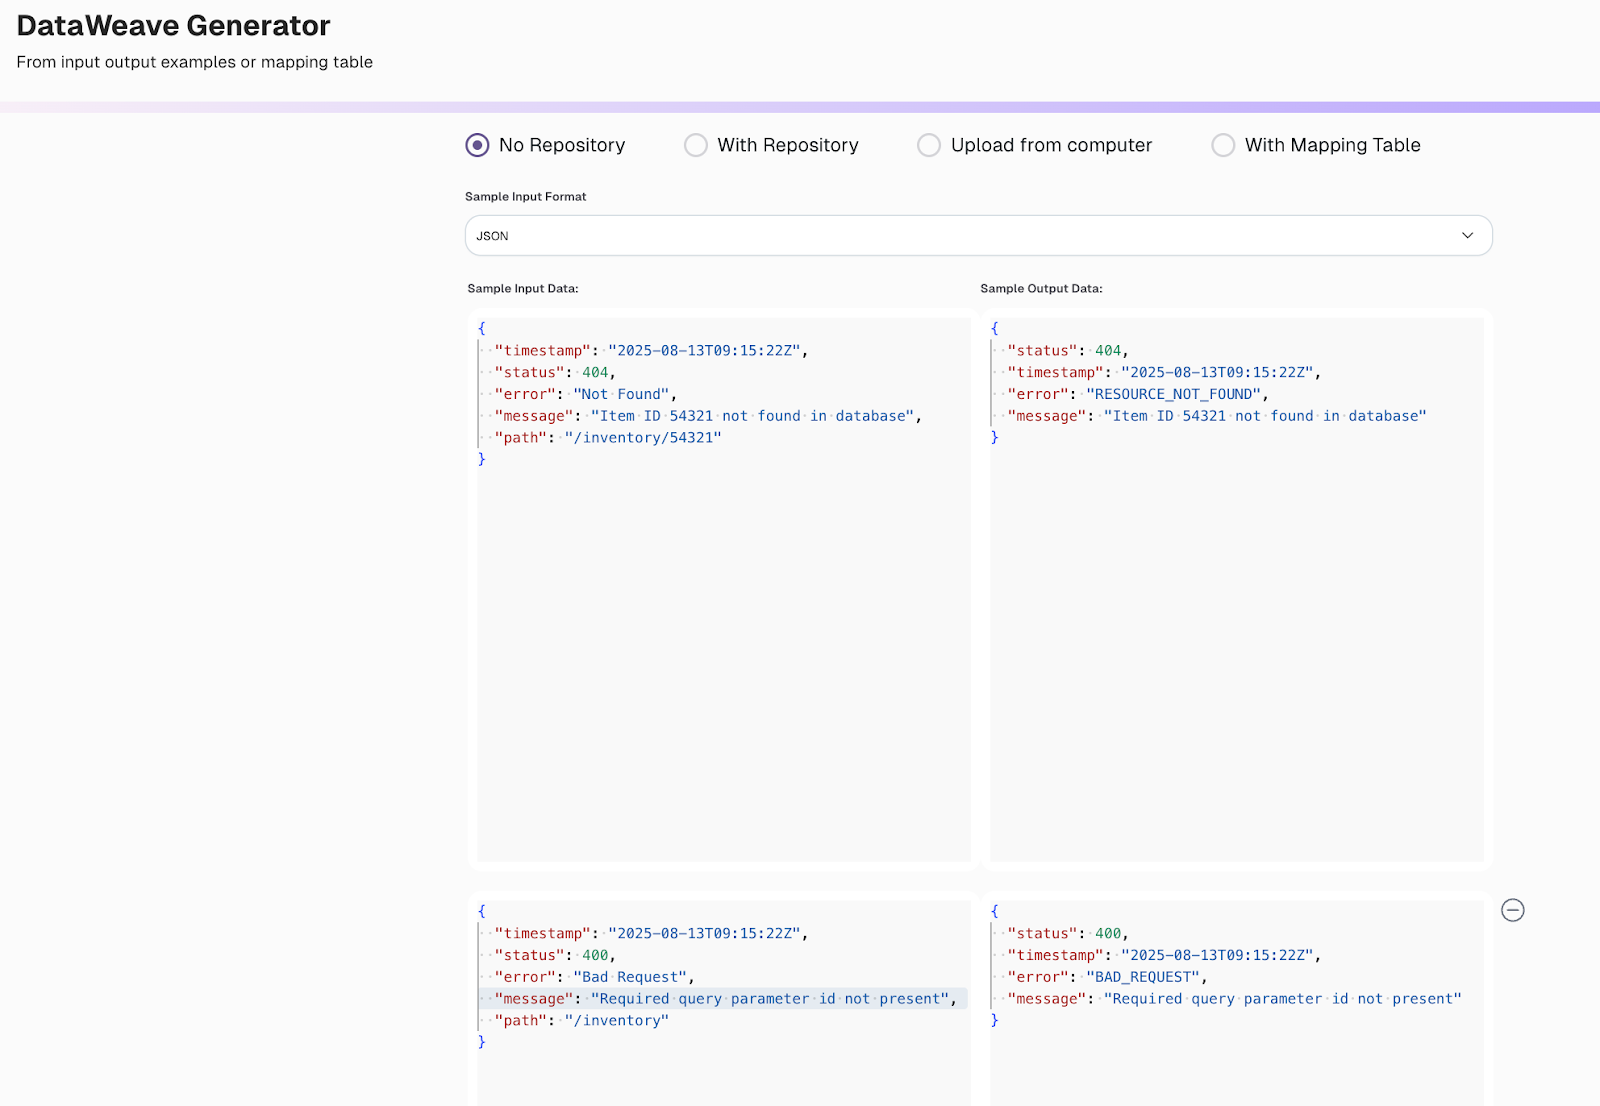
Using CurieTech AI Agent DataWeave Generator to standardize error responses
We can use the CurieTech AI Agent DataWeave generator to standardize the error responses from the backend service. This example uses the existing responses from downstream services and a prompt to generate a DataWeave script for standardizing responses. The script checks for an error response and updates the format as expected.
Select the Dataweave Generator agent from the homepage options under the Code tab.

You can also use CurieTech’s Anypoint Studio plugin directly with the Mule application to standardize the error response.

Here is the initial prompt, along with sample input and output responses, for the DataWeave Generator tool on the web.
The agent generated a Dataweave script accordingly:

Here is the generated script for standardizing responses.
%dw 2.0
output application/json
---
{
 // Rule: The status field is directly mapped from the input status field.
 status: payload.status,
 // Rule: The timestamp field is directly mapped from the input timestamp field.
 timestamp: payload.timestamp,
 // Rule: The error field is conditionally mapped based on the status field.
 // If status is 404, map to RESOURCE_NOT_FOUND.
 // If status is 400, map to BAD_REQUEST.
 // Otherwise, use the original error from the payload to ensure scalability for unmapped status codes.
 error: payload.status match {
   case 404 -> "RESOURCE_NOT_FOUND"
   case 400 -> "BAD_REQUEST"
   else -> payload.error
 },
 // Rule: The message field is directly mapped from the input message field.
 message: payload.message
}
Best practices
When developing a MuleSoft proxy, following and maintaining best practices makes it easier to scale applications as they grow. Here are some of the best practices to follow while developing proxy applications.
Take a design-first approach
While building design specifications, always clearly state the API definitions, security schemes, and endpoint request/response schemas in a clear and reusable format using RAML. This ensures everyone is aligned and understands the API contracts before development starts.
Enforce security policies
Once the API is in Exchange, contracts, authorization, and basic protective policies will be applied. This can be done as soon as the API and proxy are available; don’t wait for the backend service to set up security. The earlier the security policies are applied, the less likely it is to expose sensitive data or leave open access points to the service.
Set up continuous monitoring
Use Anypoint Monitoring to monitor performance metrics, error rates, and usage patterns. Set up alerts and monitoring dashboards to spot and resolve issues early, reducing user impact.
Use version management
When managing multiple versions of an API, keep the proxy version aligned with the backend API version. Whenever the backend changes, update the proxy settings to match. This prevents contract mismatches and avoids unexpected request or response problems.
Document everything
When creating proxies and applications, always document the complete process, including functional and non-functional requirements. Use Anypoint’s documentation generator to keep API specs, proxy settings, and applied policies current. Clear, current documentation makes onboarding easier and ensures smooth handovers between teams.
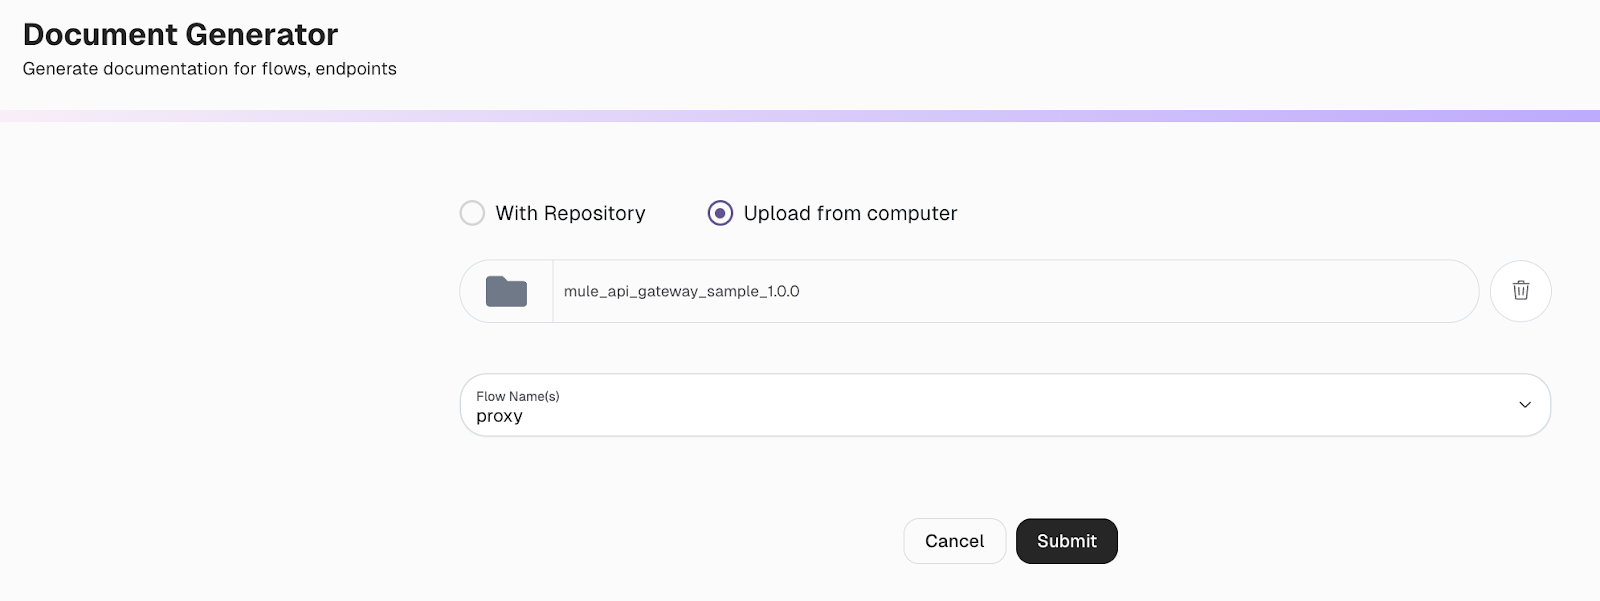
Using the CurieTech AI Agent Document Generator to generate documentation
With AI agents such as CurieTech AI Agent Document Generator, it has become extremely easy to automatically generate documentation for the provided flows. Let's run through an example that generates documentation for the proxy developed in this article.
Select the Document Generator agent from the homepage options under the Document tab.

To directly generate the documentation using CurieTech’s Anypoint Studio plugin, simply ask CurieTech AI to generate the documentation for the specified flow.

If using it on the web, upload the API proxy code for the agent to analyze and generate end-to-end documentation for the selected flows.
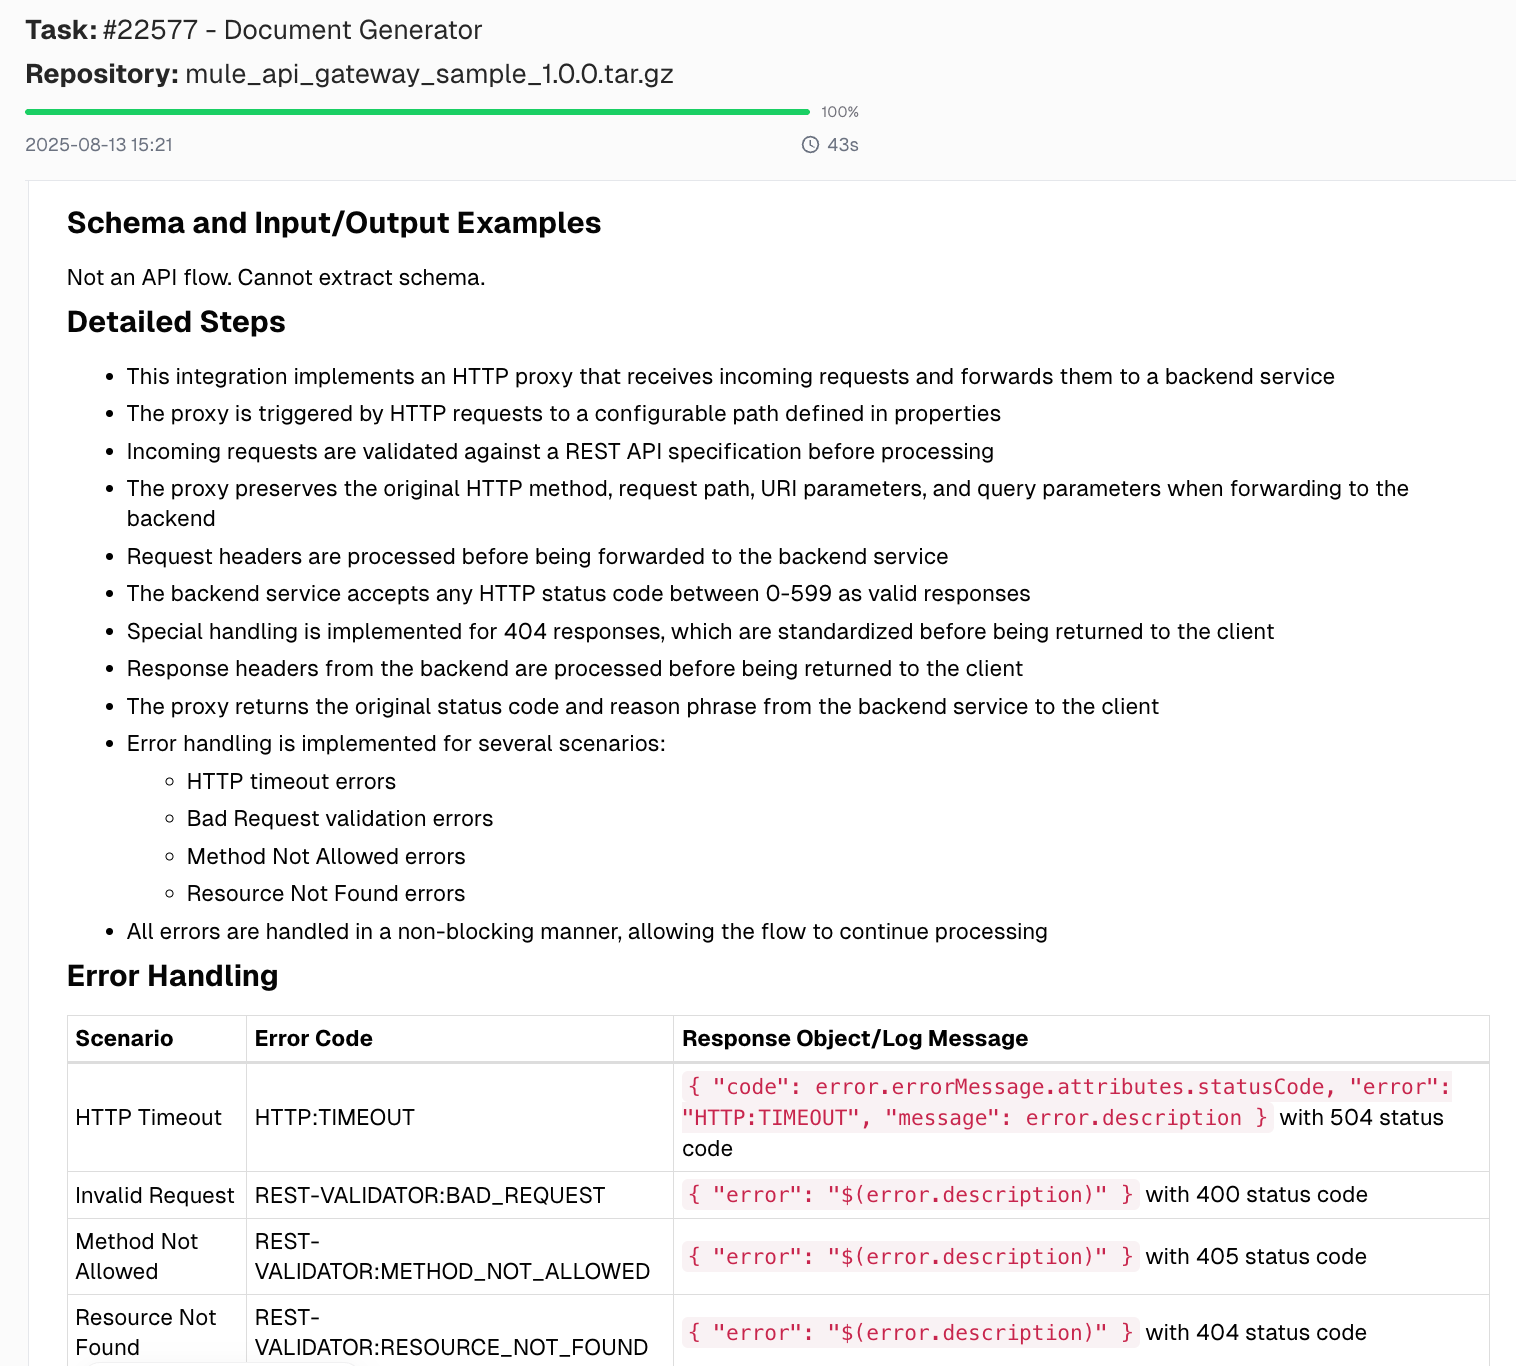
The tool generates complete documentation for the flow, including a sequence diagram, detailed flow steps, error handling scenarios, mapping tables, unit test scenarios, logging, and security details. Here are some snapshots from the generated documentation.
Sequence diagram generated by CurieTech AI Agent Document Generator:

Snapshot of the generated flow documentation:
{{banner-large-table="/banners"}}
Conclusion
MuleSoft API proxies simplify the management and security of your APIs. They are intermediaries between your backend services and the consumers using them. Using proxies helps you keep everything organized. You can enforce security, control traffic, and apply policies without modifying your core services.
Using a proxy allows you to protect your APIs, monitor usage, and standardize error handling. It provides the flexibility and control you need. Follow best practices, such as designing with RAML, versioning correctly, and monitoring performance. This way, you’ll have a reliable, scalable system that is easy to manage as your API landscape expands.