
DataWeave Map: Tutorial, Best Practices & Examples
MuleSoft is a leading integration platform enabling organizations to connect applications, data, and devices seamlessly. At the heart of its data transformation capabilities is DataWeave, a powerful expression language designed to transform data across formats such as JSON, XML, CSV, and more.
While MuleSoft offers various tools to handle data transformation, one of the most widely used is the DataWeave map function. This function addresses an everyday use case in integration development: transforming each item in an array into something else. It performs practical tasks such as updating a value, renaming a field, or reshaping data. The function takes an array as input and returns a new array with the transformed values. Consider it a smarter, cleaner version of a “for loop.” Instead of manually writing the logic to iterate over each item, map handles the iteration for you and returns a new array with the results of your transformation.
In this article, we explore the map function, how it works, and how to use it effectively, especially by leveraging AI tools available in the market.
Summary of key Dataweave map concepts
Understanding the Dataweave Map function and its syntax
The map function in DataWeave is used to iterate over each item in an array and apply a transformation to it. It returns a new array made up of the transformed elements. Most developers widely use it as it simplifies data transformation, keeping the code clean with just a few lines in DataWeave.
The map function works only with arrays—it takes an input array and processes each element by splitting it into two parts: the item (T) and the index (number). You can use a map function by specifying just the item. Still, it’s often recommended to include the index as well, especially when the position of each element matters in our transformation.
This shows how the syntax of the Dataweave map function works.
map(Array<T>, ((T, Number) -> R)): Array<R>
This definition involves two types of variables: T and R. T represents the type of items in the input array, while R represents the type of items in the output array. Since the map's purpose is to transform each item in an array, it's logical to allow different types for input and output items. Based on this, we define the lambda function as:
((T, Number) -> R)
This means the lambda takes an item of type T from the input array, along with its index (a number), and returns a new item of type R that will be included in the output array.
Example 1:
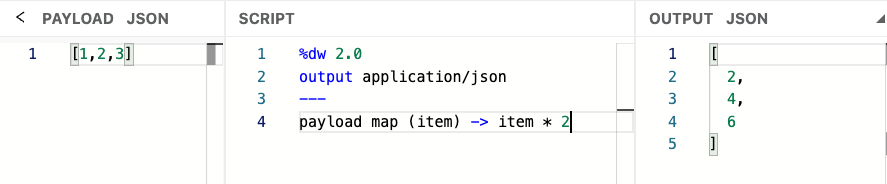
In this example, we use an array of numbers (item T) and multiply each item by 2; it returns a transformed output in an array format. The output result shows an array of elements.
Example 2:
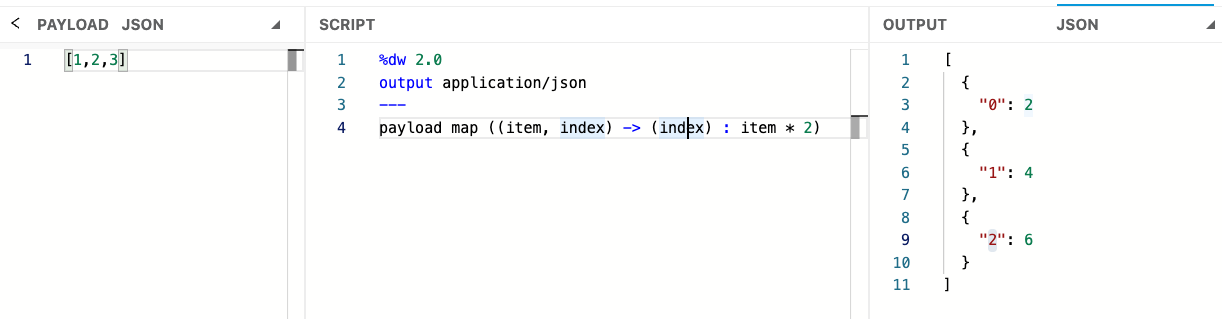
In this example, we transform the input array, multiply it by 2, and specify the index of each item starting from 0. The output result shows an array of objects where the index is the key and the item is the value.
In Dataweave, you can use the default logic if the item and index are not defined by using $ and $$. A single dollar sign ($) indicates that you want to map the item inside the array, while a double dollar sign ($$) means mapping the index of each item in the array.
The screenshot below shows how to use default logic in the Dataweave map when the item and index are not defined.
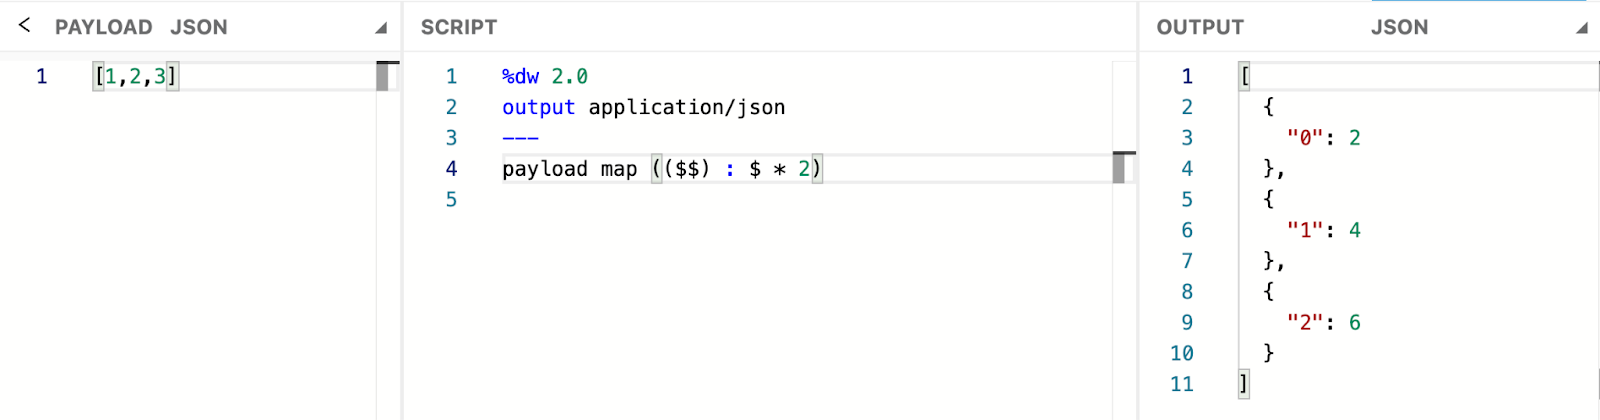
In this example, we use an array of numbers as input. Since the item and index are not defined after the map function, we use $$ to map the index and $ to identify each item in the array.
{{banner-large-graph="/banners"}}
Identifying when to use the Map function in DataWeave
In MuleSoft, the DataWeave map function is a powerful and commonly used tool when applying the same transformation logic to every element in an array. It enables efficient and flexible manipulation of structured data.
Typical use cases include:
- Iterating over an array of objects to apply consistent transformations
- Converting data among formats such as JSON, XML, or CSV
- Extracting specific fields or renaming them to match downstream requirements
- Extracting an array of strings or numbers
Practical examples demonstrate how the map function can be applied in each scenario.
Iterating over an array of objects to apply consistent transformations
The map function commonly transforms arrays of objects. In the example below, each object contains name and age properties and appears inside curly braces, showing that it is an individual object. Square brackets enclose the entire set, indicating an array. You can pass this array to the map function to apply transformations.
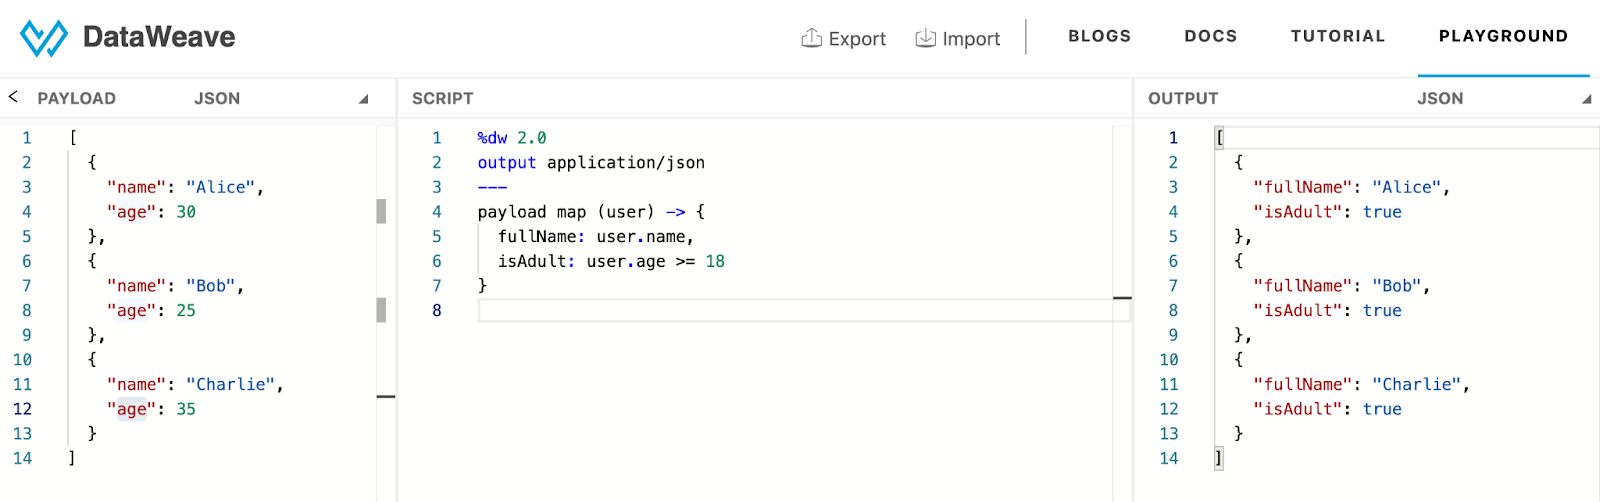
In this example, the map function transforms an array of objects containing name and age properties into a new array. Each resulting object includes a fullName field and a flag that indicates whether the age is greater than or equal to 18.
To simplify the transformation, we can also use the default logic, the dollar sign $, which automatically indicates the item in the array of objects.
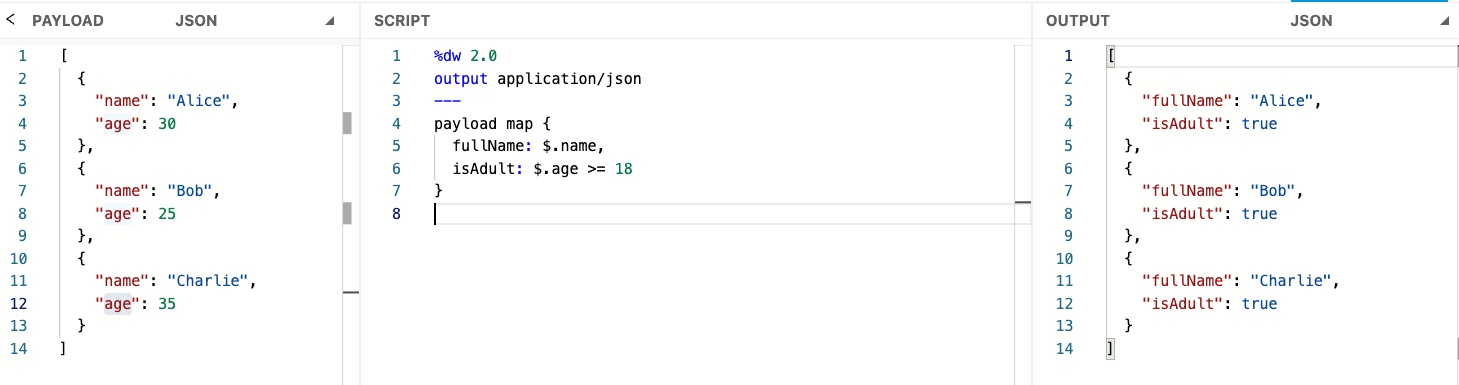
In this example, we use the default logic dollar sign to map the name and age from the input and map it to the fullName field and a flag that evaluates whether the age is greater than or equal to 18.
Converting data among formats such as JSON, XML, or CSV
Dataweave map functions are also used to convert data from one format to another, for example, by transforming input JSON, XML, or CSV to a new JSON structure required by downstream systems.
Here are some examples of how to convert data from one format to another
XML to JSON
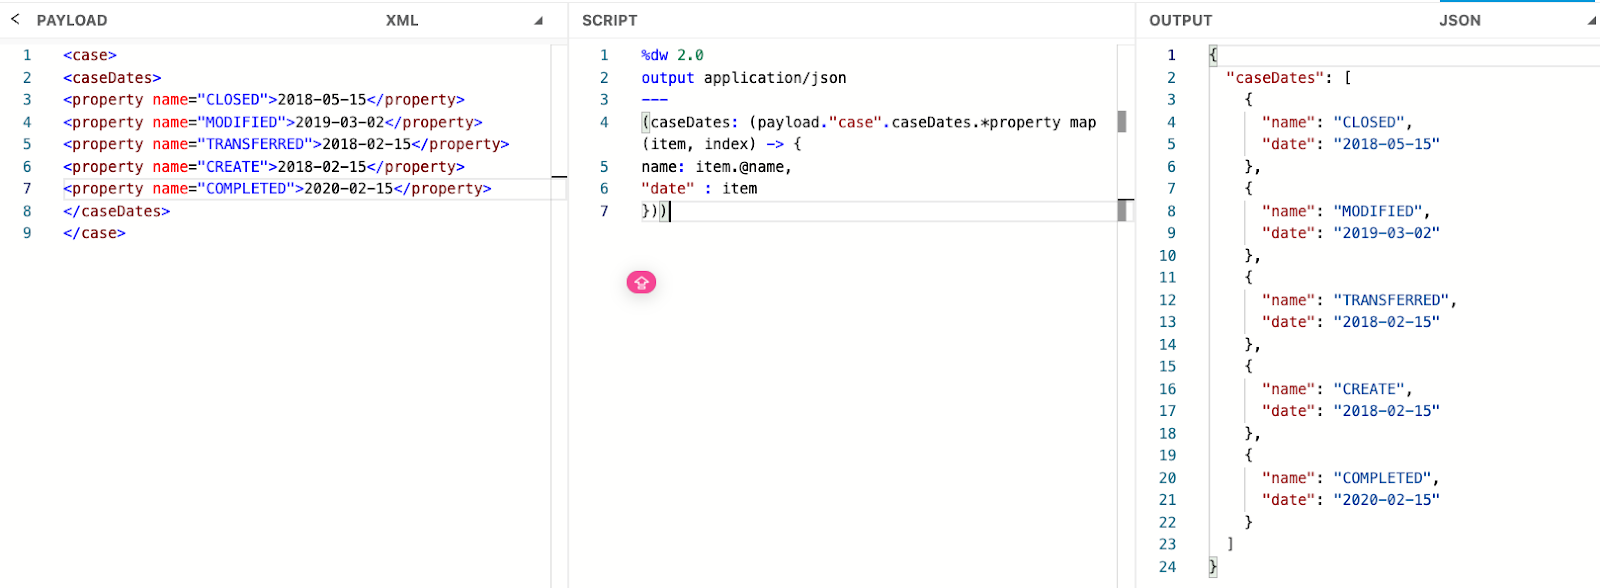
In this example, we convert XML input into a JSON structure with an array called caseDates containing names and dates. To access the XML attributes during the transformation, we use the @ symbol, as shown in the example above. This transformation helps ensure the data can be sent in JSON format to a downstream system that doesn’t accept XML, allowing for smoother and more reliable integration.
JSON to JSON
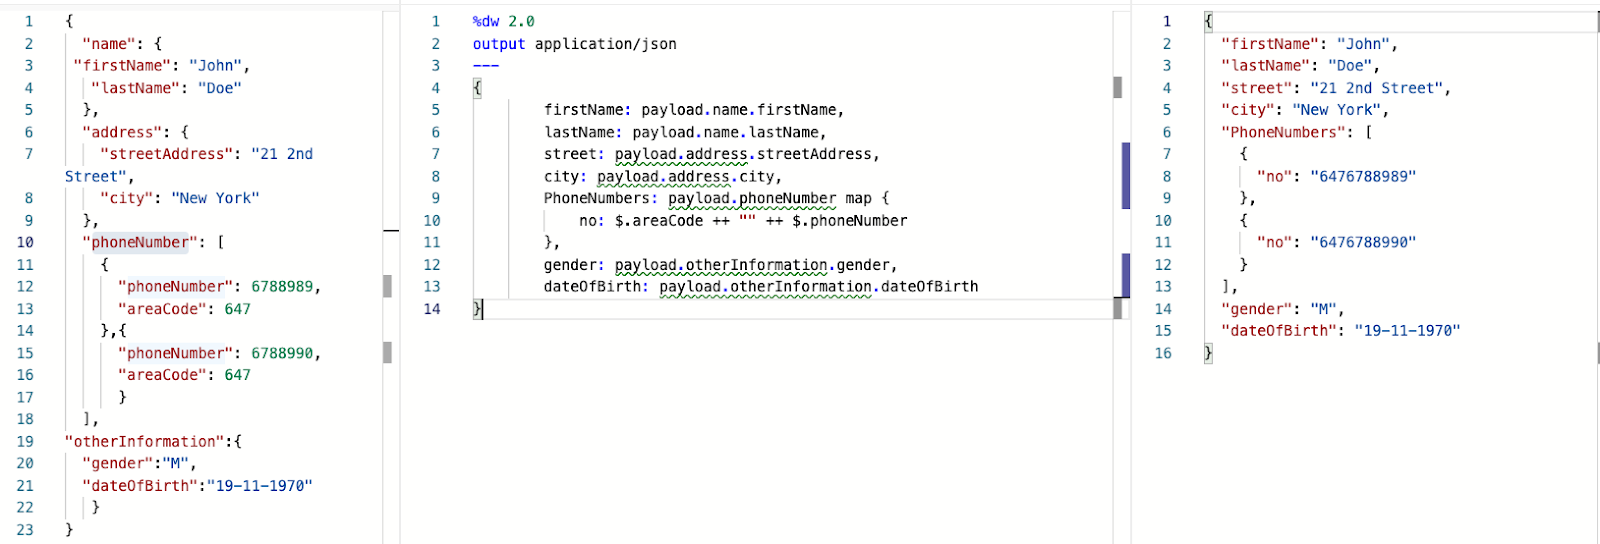
In this example, we start with a JSON input and transform it into a new JSON structure with the fields firstName, lastName, street, city, phoneNumbers, gender, and dateOfBirth. For the phoneNumbers field, we use the map function to iterate over each number, prepending the appropriate area code to standardize the format.
CSV to JSON

In this example, we convert a CSV input into a JSON structure with the fields firstName, lastName, age, and gender. Since CSV files are structured like spreadsheets, the field names are usually defined in the first row, which serves as the header for mapping each column to its corresponding JSON field.
Using AI to automate transformations
The examples above illustrate how you can leverage DataWeave’s map function within your system. While it may initially seem complex, AI tools are available to simplify the process and help achieve seamless data transformations.
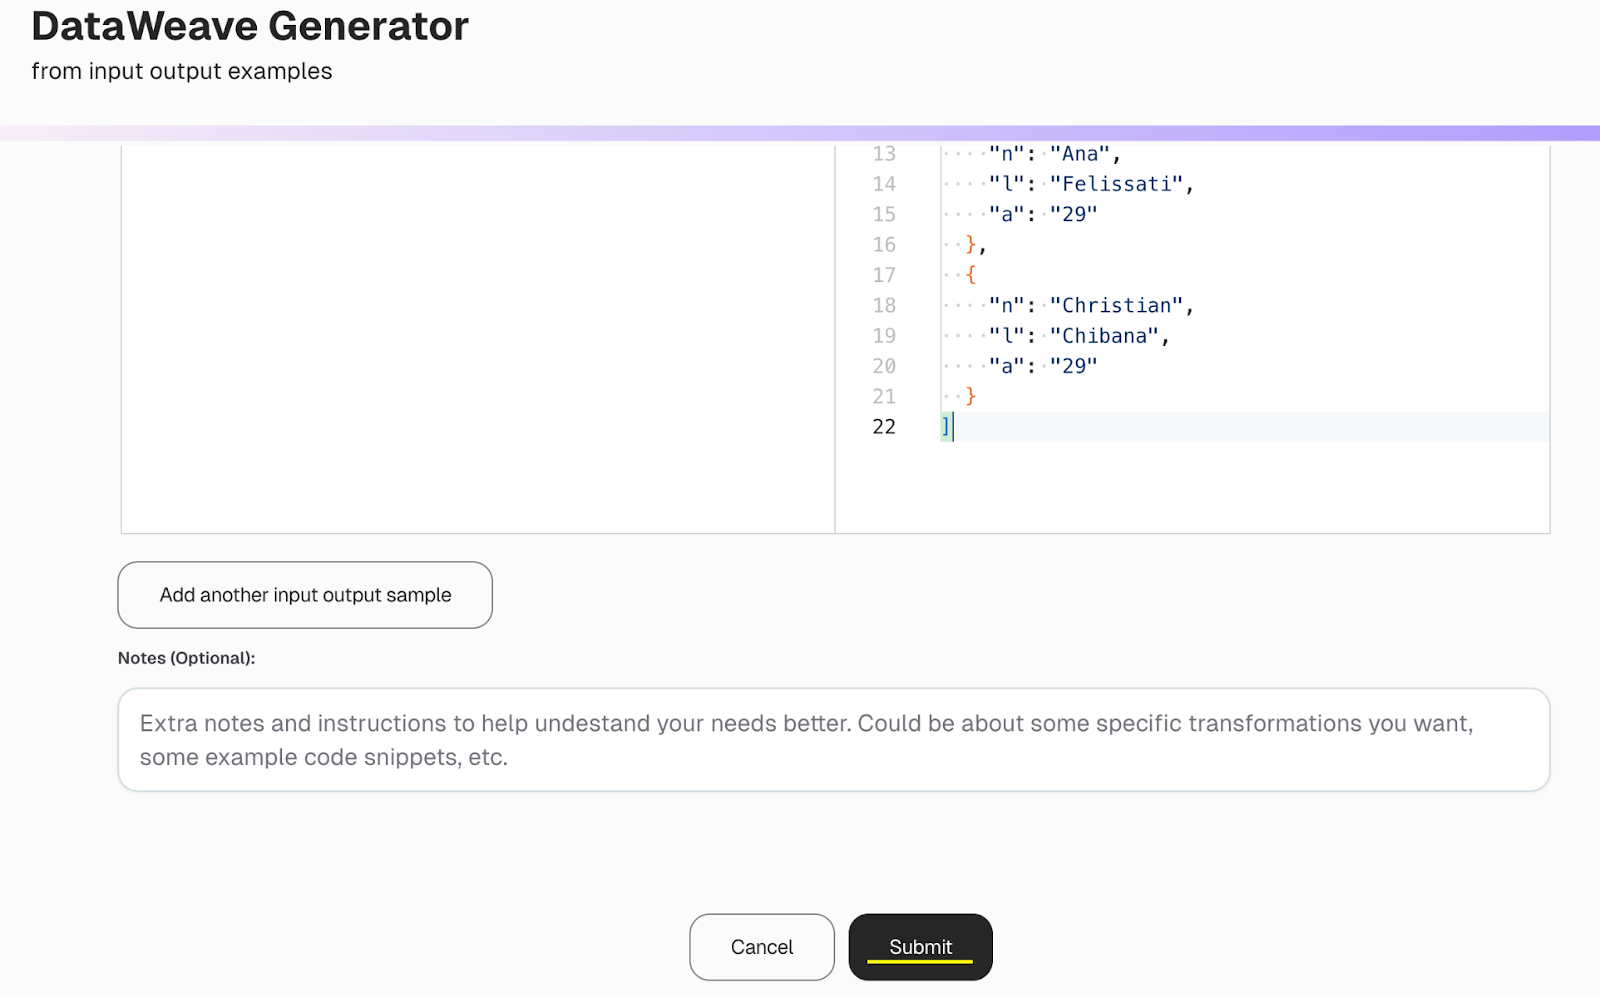
CurieTech AI is a third-party solution offering advanced AI-powered automation designed to complement the MuleSoft platform. CurieTech provides agents like DataWeave Generator, which helps developers validate their code and reduce manual effort.
CurieTech’s DataWeave Generator enables efficient transformation and reshaping of data across formats such as JSON, XML, and CSV. It reduces manual effort, accelerates development, and enhances the overall efficiency of integration workflows, making the process faster, more innovative, and more reliable.
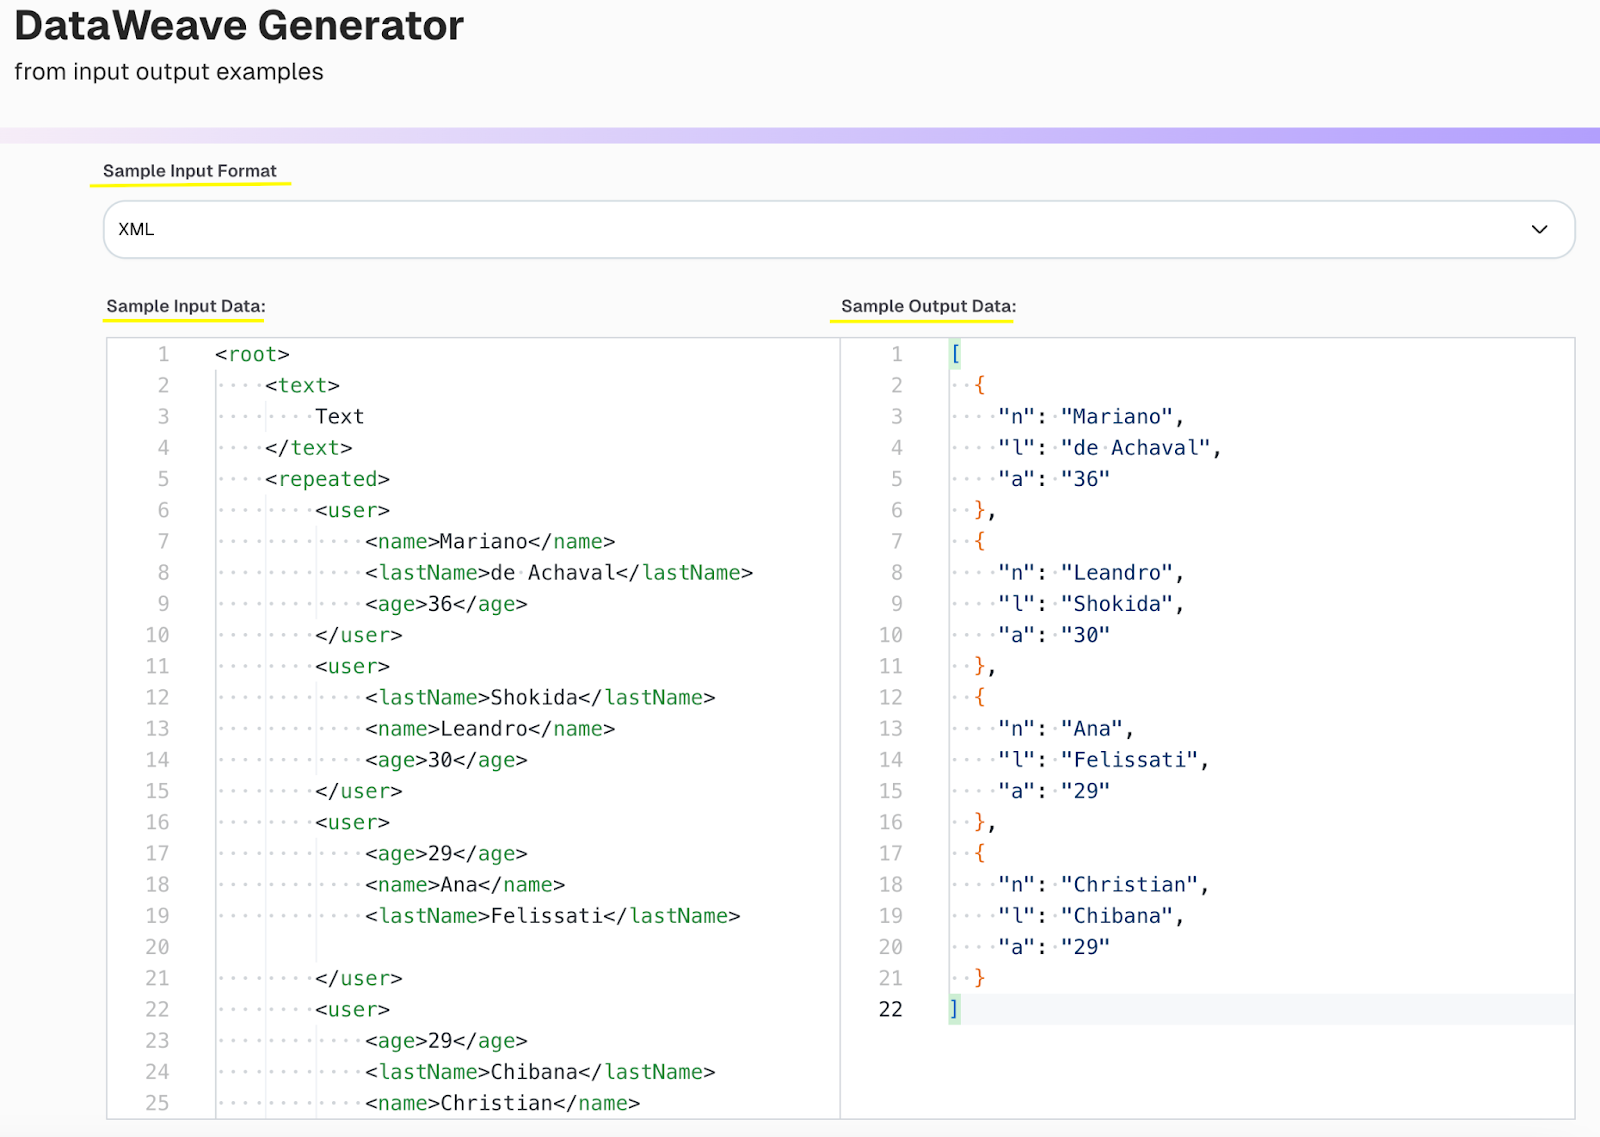
The screenshot below shows how to leverage AI tools to generate a DWL expression. First, select the example type (e.g., whether you want to convert an XML record to JSON or XML). Then provide valid XML data in the Sample Input Data section and the valid JSON output you need in the Sample Output Data section.
Once done, click Submit, and the tool will automatically create a Dataweave expression that you can use in your API.

AI tools like CurieTech AI can help minimize manual effort and accurately generate DataWeave code, significantly streamlining the development process. These tools assist in writing, validating, and optimizing transformations, reducing the risk of errors and saving valuable development time. Automating repetitive tasks and offering intelligent code suggestions enhances productivity, ensures consistency, and supports faster API delivery. Additionally, such tools are handy for developers new to DataWeave, providing guidance and best practices to improve code quality.
Extracting specific fields or renaming them to match downstream requirements
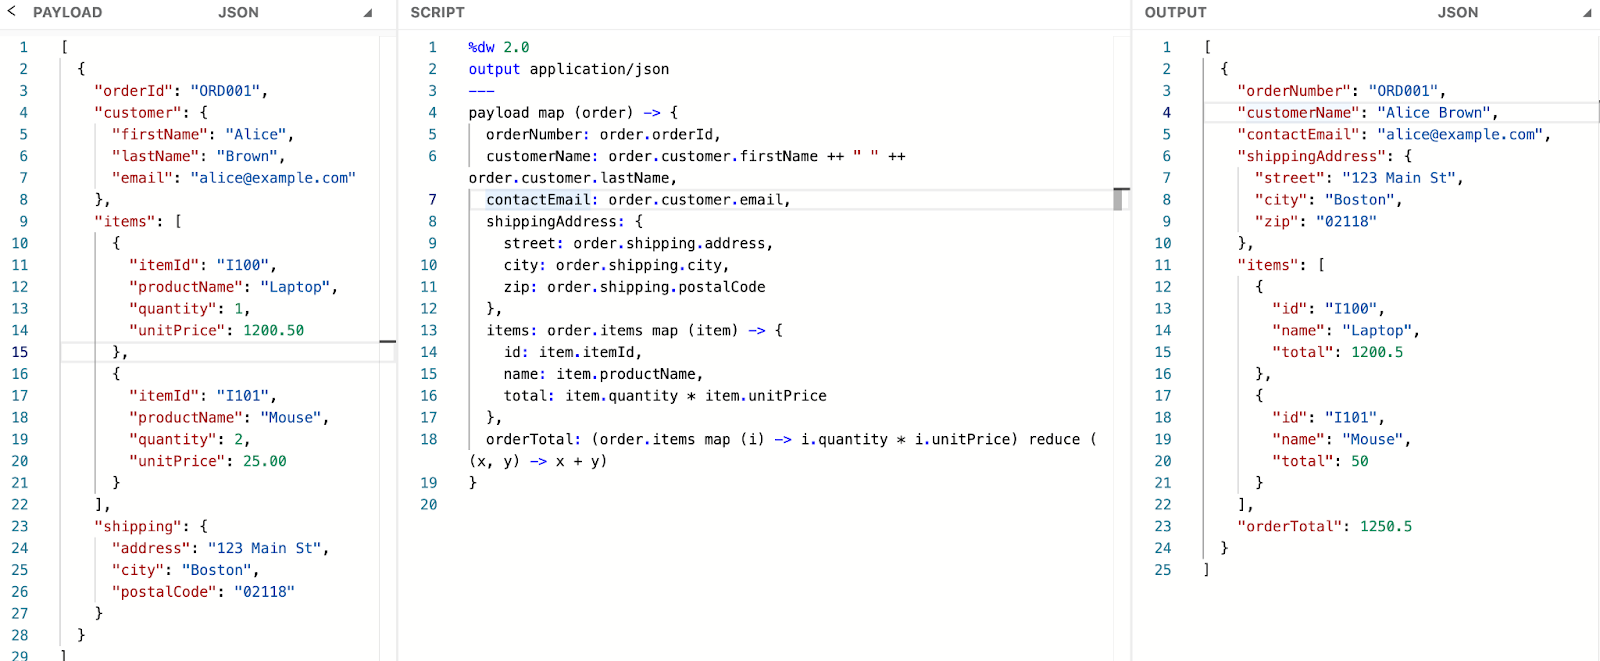
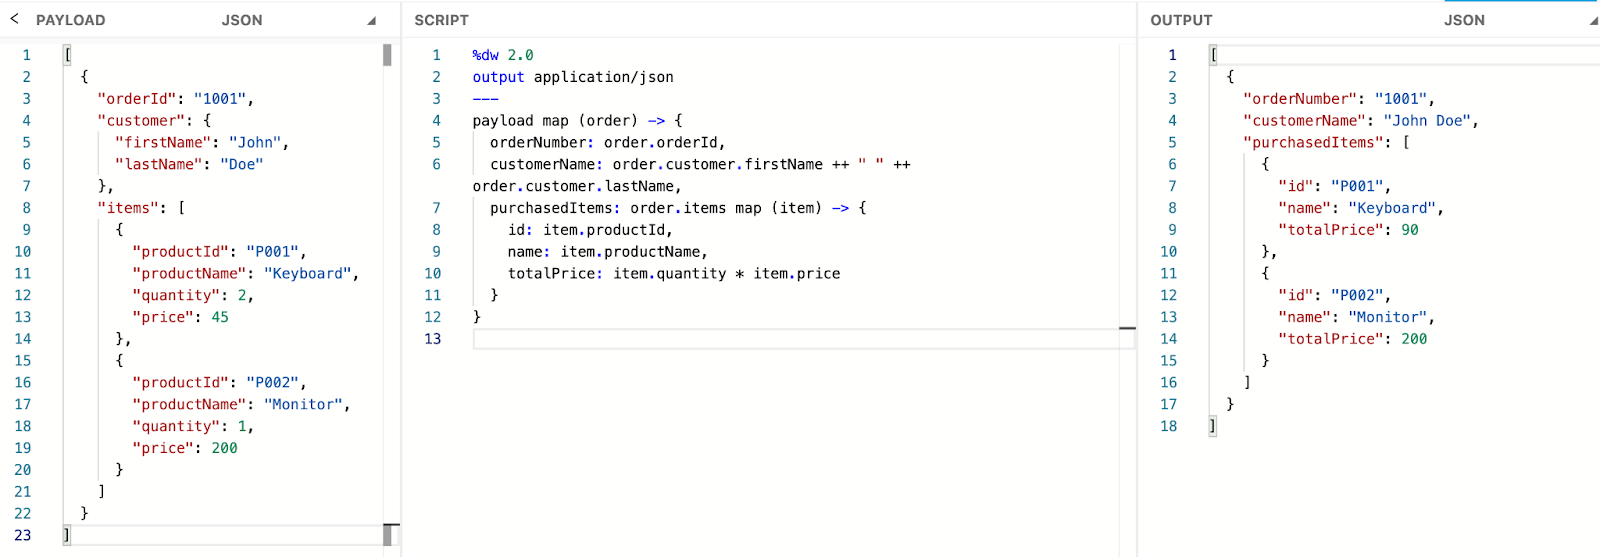
When working with data transformations in MuleSoft, it is common to reshape or simplify complex payloads by extracting specific fields or renaming them to match the target system's requirements. DataWeave's map function provides a clean and efficient way to iterate over arrays and return a modified structure with the exact fields needed. This is especially useful in integration scenarios where upstream and downstream systems expect different field names or formats. By leveraging a map, you can isolate important values, rename fields for clarity or compatibility, and drop unnecessary data—all in a single, readable transformation.
In this example, we start with a JSON input containing the orderId, customer details, and a list of purchased items. To align with the format expected by the downstream system, we renamed orderId to orderNumber and combined the customer's first and last names into a single customerName field. We also simplified the shipping information by renaming its fields to more readable names. Additionally, we extracted and transformed the item details to reflect what the customer purchased. This transformation ensures the downstream system can easily understand and process the data.
Extracting an array of numbers and strings using the map function
Another common scenario we can encounter during data transformation is working with input payloads that contain mixed data types. While processing data in DataWeave, especially when using the map function, we may need to selectively work with only certain types, most commonly, numbers and strings.
In such cases, the goal is to iterate through the input array and extract only the values of numbers or strings, while ignoring other types like booleans, nulls, or objects. Although a filter is the typical choice for excluding unwanted elements, you can also achieve this with the map function by returning null for non-matching values and optionally removing null entries afterward.
This approach is beneficial when preserving structure or performing additional transformations during filtering. It demonstrates the map's flexibility in handling type-based logic within DataWeave transformations.
Below are examples of extracting numbers and strings using the DataWeave map function.

In the example above, we have an array of numbers representing customer IDs. We transform each number into a string by adding the prefix "CUST", indicating that it is a customer ID.
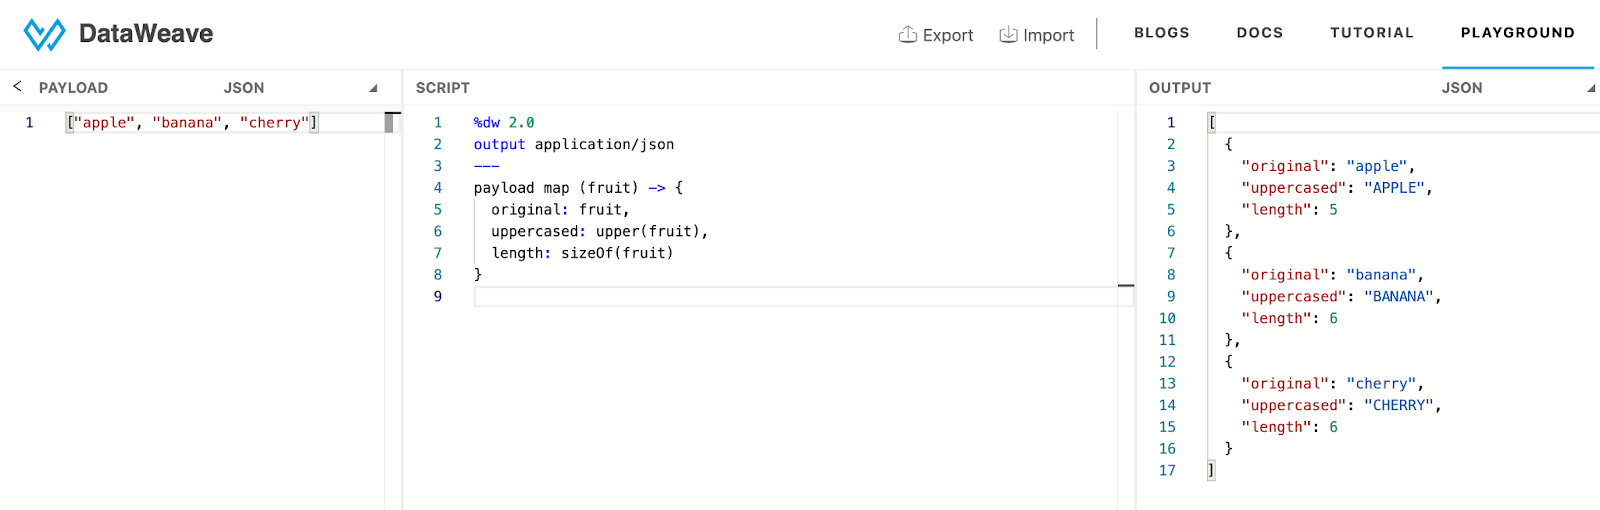
In the example above, we have an array of strings, and we have converted each fruit name to an object with additional info, like string length and uppercase value.
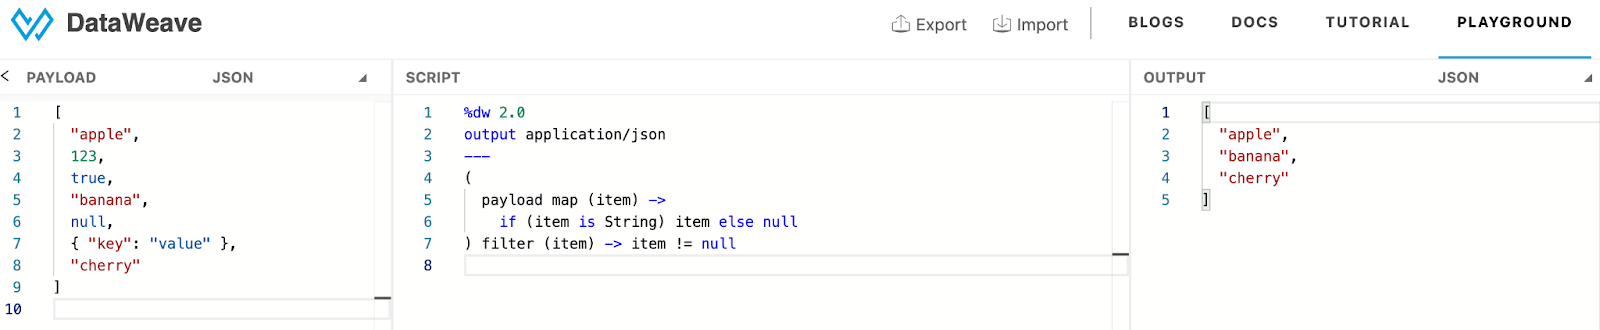
In this example, an array with mixed types is processed using a map to keep only string values and replace others with null values, followed by a filter to remove the nulls. The result is an array containing only the strings: "apple", "banana", and "cherry".
Leveraging streaming with the map function in DataWeave
When working with large datasets in MuleSoft, performance and memory efficiency become critical. Dataweave offers streaming features that allow you to process a large amount of data without running out of memory. The map function in DataWeave can be used within a streaming context to apply a transformation to each element of a stream, and the deferred=true setting in DataWeave enables deferred writing, which can further enhance streaming performance, especially when dealing with large files or API responses.
MuleSoft requires you to manually turn on deferred mode in your DataWeave transformations. By enabling this setting, you can immediately transmit the streaming output data to the following message processor with less resource/memory usage.
Here is an example of a DataWeave transformation using the map function while enabling the deferred setting.
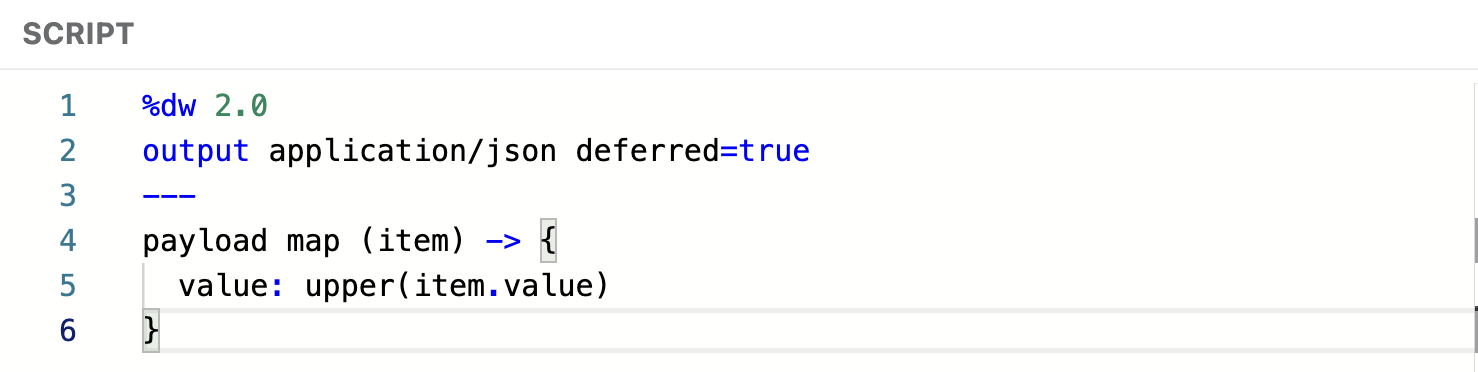
In this example, the transformation ensures that the output stream begins as soon as the first item is transformed, eliminating the need to wait for the entire input to finish processing.
CurieTech AI introduced a tool to detect and debug errors and ensure careful code validation. CurieTech AI Code Enhancer can enhance existing code, primarily if it works with significant transformations or lacks exception handling. This tool will highlight the issue and provide suggestions.
Here’s an example of how to use the Code Enhancer. Upload your project folder. After uploading, pass the description to add streaming to all the DWL files, and then click “Submit.”
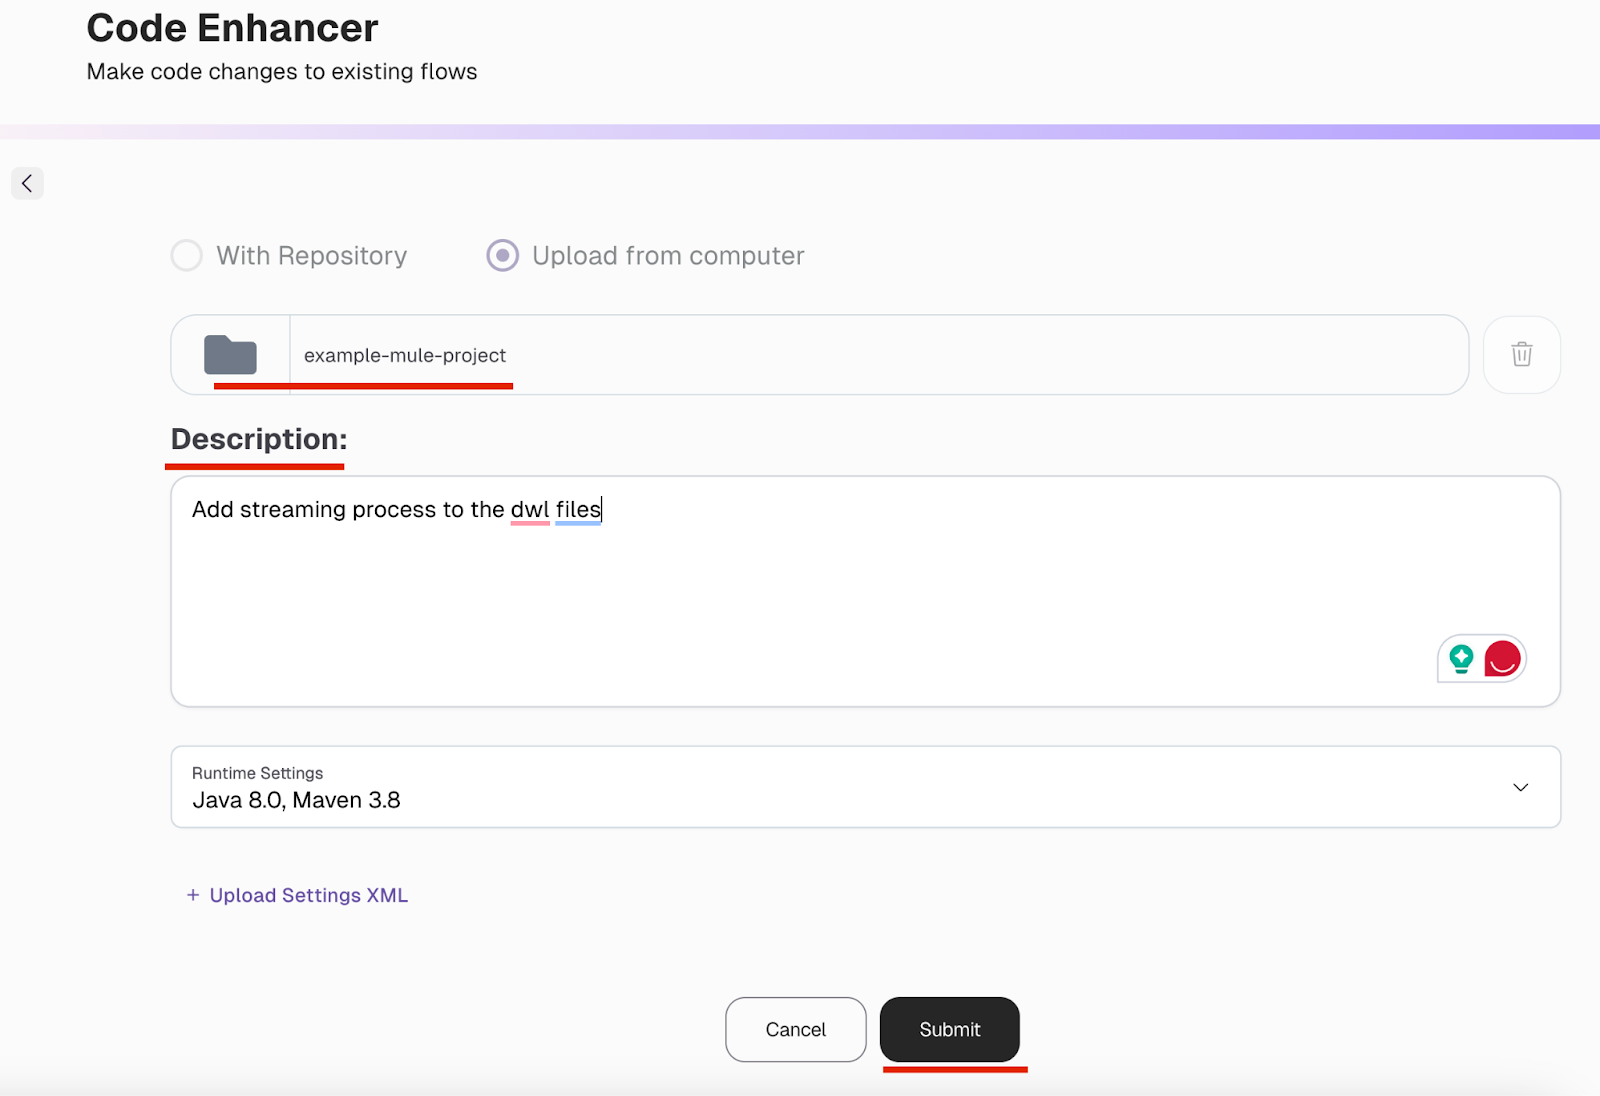
Once completed, we will see the changes made by the tool to add streaming settings to all of our DataWeave files in the project, as requested.
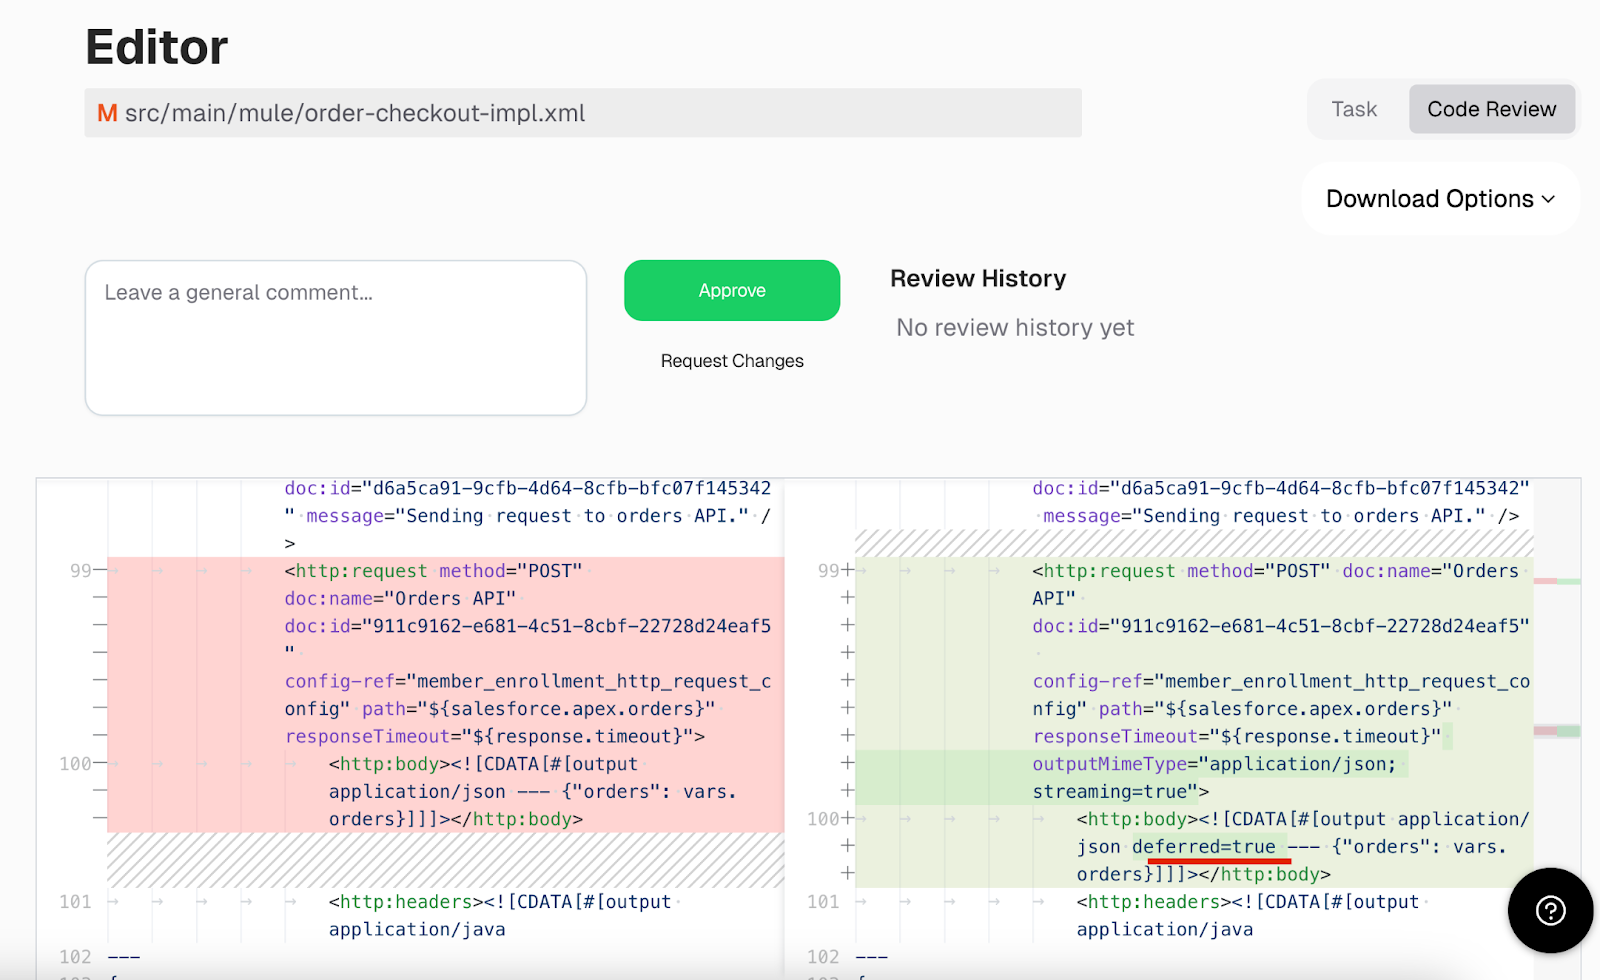
The generated project can also be exported as a zip file and imported directly into Anypoint Studio, the IDE for developing MuleSoft applications.
It is important to note that not all the functions are compatible with streaming. Functions like sort, groupBy, and distinctBy require the whole dataset to be loaded into memory, limiting their use to non-streaming scenarios. By integrating the CurieTech AI Code Enhancer during development, teams can streamline workflows and gain valuable insights tailored to MuleSoft projects.
DataWeave nested mapping
The data isn't flat in many real-world scenarios—it's deeply nested within arrays and objects. That’s where nested mapping in DataWeave becomes essential. You can precisely traverse and transform each data structure level using the function inside another map.
Nested mapping allows you to iterate through arrays within objects (e.g., orders with items), modify or reshape inner data while preserving the outer structure, and perform calculations or conditional logic on nested elements.
This section describes some examples of how to use nested map functions effectively.
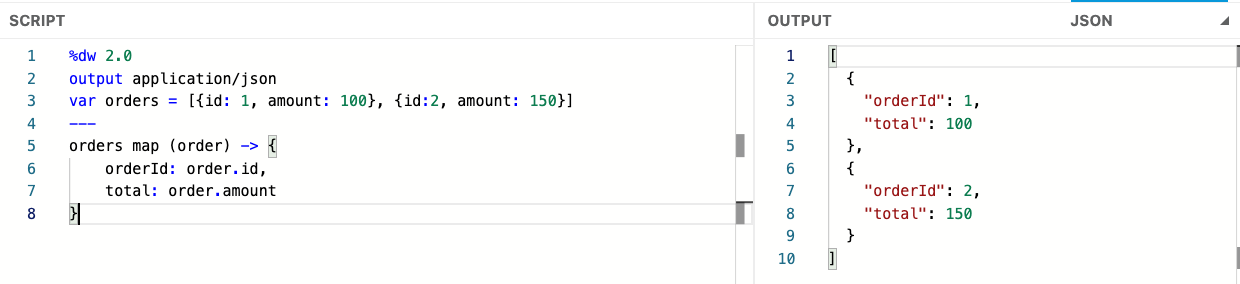
The screenshot below shows a JSON payload representing customer orders, each containing a list of purchased items. We use the map function to rename fields for better readability and apply a nested map to transform each item, including calculating total prices. The outer map loops through the array of orders, while the inner map processes each item within an order. We create a new structure for each item and calculate the totalPrice value, effectively transforming nested arrays using map within map.
Now, let's apply this change using one of the AI tools available in the market, which can help generate flow code tailored to specific integration requirements.
CurieTech’s AI Integration Generator helps developers build flow code customized to fit specific integration needs. By simply uploading your project and defining key details like data sources and transformation steps, the tool can quickly generate code for even complex workflows. You can also give feedback on the generated code, making it easy to refine and tailor it further to your project.
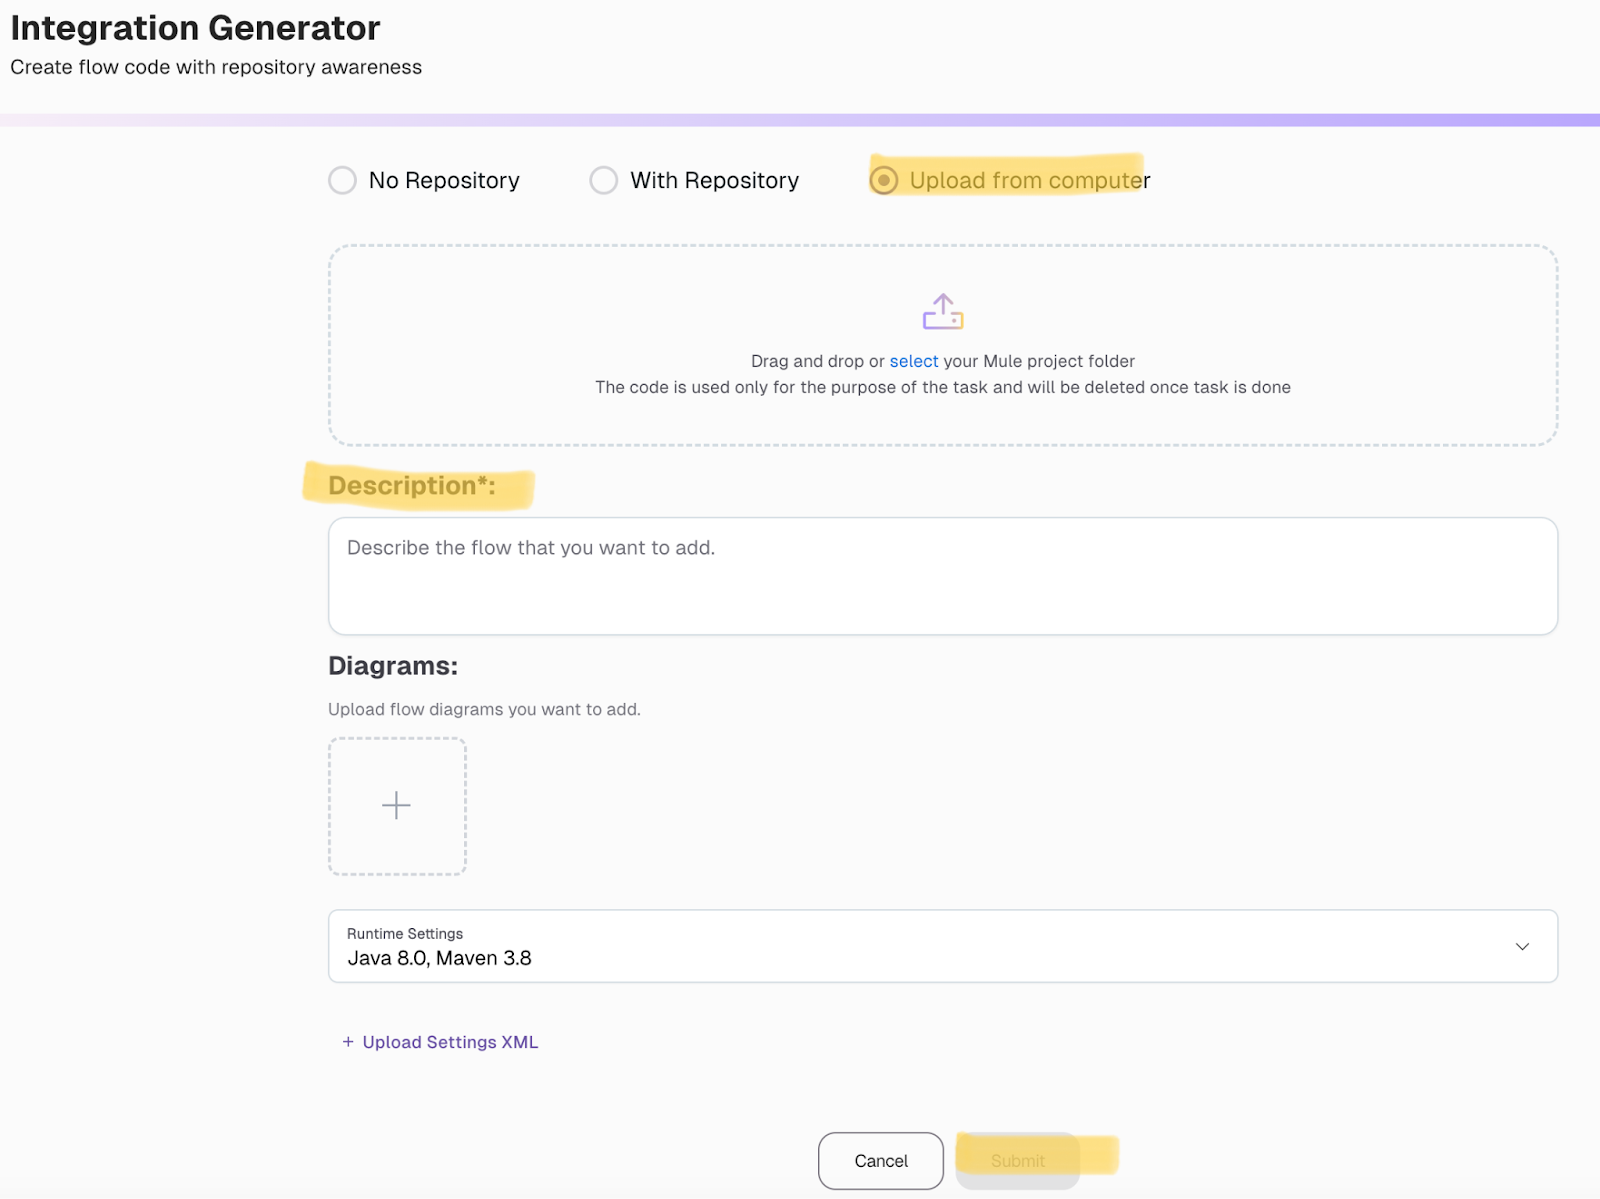
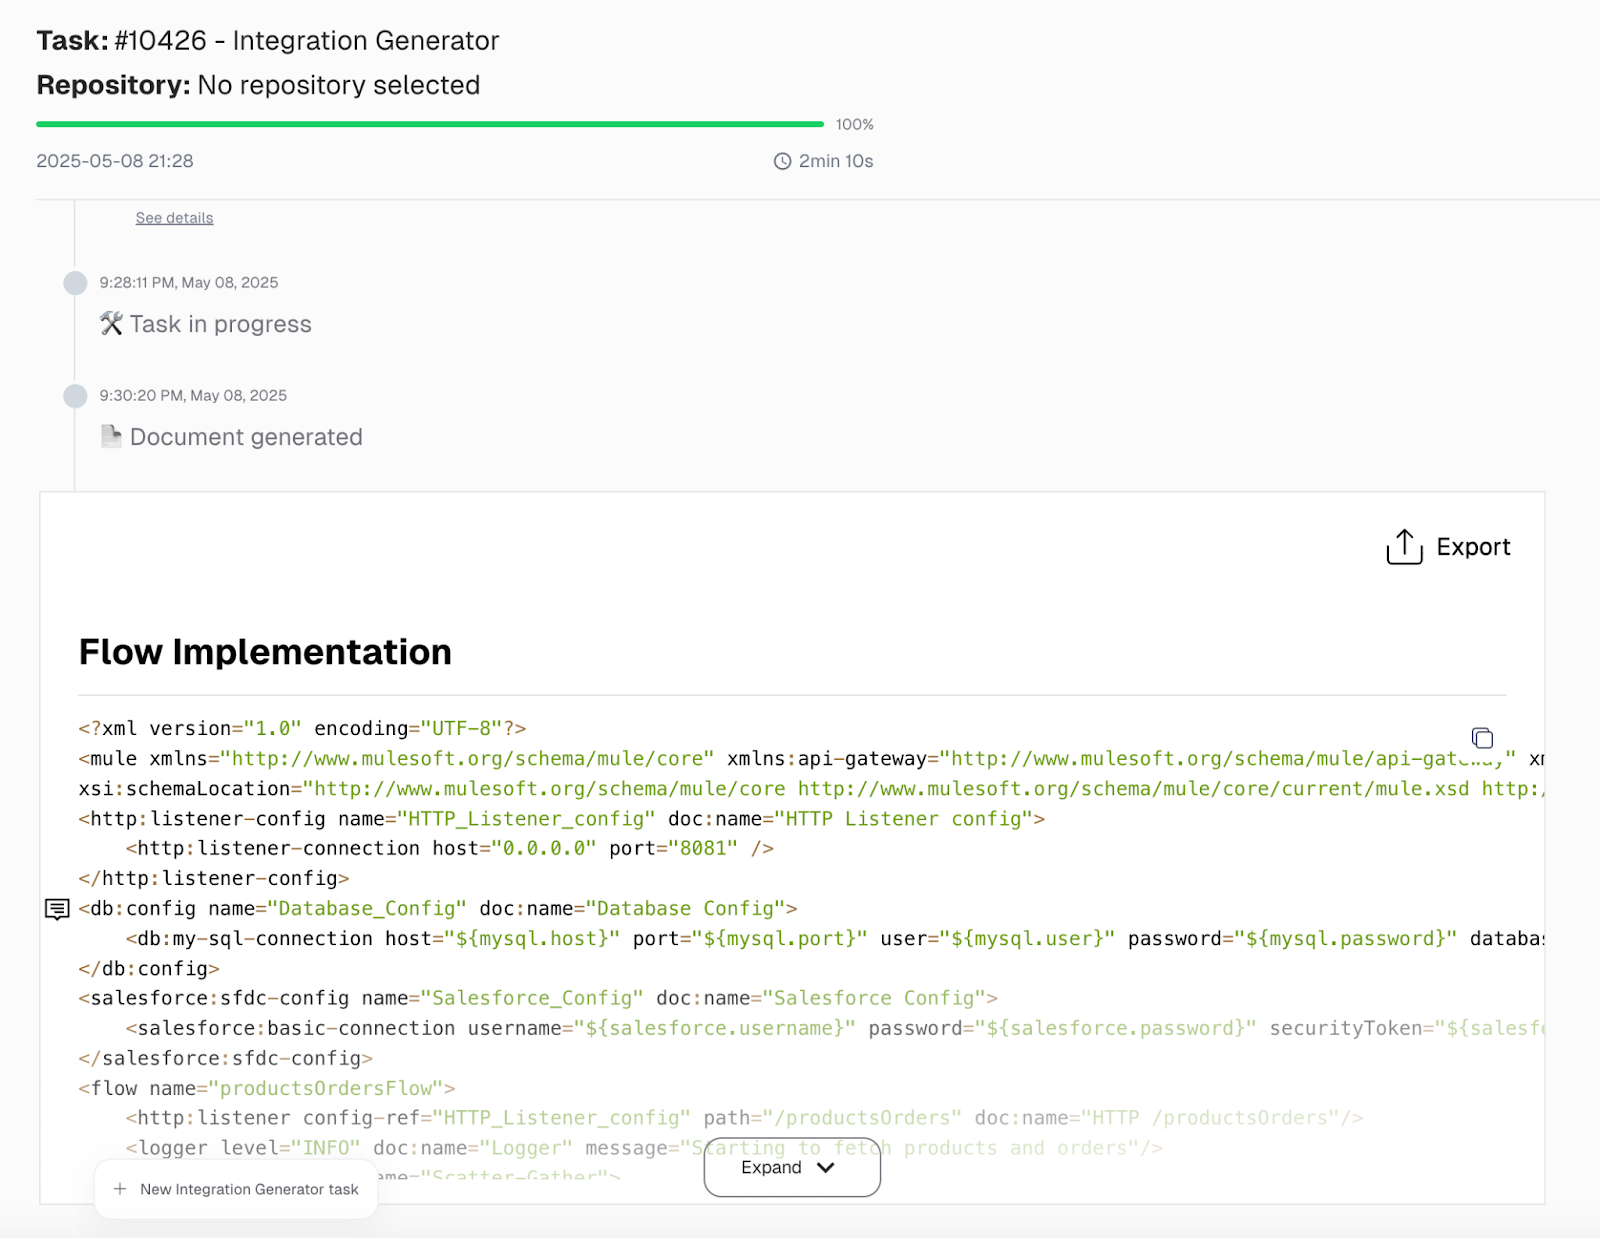
In this example, we specified that we wanted to generate a flow for the endpoint /productOrders, which retrieves data from both Salesforce and a database. The responses from these sources are then combined and transformed using DataWeave with nested mappings, resulting in a more structured and refined JSON response for downstream applications.
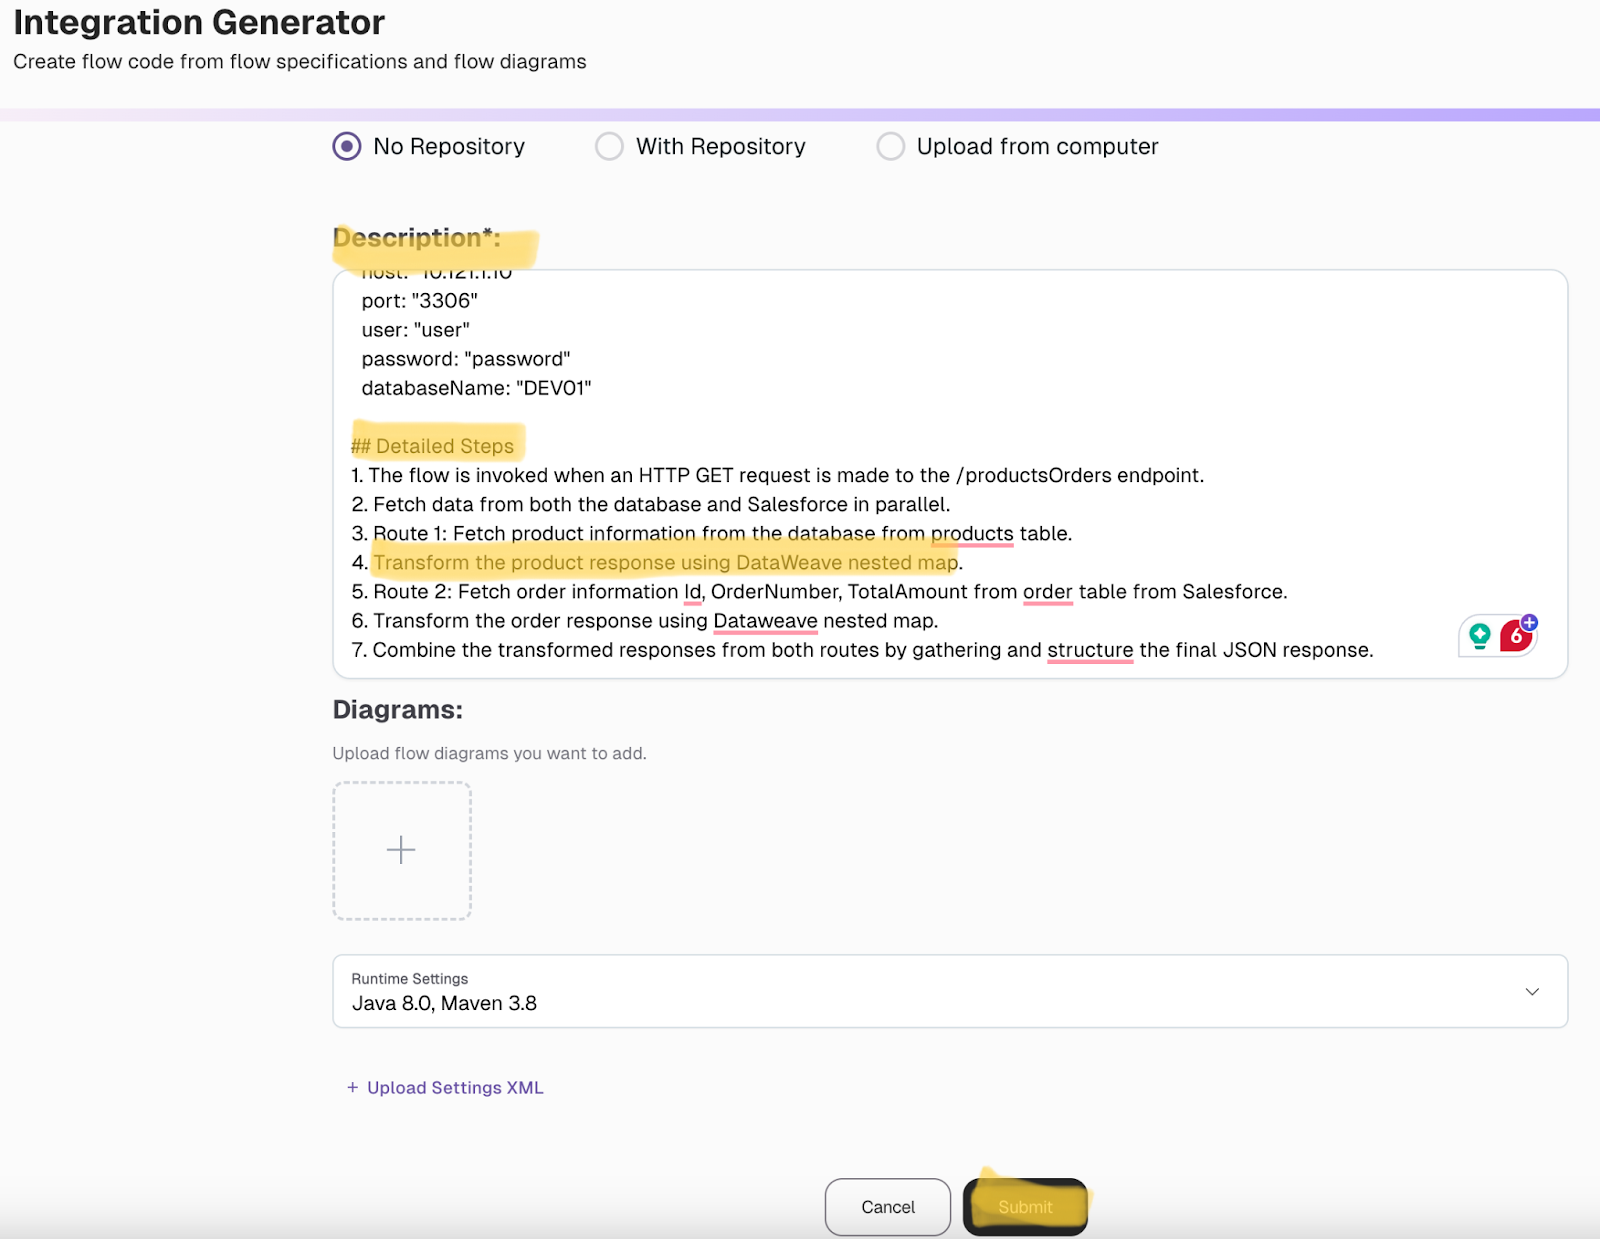
Once we submit the tasks, it’ll generate a flow implementation that we can import and use in our Anypoint Studio for implementation.
Dataweave map benefits
These are some of the benefits of using Dataweave Map functions:
- Non-destructive transformation: Map creates a new array instead of modifying the original. This ensures data integrity and avoids unintended side effects.
- Clean and readable code: Encourages a functional programming style that results in cleaner, more concise, and easier-to-read transformation logic.
- Flexibility in transformation: You can apply complex logic to each item, transform structures, or even filter and enrich data within a map expression.
- Efficient Data Manipulation: Map, especially when combined with streaming and deferred execution, allows large datasets to be processed with minimal memory consumption.
- Index access: The map provides access to both the item and its index, which is helpful for transformations that rely on position or need to include sequence numbers.
- Strong typing and type inference: With support for types like T and R, map can clearly express and infer input/output types, improving code clarity and reducing runtime errors.
- Composable with other functions: The map can be easily combined with other DataWeave functions, such as filter, flatMap, or reduce, for powerful and elegant data transformations.
- Supports nested structures: You can use a map within other map calls to transform deeply nested data structures, such as arrays within objects or arrays of arrays.
- Improved maintainability: Since the map focuses on single, isolated transformations, it’s easier to update and debug specific logic without affecting unrelated parts of the code.
- Promotes reusability: Lambda functions inside the map can be extracted and reused, making your transformations modular and easier to maintain across projects.
Dataweave map limitations
The map function in DataWeave is a powerful and essential tool in MuleSoft for transforming data within arrays. While it offers significant benefits and flexibility, it also comes with certain limitations that developers should be aware of to avoid unexpected issues during implementation. Here are some of the standard issue areas encountered:
- Performance and debugging: The DataWeave map function is powerful for transforming arrays, but it can impact performance with large datasets or complex logic. Debugging may be challenging, as errors inside the map often lack clear context. To improve efficiency and reliability, keep transformations simple, validate inputs, and handle missing fields with defaults or conditional checks.
- Limited context outside the loop: You can only access the current item and index within the map function. If you need to access external or previous values during iteration, you’ll need to use additional functions or variables outside the map.
- No support for short-circuiting: Unlike the traditional for loop, the Dataweave map does not support early termination. It will process every item in an array, even if you only need a specific value, and if the condition has been met early on. If you want a particular value as an output, the Dataweave filter function is commonly used before the map function.
- No built-in error handling: Map doesn’t provide built-in ways to handle transformation errors by item. If one item causes a failure (e.g., null), the entire map operation fails. You can use try or the default function inside the map function to guard against errors.
- You are limited to one input-to-one output transformation: Each input item maps to exactly one output item. If you need to transform multiple arrays as input, you can use flatten, or if you need to transform one input to multiple outputs, use flatMap.
{{banner-large="/banners"}}
Dataweave map best practices
In DataWeave, the map function is best used for transforming elements within an array, producing a new array with the modified elements. When using a map, it's essential to focus on clarity, reusability, and performance to write efficient and maintainable DataWeave scripts. Following best practices when using the map function can significantly improve the performance, maintainability, and readability of your MuleSoft code.
Here are some key best practices:
- Use descriptive variable names: Instead of generic names like item, use descriptive names that reflect the data you’re working with.
The screenshot above demonstrates working with an order input payload. Instead of using the default variable name item in the map function, we use order to represent each element in the array, making the transformation logic easier to read and understand.
- Avoid default parameters: Avoid relying too heavily on default values, especially if the input structure is unpredictable. While using defaults (field default “N/A”) can prevent errors, it might hide issues with missing or incorrect data. It’s better to handle such cases explicitly for better data integrity.
- Leverage built-in functions: DataWeave offers many built-in functions, such as filter, pluck, flatMap, and groupBy, that can simplify your logic. Using these instead of writing manual loops or conditional transformations makes your code cleaner, shorter, and often more efficient.
- Use an appropriate data type as an input: Make sure to apply the map function only to arrays, not objects. Arrays are typically in square brackets [ ], while objects are enclosed in curly braces { }. It's also recommended that the data be validated before using the map function to avoid potential errors during execution.
- Format output clearly: Always structure your output fields clearly and consistently to ensure smooth integration with downstream systems. Use clean indentation, logical grouping, and proper formatting to make the data easy to read, validate, and consume.
- Use null-safe operators: Avoid runtime errors by safely handling null values when mapping fields. Combine the default function with null-safe navigation. It will ensure that if any field returns null, the mapping will not break.
- Use comments to explain complex maps: Complex mapping might confuse developers, so a simple explanation of what the mapping is might help with future issues or bugs that will be encountered.
- Avoid deeply nested mapping: In DataWeave, deeply nested maps can make the code hard to read, maintain, and debug. Instead, use the fun function to break your logic into small, reusable functions.
An AI coding assistant like CurieTech AI makes it easier to build high-quality MuleSoft integrations by guiding best practices, simplifying data transformations, and even helping with code reviews.
The screenshot below shows CurieTech AI Single Code Repo Lens, which reviews and explores details about a complete repository. This tool lets users ask high-level and detailed questions about flows, APIs, configurations, and more, helping streamline development and troubleshooting in MuleSoft environments.
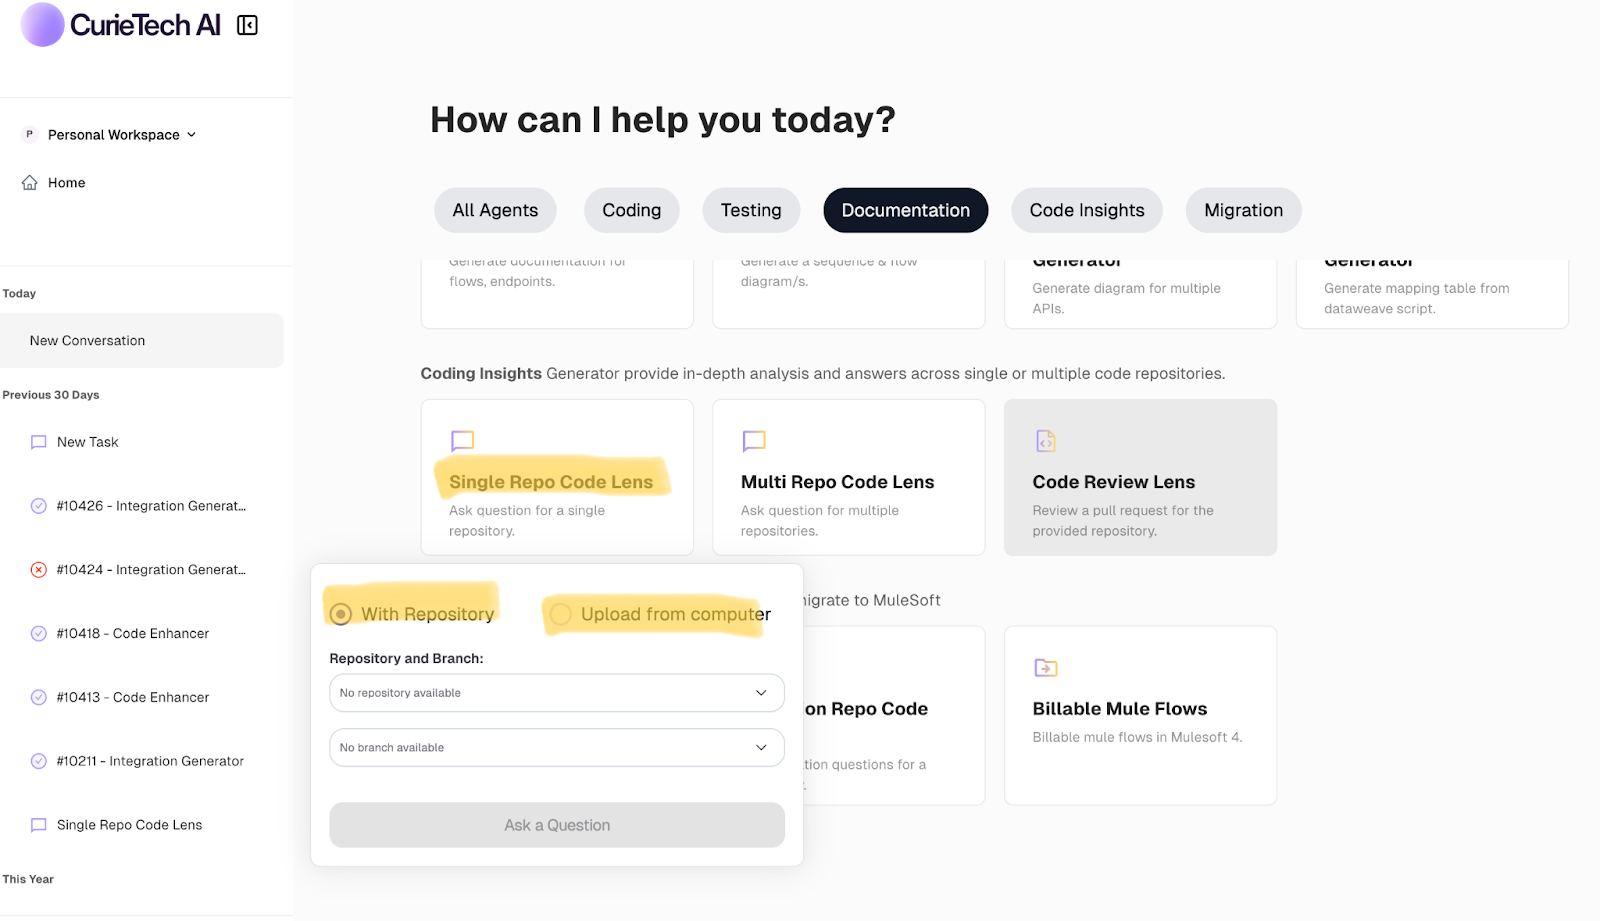
Just provide the repository details of your APIs or MuleSoft project, and you'll be taken to a page where you can ask questions about the flow.
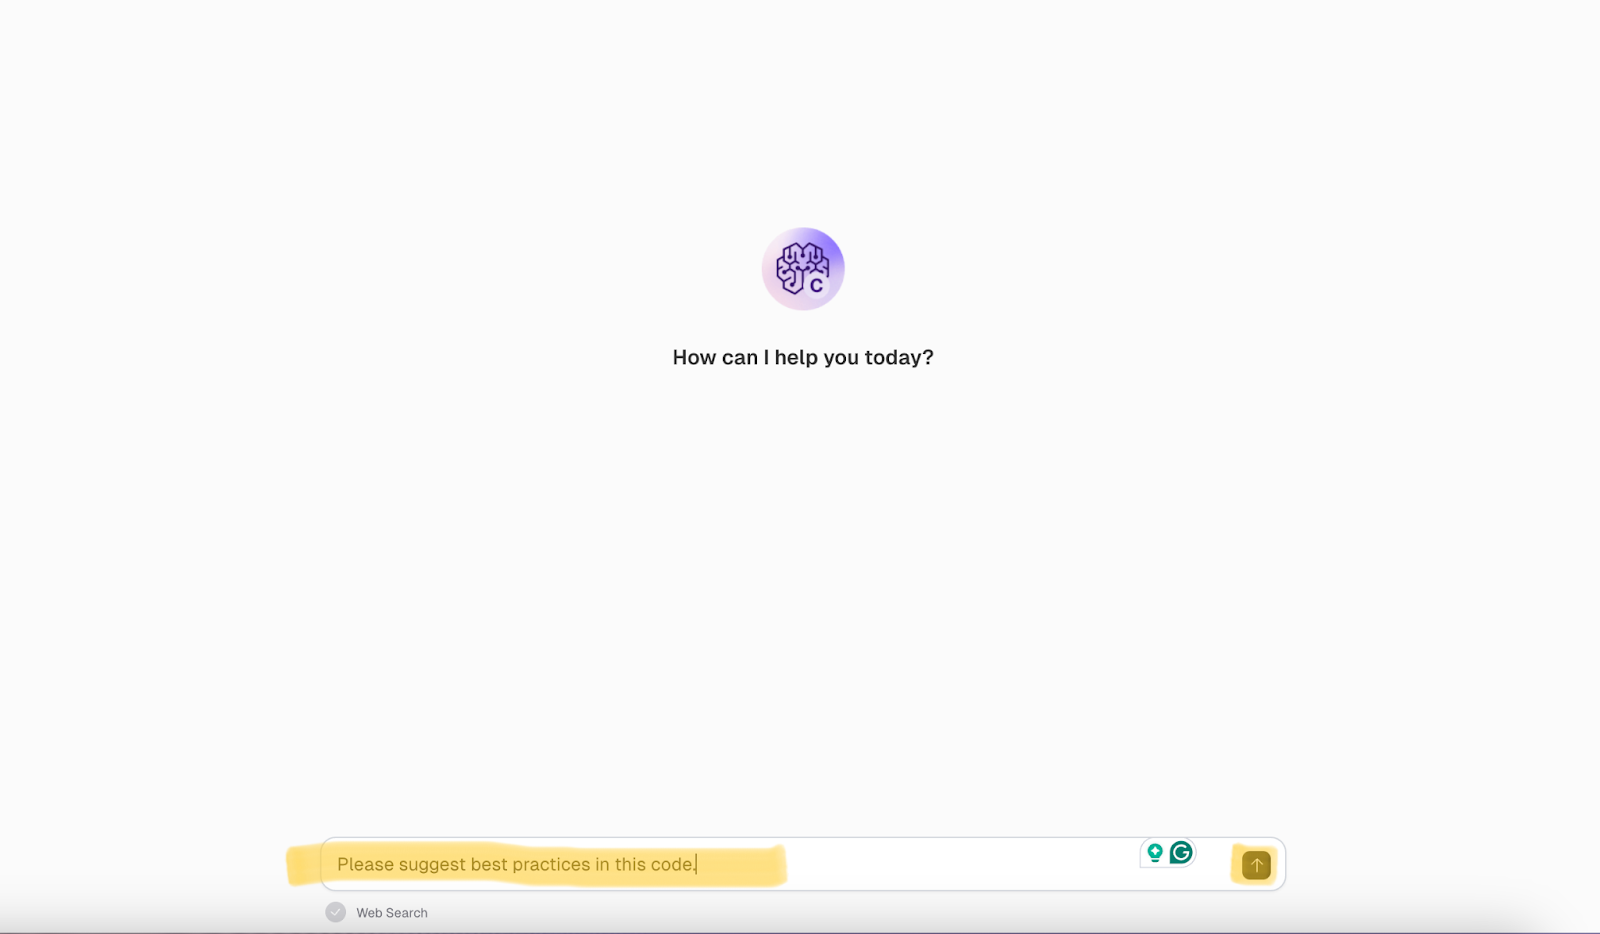
In this case, we want to know what best practices apply in our flow. Provide that to the tool and click Submit.
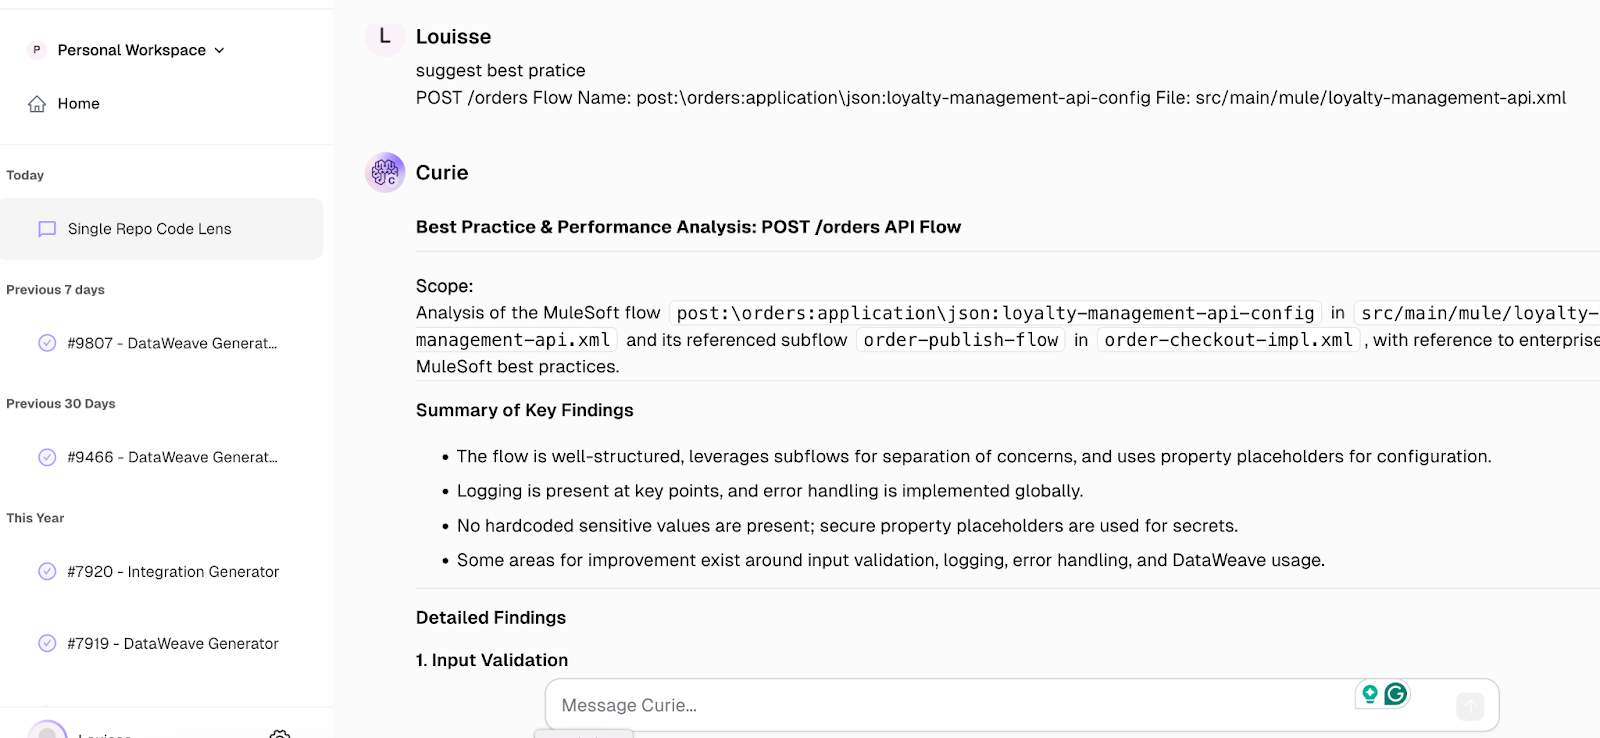
This AI tool will guide you through every stage—from API design to logging—helping ensure your API is robust, scalable, secure, and easy to maintain.
{{banner-large-table="/banners"}}
Conclusion
The map function is one of the most powerful and commonly used tools in DataWeave for transforming arrays. Whether you’re restructuring API responses, enriching data, or preparing payloads for external systems, map allows you to apply logic cleanly and consistently to each element in a list. Understanding how and when to use it can make your MuleSoft transformations more efficient, readable, and maintainable. With the use cases covered in this article, you now have a solid foundation to apply maps in various real-world integration scenarios.